background image

S Series – S1400/800 Operating Instructions


Page 17


Performance Of Your Amplifier:  Specifications  

 
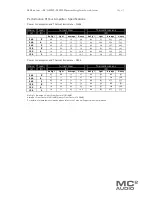
Power Consumption and Thermal Emissions — S1400 
 

Mains 

(V) 

Load 

(R) 

Current Draw 

(A) 

Thermal Emissions 

(W) 


No Sig’l 

Light 

Average 

Heavy 

No Sig’l 

Light 

Average 

Heavy 

240 

0.6 

1.1 

1.9 

4.0 

144 

173 

223 

343 

240 

0.6 

1.5 

3.2 

7.3 

144 

200 

296 

543 

240 

0.6 

1.8 

3.7 

8.4 

144 

214 

327 

605 

120 

1.2 

2.2 

3.8 

7.9 

144 

173 

223 

343 

120 

1.2 

3.1 

6.4 

14.6 

144 

200 

296 

543 

120 

1.2 

3.6 

7.3 

16.7 

144 

214 

327 

605 

 
Power Consumption and Thermal Emissions — S800 
 

Mains 

(V) 

Load 

(R) 

Current Draw 

(A) 

Thermal Emissions 

(W) 


No Sig’l 

Light 

Average 

Heavy 

No Sig’l 

Light 

Average 

Heavy 

240 

0.5 

0.8 

1.3 

2.7 

120 

139 

168 

251 

240 

0.5 

1.1 

2.1 

4.7 

120 

157 

216 

368 

240 

0.5 

1.6 

3.1 

7.4 

120 

183 

277 

533 

120 

1.0 

1.6 

2.6 

5.4 

120 

139 

168 

251 

120 

1.0 

2.2 

4.2 

9.3 

120 

157 

216 

368 

120 

1.0 

3.1 

6.3 

14.9 

120 

183 

277 

533 


No Sig’l = Quiescent, Light = Crest Factor of 7.8(18dB),  
Average = Crest Factor of 4.8(14dB), Heavy = Crest Factor of 2.8(9dB) 
For details of measurement methods please refer to the Technical Support area of our website.   

Summary of Contents for S1400

Page 1: ...e Reference Power Amplifiers MC S1400 S800 Operating Instructions MC www mc2 audio co uk Tel 44 0 1404 44633 Fax 44 0 1404 44660 MC AUDIO Units 6 8 Kingsgate Heathpark Industrial Estate Honiton Devon England EX14 1YG 2 ...

Page 2: ...Page 2 S Series S1400 800 Operating Instructions ...

Page 3: ...siderations 9 Connecting To Your Amplifier Inputs and Link Outs 10 Connecting To Your Amplifier Speaker Outputs 11 Connecting To Your Amplifier Bridged Mono Operation 11 Operating Your Amplifier Front Panel Controls and Indicators 12 Operating Your Amplifier Notes and Switching On 13 Operating Your Amplifier Rear Panel Sockets and Switches 14 Looking After Your Amplifier Maintenance 15 Looking Aft...

Page 4: ...T3500 T4 250 Ti500 Ti1000 Ti1500 Ti2000 Ti3500 Ti4 250 E15 E25 E45 E90 E100 E475 S800 S1400 and all OEM variants of these models are manufactured in accordance with EMC Directive 2004 108 EC in compliance with the following norm s or document s Technical Regulations EN55103 1 1996 EN55103 2 1996 and in accordance with the Low Voltage Directive 2006 95 EC in compliance with the following norm s or ...

Page 5: ...ocus the S Series amplifiers deliver the sound quality and reliability expected from MC2 These amplifiers utilise the best complimentary AB bipolar output stages combined with the unique MC2 current driven floating drive stage along with analogue level controls for minimal signal degradation Sophisticated side chain limiters prevent distortion and speaker damage but are out of circuit until the on...

Page 6: ...shing and ensure that no objects filled with liquids such as vases are placed on the equipment To completely disconnect this equipment from the AC mains disconnect the power cord from the mains circuit breaker Where the amplifier is mounted in a rack and permanently connected to the mains then the rack should be installed with a readily accessible connector or an ALL POLE circuit breaker with 3mm ...

Page 7: ...i des liquides comme les vases n est placé sur l équipement Pour complètement débrancher cet équipement de la conduite principale de courant alternatif débranchez la corde de pouvoir du disjoncteur de conduite principale Où l amplificateur est monté dans un égouttoir et en permanence raccordé à la conduite principale alors l égouttoir devrait être installé avec un connecteur sans hésiter accessibl...

Page 8: ...ible connector or an ALL POLE circuit breaker with 3mm breaking distances This unit is fitted with a 3 wire power cord For safety reasons THE EARTH LEAD SHOULD NOT BE DISCONNECTED IN ANY CIRCUMSTANCE If ground loops are encountered consult the section on connecting your amplifier on page 10 The wiring colours are 230V AREAS EARTH GREEN AND YELLOW 120V AREAS EARTH GREEN NEUTRAL BLUE NEUTRAL WHITE L...

Page 9: ...ng the amplifier in a rack or enclosure Be aware that THE FRONT PANEL IS NOT CAPABLE OF SUPPORTING THE UNIT ON ITS OWN Make sure that the rear of the unit is adequately supported The brackets which are supplied fit standard 19 inch 483mm rack mounting systems ENSURE THERE IS ADEQUATE VENTILATION The cooling fans suck cool air in through the front and blow hot air out at the rear of the unit throug...

Page 10: ...the unbalanced equipment or left disconnected at the unbalanced end PIN2 Hot signal PIN3 Cold ground 0V NOTE This amplifier is wired to the latest industry recommendations PIN1 is connected directly to the chassis mains earth If ground loops mains hum are encountered remove the screen connection from the other end of the cable and leave it open circuit If problems persist consult your dealer suppl...

Page 11: ...to 4 Ohm speaker loads When operating the amplifier into loads of less than 4 Ohms be aware that the current capacity of the speaker cables will need to be increased above the values quoted here Do not connect the inputs outputs to any other voltage source such as a battery mains source or power supply regardless of whether the amplifier is turned on or off Do not run the output of any amplifier c...

Page 12: ...the protection circuit will disengage the outputs and the A P LED will illuminate The amplifier will continue to be monitored and depending on the type of fault will either reset after the fault has cleared or require manual resetting by switching off at the mains switch and then on again after a few seconds Temperature related faults will reset if the unit has cooled sufficiently Output short cir...

Page 13: ... the free flow of air around the unit If the unit is used in an extremely dusty or smoky environment it should be cleaned of any collected debris at regular intervals Please also see the notes regarding maintenance on page 15 It is important that the power output of your amplifier is matched to the power handling capacity of your loudspeaker If not damage to the loudspeaker could occur Switching O...

Page 14: ...no switch Depress this switch to run the amplifier in bridged mode Note that the output must be taken from channel A s output Speakon connector on pins 2 hot 1 cold 5 Channel A output Speakon socket Normal output is on pins 1 hot 1 cold Channel B s output is also wired to this socket to enable a single NL4 to provide both channels and to facilitate easier wiring in bridged mode Channel B is wired ...

Page 15: ...y solvents as they will damage the paint finish and could remove printing If you have any doubts about carrying out maintenance please refer to a service engineer or contact your local dealer Looking After Your Amplifier Warranty Your amplifier is guaranteed for a period of five 5 years from the date of purchase We hope that it gives you many more years of reliable service than this but should any...

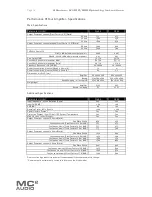
Page 16: ...5 Additional Specifications Parameter Units S1400 S800 Input Impedance Active Balanced Ohms 20k 20k Input CMRR dB 60 60 SNR dB 106 106 Damping Factor 1kHz 8 ohms 400 400 Signal Limiters Present Yes Yes Protection Present Short Circuit DC Output Temperature Yes Yes Mains In rush Control Present Yes Yes Output Power per channel 8 Ohms Watts Sine Wave 1kHz 650 450 Continuous music Crest Factor of 2 8...

Page 17: ...296 543 120 2 1 2 3 6 7 3 16 7 144 214 327 605 Power Consumption and Thermal Emissions S800 Mains V Load R Current Draw A Thermal Emissions W No Sig l Light Average Heavy No Sig l Light Average Heavy 240 8 0 5 0 8 1 3 2 7 120 139 168 251 240 4 0 5 1 1 2 1 4 7 120 157 216 368 240 2 0 5 1 6 3 1 7 4 120 183 277 533 120 8 1 0 1 6 2 6 5 4 120 139 168 251 120 4 1 0 2 2 4 2 9 3 120 157 216 368 120 2 1 0 ...

Reviews: