
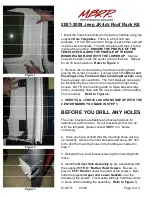


7. Lift the
Driver Side Assembly
into position on the side of
the hardtop. Line up the holes and slide the
5/16”x1”
Button Head Screws
through the hard top, through the
holes in the
Inner Brackets
, and secure using the supplied
5/16” Nyloc nuts
and
5/16” Washers
. Do not tighten the
bolts yet. You will need 2 people for this step.
Refer to
Figures 4 and 5.
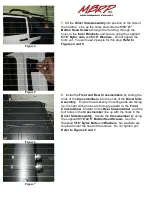
8. Install the
Front and Rear Crossmembers
by sliding the
ends of the
Crossmembers
into the ends of the
Driver Side
Assembly
. Ensure the accessory mounting pads are facing
up, the light wiring holes are facing rearward on the
Front
Crossmember
, forward on the
Rear Crossmember
, and the
bolt holes in the
Crossmember
line up with the holes in the
Driver Side Assembly
. Secure the
Crossmember
by using
the supplied
5/16”x2.5” Button Head Screws
. Use the
Supplied
5/16” Nyloc Nuts
and
Washers
. No washers are
required under the head of the screws. Do not tighten yet.
Refer to Figures 6 and 7.
Figure 4
Figure 5
Figure 6
Figure 7
Summary of Contents for 0130717
Page 1: ......
Page 4: ...0130717 03 09 Page 3 of 4 ...


