background image


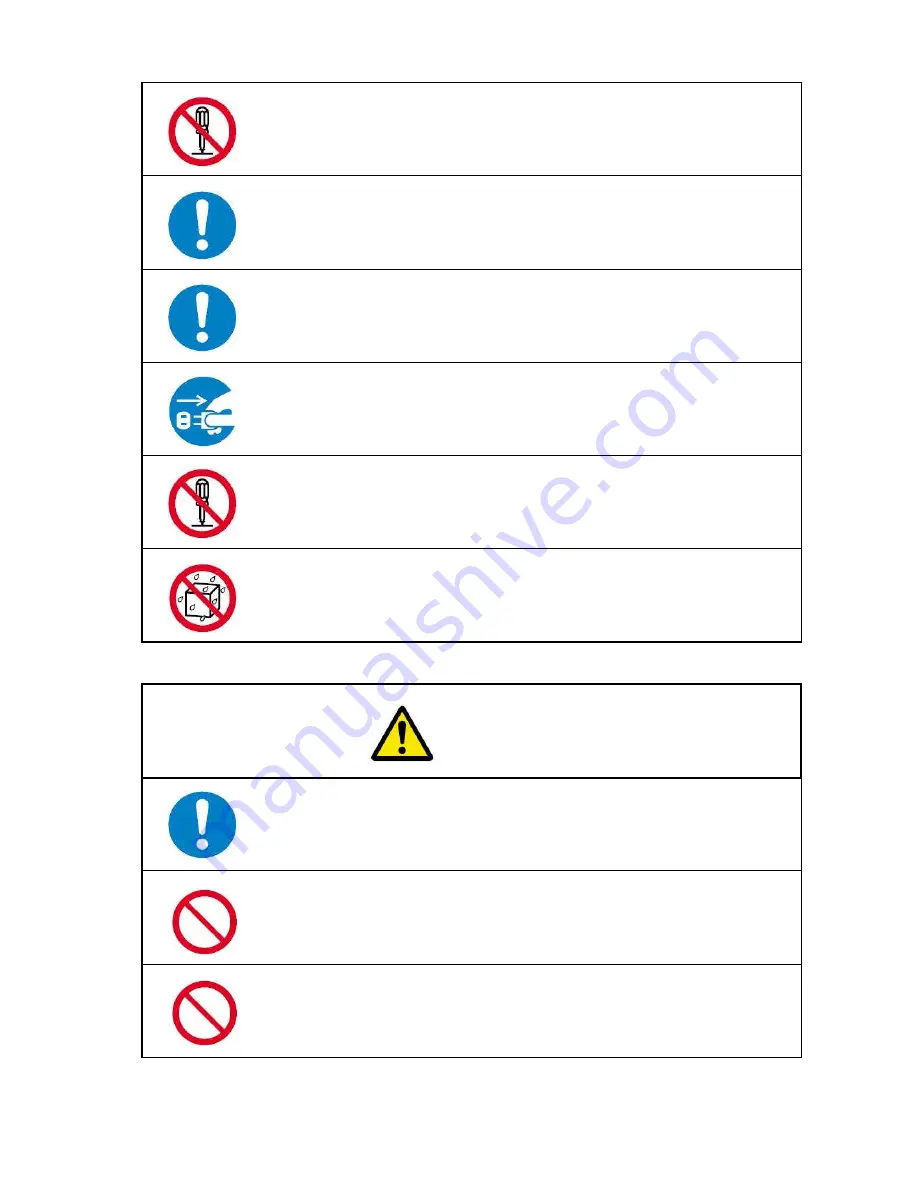
Before removing jammed paper, first turn off the power switch.


To remove a sheet of paper caught in the cutter unit, first release the error, press 
the Start Key to disengage the cutter, turn off the power switch, then remove 
the sheet.


Do not remove the transparent cover of the trash box. This transparent cover is 
part of the cover of the slitter unit. 

Do not wet the machine with water. 
Doing so could cause fire or an electric shock. 

If you notice a strange sound or smell, turn off the power switch immediately, 
disconnect the power plug, then call your dealer for repair. 
Otherwise, fire or an electric shock could result.


Never disassemble the 

slitter cartridge


When lifting the machine body, securely hold the bottom plate with both of your 
hands.  If  you  grab  part  of  the  plastic  cover,  it  may  damage  the  cover  and  the 
machine could fall and cause an injury.


Do not rub your hands on the edges of cut paper. 
Doing so could injure your hands.


Do not use the machine in dusty or damp conditions. 
Doing so could cause fire or an electric shock.


CAUTION


Summary of Contents for BC-12

Page 1: ...o operate the machine safty and properly Keep the manual in handy place for further reference Be sure to include this manual with the machine when transferring or leasing it to another person The manual is supposed to be changed or renewed without prior notice BC 12 ...

Page 2: ...Operation Manual V 2 0 September 2011 BC 12 MULTI CARD CUTTER ...

Page 3: ...tions 3 5 Main Specifications 6 Accessories 6 1 Installation Precautions 7 8 2 Part Names 9 10 3 Composition and Imposition 11 16 4 Preparations for Operation 17 18 5 How to Use 19 30 6 Handling of the Trash Box 31 7 Power Off 31 8 Maintenance 32 33 9 Option 34 10 Troubleshooting Q A 35 36 ...

Page 4: ...ual describes how to obtain the best performance from the machine and to use it safely without troubles Be sure to read this manual before installation and operation then keep the manual carefully in a handy place for further reference When transferring or leasing this machine to another person be sure to include this manual with it Prohibited Must be grounded Unplug General instruction Do not exp...

Page 5: ... is properly inserted into the outlet It is prohibited to use power cords other than the one provided with the machine Do not use the provided power cord for other purposes Do not damage the power cord Doing so could cause fire or an electric shock Do not put heavy objects on it pull it bend it forcibly or modify it Do not operate the machine without grounding Doing so could cause fire or an elect...

Page 6: ...ectric shock If you notice a strange sound or smell turn off the power switch immediately disconnect the power plug then call your dealer for repair Otherwise fire or an electric shock could result Never disassemble the slitter cartridge When lifting the machine body securely hold the bottom plate with both of your hands If you grab part of the plastic cover it may damage the cover and the machine...

Page 7: ...ow the instructions in the relevant operation manual Regularly disconnect the power plug from the outlet and clean the area around the pins If the plug is kept connected for a long time the area around the pins may become dusty which could cause a short circuit and result in fire Do not place the machine on an unstable place It may fall down resulting in an injury When disconnecting the power plug...

Page 8: ...duct receiving capacity 120 sheets for business cards for 0 2mm thick paper 50 100 sheets for other types of card It varies depending on the dimensions and type of paper to be cut Cutting speed 1 min 18 sec for 100 business cards based on 10 up and single cutting Dimensions 750mm W 435mm D 290mm H Net weight 24kg Power requirements AC120V 60Hz Power input 0 7A max Accessories After unpacking make ...

Page 9: ... at a humidity of 50 or higher Do not put the machine on an unstable surface Avoid areas with high moisture excessive dust oily smoke or steam Keep the machine away from fire or heating equipment Do not leave the machine exposed to direct sunlight for many hours Do not drop the machine or hit it against something ...

Page 10: ...ne Do not place any object on top of the machine When carrying the machine be sure to place both of your hands underneath to hold it Do not place the machine in extremely hot or cold areas Connecting many leads into a single outlet is dangerous Do not use the machine with any current and voltage other than 120 VAC ...

Page 11: ...9 2 Part Names Top panel Front cover Rear cover Product receiver Operation panel Paper feed tray Slitter cover Trash box Power inlet Power switch Slitter check panel Card receiver ...

Page 12: ...10 Slitter cartridge Pressure roller unit Paper feed unit Slitter cartridge adjustment Slitter cartridge fixing thumbscrew Paper feed unit fixing thumbscrew Paper feed unit fixing plate ...

Page 13: ......

Page 14: ...ls download and read the explanation of how to use templates Adobe Illustrator is a registered trademark of Adobe Systems Incorporated in the United States 3 4 After completing composition and imposition output the required quantity of products using a printer 3 5 The top and bottom and right and left margins may not be printed precisely according to the imposition If this happens fine adjustments...

Page 15: ...13 Cutting Mode Slitter Combination Table ...

Page 16: ...14 BC 12 Prescribed Imposition Format Table 1 3 Cutting Mode 1 Letter Cutting Mode 3 Letter Cutting Mode 2 Letter ...

Page 17: ...15 BC 12 Prescribed Imposition Format Table 2 3 Cutting Mode 4 Letter Cutting Mode 7 Letter Cutting Mode 5 Letter Cutting Mode 9 Letter Cutting Mode 6 Letter Cutting Mode 8 Letter ...

Page 18: ...16 BC 12 Prescribed Imposition Format Table 3 3 Cutting Mode 10 Legal ...

Page 19: ...y 4 2 1 Installing the paper feed tray 4 2 2 Installing the product receiver 4 2 3 Installing the trash box Make sure that the trash box is securely inserted into the back 2 Securely fix it using the provided thumbscrews 2 locations Paper feed tray 1 Insert the paper feed tray into the back along this guide Product receiver Securely install it between these projections Trash box ...

Page 20: ...thick paper can be loaded 4 6 Turn on the power switch The display panel in the center of the operation panel lights up When lifting the machine body securely hold the bottom plate with both of your hands If you grab part of the plastic cover it may damage the cover and the machine could fall and cause an injury CAUTION WARNING Do not connect or disconnect the power cord plug to and from the outle...

Page 21: ... Ready Clear Key When an error occurs press this key to release the error Nothing happens while the machine is in normal condition Cutting Mode Select Key Press this key to select one of the 12 cutting modes If the key is kept pressed 0 5 seconds the pilot LED lamp of each cutting mode lights up in turn Cutting Mark Key Press this key to switch on or off the cutting mark function While the cutting...

Page 22: ... leave it as it is If the Select Key is kept pressed the green pilot LED lamp of each cutting mode from 1 to 10 lights in order Release the Select Key when the LED lamp of the desired cutting mode lights up Each LED lamp is lit for 0 5 seconds If the LED lamp of the desired cutting mode goes off before selection restart and keep the key pressed to select the right one The pilot lamps cannot be mad...

Page 23: ...pose and print the cutting mark simultaneously print it in the following position The cutting mark can be used when the cutting mode is 1 2 3 5 9 or 10 If the cutting mode is 4 6 7 or 8 no top margin remains so this function cannot be used The cutting mark is printed in black but depending on the type of ink used for the printer the cutting mark may not be detected by the sensor of this machine Al...

Page 24: ...er of products imposed on letter size and legal size paper becomes the minimum unit and multiples of this unit can be preset 5 7 Adjusting the top margin if necessary If there is a misalignment in the first cutting position such as shear in printing in the direction of the long side of letter size and legal size paper this can be used for adjustment Adjustable range 1mm First select the cutting mo...

Page 25: ...the machine stops operation If the Start Key is pressed after the operation is stopped the machine starts operation again Do not press the Start Key or Stop Key before the operation stops 5 10 Emergency stop and safety device Interlock If 1 the top panel or slitter cover is opened or 2 the trash box is pulled out during operation the machine stops immediately If an emergency stop is necessary use ...

Page 26: ...ng the adjustment securely tighten the slitter cartridge fixing thumbscrew 5 12 Removing the slitter cartridge Replacement When you remove or replace the slitter cartridge be sure to turn off the power switch Open the slitter cover and remove the slitter unit fixing screw Lean the handle portion of the slitter cartridge by pushing it down to remove the slitter cartridge You can install the slitter...

Page 27: ...s unexpectedly The slitter unit and the gear engage appropriately The slitter unit and the gear do not engage fitted appropriately In that case move the small gear up and down then the gears will be fitted appropriately solution No space There is a space slitter cartridge fixing thumbscrew Slitter cover slitter cartridge Handle portion slitter cartridge fitting reference shaft Groove portion ...

Page 28: ...er jams are explained later in this manual Deal with it according to the location and type of error Before trying to remove a sheet or scrap of paper jammed inside the machine first turn off the power switch Otherwise your hand may be caught in the machine or you could receive an electric shock WARNING Top panel Pressure roller unit Paper feed unit Slitter cover Slitter cartridge Trash box ...

Page 29: ...d paper feed unit and remove any paper or scrap of paper remaining near the cutter unit To remove a scrap of paper remaining near the cutter unit push in an A4 sheet as shown in the drawing on the next page then you can easily make the scrap drop into the trash box Also to pull out a sheet of paper stuck in the first delivery roller gently drop the paper feed unit further as shown in the drawing T...

Page 30: ...cket for fixing paper feed unit Thumbscrew State before the paper feed unit is opened Push in an letter size or legal size sheet to make the scrap of paper remaining in the back drop into the trash box Letter size or legal size paper Gently drop the paper feed unit down further and the first delivery roller will move up a little ...

Page 31: ...he pressure roller unit upward Remove the sheet or scrap of paper remaining in the machine Install the pressure roller unit in the proper position close the top panel then turn on the power switch If E007 is still displayed press the Ready Clear Key If this error cannot be released by this procedure other paper may be remaining under the paper feed unit Check this part too See 5 13 2 5 13 4 When E...

Page 32: ...let side of the slitter cartridge remove the slitter cartridge from the machine body and while turning the gear of the slitter cartridge grasp the jammed paper using tweezers etc and pull it out Take care not to trap your fingers in the gear which could cause an injury Pressure roller unit S3 sensor Slitter cartridge Gear Do not put your fingers in here as there is a blade inside Use tweezers etc ...

Page 33: ...l not be used for many hours remove the power plug from the outlet Do not remove the transparent cover of the trash box as it is part of the cover of the slitter cartridge WARNING If you notice a strange sound or smell while the machine is operating turn off the power switch immediately remove the power cord plug and contact your dealer for inquiries repairs WARNING When the trash box is pulled ou...

Page 34: ... not rotate in the proper direction 8 2 Maintenance check and replacing the separation pad If the separation pad under the paper feed unit becomes worn out and paper feed failure occurs replace the separation pad For replacing the separation pad contact your dealer The separation pad is attached with double sided adhesive tape Attach the new one after completely removing the remaining adhesive and...

Page 35: ...ey are used to cut any paper other than the specified one the blades may become nicked and their durability severely deteriorated Take great care to ensure that no clips or staples enter the device together with paper 8 4 Prohibition of disassembly Do not disassemble any parts other than those specified for maintenance in this operation manual This machine was shipped after being optimally adjuste...

Page 36: ...litter BC Business Card 3 5 Standard Slitter FD Full Width for Division Option Slitter SC Scoring Center Option Slitter PE Perforation 2 16 Right Option Slitter PH Photo 2L 5 0 7 0 Option Slitter PC Post Card 4 0 6 0 Option Refer to Cutting Mode Slitter Combination Table on page 13 and BC 12 Prescribed Imposition Format Table on page 14 15 and 16 as to the detail for the cutting forms ...

Page 37: ...r than 0 30mm and no heavier than 302g mm2 Are the edges or corners of the paper heavily curled Is the paper stained with oil or powdery substance Is the friction on the paper surface too strong or weak Is the pick up roller or separation pad worn out In this case see 8 Maintenance If it does not feed paper even after checking and correcting all of the above the machine may be out of order Q4 Pape...

Page 38: ...ng accuracy is good but the positions of printed images are uneven The composition or imposition may be incorrect Make sure that they are based on the predetermined dimensions and positions The output printing may be sheared Correct the positions of printed images Q10 The display panel of the operation panel does not display as operated It is out of order Q11 When the cutting mode is set to Double...

Reviews: