

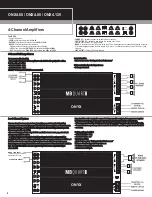
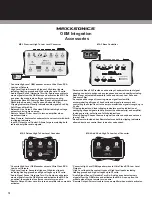


4-Channel Amplifiers
ONX4.60 / ONX4.80 / ONX4.125
6
LINE OUT
CH3/4
CH1/2
R
L
R
L
LINE INPUT
LEVEL
6V 0.2V
0dB 12dB
FULL LPF HPF
60Hz 13KHz
30Hz 250Hz
BASS EQ
X-OVER
HPF
LPF
6V 0.2V
0dB 12dB
FULL LPF HPF
60Hz 13KHz
30Hz 250Hz
POWER
PROTECTION
MODE
2
3
4
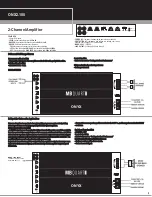
FEATURES:
-
2 Sets of RCA inputs
- LEVEL:
Variable sensitivity from
0.2V to 6V
- BASS EQ:
Adjustable 45Hz bass boost from
0dB to 12dB
- X-OVER:
Selects internal crossover functions
- FULL:
Bypasses all crossovers for full frequency operation
- LPF:
Selects the built in
LOW PASS
filter, variable from
30Hz to 250Hz
- HPF:
Selects the built in
HIGH PASS
filter, variable from
60Hz to 13KHz
- POWER
LED
:
Indicates the powered up and turned on condition
- PROTECTION
LED
:
Indicates a high voltage, low voltage, short circuit,
hard clip, over heating or DC fault condition.
- MODE:
“2” indicates one set of RCA’s are being used. This will also pass signal to channels 3/4 through 1/2 inputs.
“3” indicates bridging channels 3/4 while running 1/2 in stereo. “4” indicates connecting 2 sets of RCA’s to 1/2 and
3/4 inputs.
- LINE OUTPUT:
Full range RCA pass through.
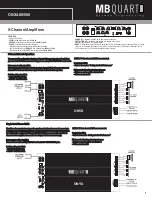
4 Channel Full Range Stereo:
Control checklist:
Interconnect cable checklist:
- Refer to the section “Settings for Best Performance”
- Connect the four inputs of the amplifier to a Radio/CD with quality RCA cables.
Switch setting checklist:
Minimum final loudspeaker impedances:
- 1/2CH X-OVER: FULL
- 2 ohm per channel.
- 3/4CH X-OVER: FULL
MODE: “4” since 2 sets of RCA’s are connected.
Important:
Do not be tempted to connect the hot, or positive outputs, from any source together
2 or 3 Channel System:
to obtain a mono signal, as this could very well damage the output stage of that source.
- It is necessary to feed the SAME signal to both left and right inputs via a Y-adapter RCA cable.
Here we show how to use the 4 channel amplifiers as a 3 channel unit by taking
- Connect the mono speaker positive terminal to the RIGHT +, and its negative terminal to LEFT
advantage of the mono bridging capability of all MB Quart amplifiers. In order to create
- as shown.
a 2 channel system, simply follow the example to also mono bridge channel pair 1/2.
Interconnect cable checklist:
Switch setting checklist:
- Connect the inputs of channel pair 1/2 to a suitable stereo source, e.g. a head unit
- 1/2CH X-OVER:
FULL
with good quality RCA cables.
- 3/4CH X-OVER:
LPF
- A MONO signal source is required to bridge channel pair 3/4, such as would be
Control checklist:
available from the mono sub bass output of an active crossover, whether standalone, or
- Refer to the section
“Settings for Best Performance”
built into a head unit or equalizer. If you only have 1 set of RCA outputs from your
Minimum final loudspeaker impedances:
headunit, you can simply connect those to the inputs for ch 1/2 and switch the
MODE
to
- 2 ohm per channel in stereo mode.
3ch. The amplifier will auto sum the signal and provide mono output for bridged
- 4 ohm mono bridged.
channels 3/4.
LINE OUT
CH3/4
CH1/2
R
L
R
L
LINE INPUT
LEVEL
6V 0.2V
0dB 12dB
FULL
LPF HPF
60Hz 13KHz
30Hz 250Hz
BASS EQ
X-OVER
HPF
LPF
6V 0.2V
0dB 12dB
FULL
LPF HPF
60Hz 13KHz
30Hz 250Hz
POWER
PROTECTION
MODE
2
3
4
ONYX
POWER INPUT
GND REM BA
TT+12V
CH 1/2 SPEAKER OUTPUT CH 3/4
RIGHT LEFT
RIGHT LEFT
- + - + - + - +
BRIDGED
BRIDGED
FUSE
STEREO LINE INPUT
MONO LINE INPUT
(Unless using procedure
listed above for 3ch)
Summary of Contents for ONYX ONX1.1000D
Page 10: ...9 ...


