background image


11 


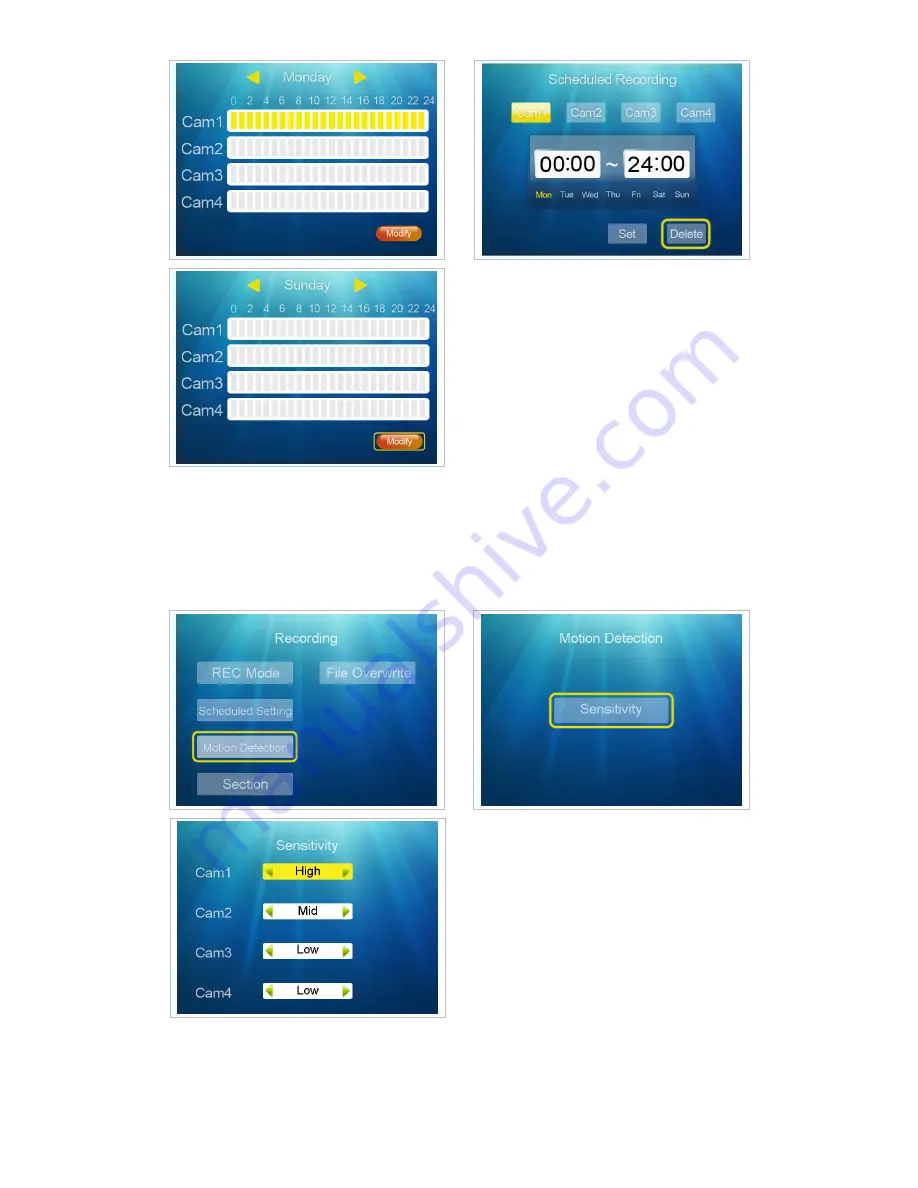
5.2.3 Motion Detection 

At  the  "Recording"  screen,  press  "

▲▼

"  to  select  "Motion  Detection",  press  "Enter"  to 

enter  next  step,  and  press  "Enter"  at  the  Motion Detection  screen  to  enter  next  step. Press   
"


" to select "Cam 1-2-3-4", and press "


" to select "Low/Mid/High" , then press 

"Enter" to confirm and press "Menu" to exit.


5.2.4 Section 

At  the  “Recording”  screen,  press  “

▲▼

”  to  select  “Section”,  press  “Enter”  to  enter  next 

step. Press “


” to select “5 min / 10 min / 15 min”, then press “Enter” to confirm and 

Summary of Contents for MWM719

Page 1: ...DIGITAL WIRELESS LCD DVR SYSTEM NETWORK VERSION USER S MANUAL PLEASE READ THIS MANUAL CAREFULLY BEFORE OPERATING EQUIPMENT RETAIN IT FOR FUTURE REFERENCE...

Page 2: ...BUTTON OPERATION 5 1 Camera setting 7 9 5 2 REC setting 9 12 5 3 System setting 12 14 5 4 System Info 15 16 5 5 Playback 17 6 USAGE OF SOFTWARE IN APPLE CLIENT 6 1 Install client end software 17 6 2...

Page 3: ...on in accordance with bedframe The lighting flash with arrowhead symbol within an equilateral triangle Is intended to alert the user to the presence of uninsulated dangerous voltage within the product...

Page 4: ...cable 1 unit Camera bracket 2 unit Mounting hardware 3 unit DVR Camera CD Power Adapter DVR Power Adapter Camera RJ45 cable AV Cable Camera bracket Mounting hardware Note The above packing list is bas...

Page 5: ...creen display TALK Turn on off the 2 way audio intercom only for 2 way audio model Move to previous column or Adjust the digital Move to next column or Adjust the digital ENTER Confirm the settings Mo...

Page 6: ...or Exit the menu operation 2 3 Camera appearance A Housing for camera without speaker B Housing for camera with speaker C Indoor Camera 3 SPECIFICATIONS 3 1 LCD DVR ITEMS DESCRIPTION Display Screen 7i...

Page 7: ...Smart phone video playback Power Supply 100 240V 50 60Hz 5V 1000mA Power consumption 5W max Operating Temperature 0 40 Operating Humidity 65 Storage temperature 10 50 Dimensions 200 W 140 H 30mm D 3 2...

Page 8: ...ID Usage Environment Indoor Operating Temperature 0 40 Operating Humidity 65 Storage temperature 10 50 Power Supply 100 240V 50 60Hz 12V 500mA Power consumption 5W max Dimensions 64 L 130 H 80 D mm w...

Page 9: ...lease pay attention to your safety in the outside installation 5 MENU OPERATION 5 1 Camera Setting 5 1 1 Pairing 5 1 1 1 Plug and turn on the power adapters of LCD DVR and cameras 5 1 1 2 Press Menu t...

Page 10: ...m 1 2 3 4 and press to select ON OFF then press Enter to confirm and press Menu to exit Remarks Dual screen display if only set 2 cameras as ON 5 1 3 Resolution At the Camera setting screen press to s...

Page 11: ...ter to enter next step Press to select 60Hz 50Hz then press Enter to confirm and press Menu to exit 5 2 REC Setting 5 2 1 REC Mode Press Menu to enter the main menu and press to select REC Setting the...

Page 12: ...m 1 2 3 4 then press to select the time at 00 24 then press to select the date at Mon Tue Web Thu Fri Sat Sun Press to select Set and press Enter to confirm Remarks date hours in yellow means the sett...

Page 13: ...ter at the Motion Detection screen to enter next step Press to select Cam 1 2 3 4 and press to select Low Mid High then press Enter to confirm and press Menu to exit 5 2 4 Section At the Recording scr...

Page 14: ...t YES NO then press Enter to confirm and press Menu to exit 5 3 System Setting 5 3 1 Date Time Press the Menu to enter the main menu and press to select System Setting then press Enter to enter next s...

Page 15: ...rmat At the Setting screen press to select Format and press Enter to enter next step Press to select YES NO then press Enter to confirm and press Menu to exit Remarks this operation is to format the S...

Page 16: ...exit 5 3 6 Update At the Setting screen press to select Update and press Enter to enter next step Press to select YES NO then press Enter to confirm and press Menu to exit 5 3 7 Language At the Setti...

Page 17: ...Network screen press to select Static IP and press to select Address Mask Gateway and press Enter to confirm Press to adjust the digital of 0 9 then press Enter to confirm and press Menu to exit 5 4 S...

Page 18: ...acity 5 4 2 Version At the System Info screen press to select Version and press Enter to check the machine software version then press Menu to exit 5 4 3 Network Info At the System Info screen press t...

Page 19: ...14 02019 15 31 46 then press Enter to play or press Menu to exit 6 USAGE OF SOFTWARE IN APPLE CLIENT END Apple mobile phones and iPad tablet PC hereafter refer as Apple phone Before using the software...

Page 20: ...VR methods 6 2 1 After client end software installation is completed return to the Apple phone desktop and search icon iHomeCam as below pictures 6 2 2 Click to run the client software to display the...

Page 21: ...work DVR Select the DVR enter the password Click the Save added to the list 6 2 2 3 Manually add the DVR Click to add network DVR adding devices windows appears Click the Save added to the list System...

Page 22: ...art apple mobile phone to horizontal screen item and then put it horizontally to get full screen display function then click the screen the status bar is hidden 6 3 4 Introduction of Icon Function Sel...

Page 23: ...to the system parameter modification Reconnect Refresh network signal coupling 6 4 2 Security Code settings Fill the old password firstly then fill the new password and confirm password then click OK...

Page 24: ...lick to go back the last step 6 4 4 About Device Check the software and SD card total capacity and rest capacity 6 5 Delete network DVR methods Click to delete the device appears then click appears th...

Page 25: ...onnect to the Internet properly 7 1 Install the client end software Use Android phone to search iHomeCam Client end Software in the Google play users online install the software as below pictures 7 2...

Page 26: ...dimensional code at the network DVR Select the DVR enter the password Click the OK added to the list 7 2 2 3 Manually add the DVR Click to add network DVR adding devices windows appears System name Us...

Page 27: ...y is turned on 2 Confirm LCD DVR status indicator is in green or red green indicator means screen is turned on red indicator means screen is turned off 3 Make sure there is nothing obstructing the vie...

Page 28: ...26 1 Check password is correct or not 2 Select Restore factory settings in the network DVR menu the system will be restored to the factory default status...

Reviews: