background image

24

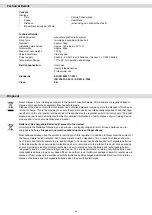
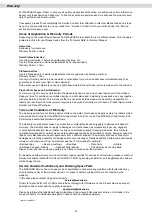
Technical Details:

Braking System: 


manual magnetic brake system

Drive Type:  


two-stage longitudinal ribbed belt

Flywheel: 

  approx. 

18kg

Installation dimensions:  

Approx. 149 x 64.5 x 127 cm

Total weight: 


Approx. 63kg

Maximum user weight:  

130 kg

Value Adjustment: 


Via a keypad

Power supply:  


Cockpit – 2 AAA 1.5-volt batteries – Sensor: 1 x C3220 battery

Temperature Range:   

10° to 30° for operation and storage

Field of application:


Home use


  Semi-professional 

use


  Professional 

use

Standards  


EN ISO 20957-1:2013


ISO 20957-5:2016 / EN 957-5:1996

Class: 

  SB


Never dispose of your training equipment in the normal household waste. All consumers are legally obliged to 

dispose of old appliances separately from household waste.

Dispose of the device only with a municipal or an authorised disposal company. Here the disposal of this device 

is free of charge. This is the only way to ensure that your old device is professionally disposed of and that nega-

tive effects on the environment will be avoided. Please observe the regulations which currently apply. If in doubt, 

please ask your local or municipal authorities for detailed information on how to dispose of your training device 

properly and in an environmentally sound manner.

Batteries / Re-chargeable Batteries (if present in the device)

According to the Batteries Directive, you as end user, are legally obliged to return all used batteries and re-

chargeable batteries. 

Disposal in normal household waste is an illegal offence

Most batteries already have the symbol to remind you of this regulation. In addition to this symbol the content of 

the heavy metals is also indicated. Such heavy metals must be disposed of in an environmentally sound man-

ner. This means that all consumers are legally obliged to hand over used batteries and re-chargeable batteries 

to their local authority, at a municipal collection point or to return them to the retailer. If in doubt, please enquire 

at your municipal or local government authority on how to dispose of your batteries and rechargeable batter-

ies properly and in an environmentally sound manner. You are also welcome to return your used batteries and 

rechargeable batteries to us at our head office or send them to us if sufficient postage is paid. On receipt we will 

dispose of them properly in accordance with the Batteries and Rechargeable Batteries Directive. Only return or 

dispose of batteries and rechargeable batteries when they are fully discharged. 

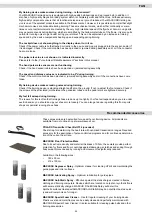
Cockpit:

Displays:


Time 


Speed


Distance 


Wheel Revolutions per Minute


Calorie Consumption 


Heart Rate  

(when using an optional chest belt)

Disposal 

Technical Details

Summary of Contents for SpeedBike S1

Page 1: ...SpeedBike S1 ENG I N S TA L L AT I O N O P E R AT I N G M A N U A L...

Page 2: ...ories 25 Exploded Drawing 26 Spare Parts List 27 29 Warranty 30 Service Contract 31 2022 MAXXUS Group GmbH Co KG All rights reserved All rights reserved This publication may not be reproduced stored i...

Page 3: ...always mounted on a level clean surface is Unevenness in the ground must be removed or compensated To protect delicate floors such as wood lamina tiles etc and from damage such as scratches it is rec...

Page 4: ...dlebars 4 Handlebar Tube 5 Emergency Stop Lever 6 Bottle Holder 7 Lever to adjust the height of the handlebars No Description 8 Stand with transport rollers 9 Pedal 10 Stand rear 11 Lever to adjust th...

Page 5: ...cription Qty 1 Base Frame 1 4 Handlebars 1 5 Stand rear 2 6 Stand front 1 41 Pedal L left Pedal R right 2 47 Seat 1 48 Stand feet 4 No Description Qty 53 Cover stand front 1 59 Knob 1 73 Holder 1 118...

Page 6: ...nd components are there before starting assembly Carefully carry out the installation as damage that has arisen due to assembly errors are not covered by the warranty or guarantee Read the instruction...

Page 7: ...ch of the rear stands 5 and the other two stand feet to the under side of the front stand 6 Step 2 Assembly of the Front Stand Loosen and remove the pre assembled screws M10x20 and then remove the tra...

Page 8: ...two rear stands 5 into the mounts on the base frame and fix them from above using three washers 9x 161 6T 94 and three Allen screws M8x12 97 on each stand Step 4 Assembly of the Seat Place the seat 4...

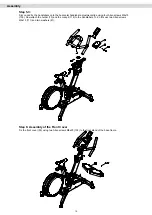
Page 9: ...andlebars Step 5 1 Insert the knob 59 with a washer 6x 16x1 6T 81 from above into the handlebar shaft Step 5 2 Loosen knob 59 and slide the carriage of the horizontal handlebar to adjustment backwards...

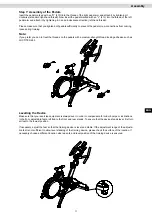
Page 10: ...slide using four Allen screws M6x15 103 Now attach the holder 73 and the cockpit 118 to the handlebars To do this use two Allen screws M6x15 111 and two washers 81 Step 6 Assembly of the Front Cover...

Page 11: ...at the threads on the pedals with a medium strength thread locking adhesive such as LOCTITE 243 Levelling the Device Make sure that your exercise equipment is always level In order to compensate for m...

Page 12: ...e optimum oxygenation during training Before putting your training device back into operation after a long period of non use make sure that all fastenings are secure Maintenance Care WARNING Before st...

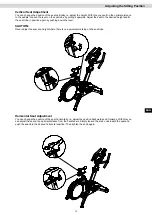
Page 13: ...d fix the seat tube in position again by pushing down the lever CAUTION Never adjust the seat at a height where there is no equivalent marking on the seat tube Horizontal Seat Adjustment You can chang...

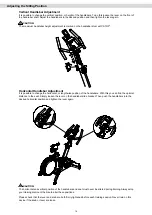
Page 14: ...is possible to change the horizontal or lengthwise position of the handlebars With this you can find the optimal distance to the seat Simply loosen the lever on the handlebar slide bracket Then push t...

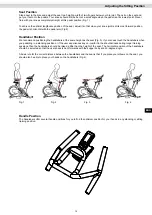
Page 15: ...ars at the same height as the seat Fig 3 If your knees touch the handlebars when you pedalling in a standing position or if the user experiences any un comfort in the shoulder neck during longer train...

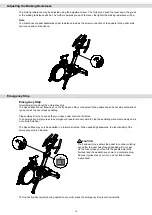
Page 16: ...automatical ly as soon as the user stops pedalling Please always train at a speed that you have under control at all times In an emergency simply press the emergency brake lever down hard to stop the...

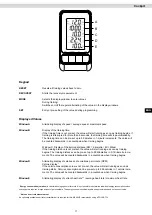
Page 17: ...t pre set the value will start running as soon as training begins The training distance can be pre set up to 99 Kilometres in 0 1 Kilometre incre ments The value will be counted backwards in a countdo...

Page 18: ...al from the sensor it means that the power of the sensor battery is too low and must be changed as soon as possible To do this undo the screw on the sensor remove the sensor and use a coin to undo the...

Page 19: ...easurement will be shown on the basis of school grades Here F1 stands for optimal recovery following training and F6 for a very long recovery phase Press the RECOVERY key again to end this function Sw...

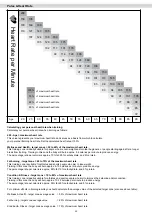
Page 20: ...25 carbohydrate and 5 protein Fat burning target zone 60 to 70 of the maximum heart rate This training zone is suitable for athletes and sports people who aim to lose weight Training in this zone the...

Page 21: ...irectly from the skin The chest belt then sends the pulse via an electromagnetic field to the built in cockpit receiver We recommend you always use a chest belt for heart rate measurement during heart...

Page 22: ...o not just get off your training device immediately the training session is finished Like with the warm up stage you should continue for 3 5 minutes at minimum resistance to cool down After training y...

Page 23: ...nce most people have training goals such as weight reduction cardiac exercise training improvement of physical con dition stress reduction etc to strive for training intensity to meet these goals shou...

Page 24: ...ound manner Batteries Re chargeable Batteries if present in the device According to the Batteries Directive you as end user are legally obliged to return all used batteries and re chargeable batteries...

Page 25: ...ning Check if the training device is standing straight and flat on the ground If not re adjust the foot stands Check if the screws at the articulated joint between the pendulum tubes and the pedal arm...

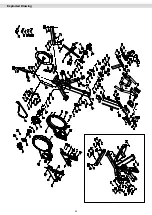
Page 26: ...26 Exploded Drawing...

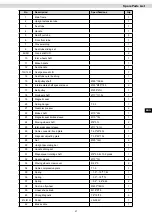
Page 27: ...c seat 1 20 Spring hanger T3 0 1 21 Gear disc presser 2 22 Brake shaft 10 48L 1 23 Magnetic seat limited sleeve 10 18L 1 24 Moving wheel shaft 8 31L 2 25 Idler wall spacer sleeve 17 8 1H 1 26 Cable co...

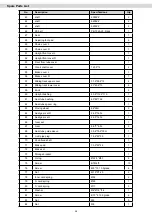
Page 28: ...r 23 49 6 13 4 59 Knob 2 60 Upright bushing 45 6 112 4 119 1 61 Seat tube bushing 40 80 74 6 1 62 Seat tube spacer ring 1 63 Moving wheel 68 24H 2 64 Seat gear set R 24 5 14 3L 1 65 Seat gear set L 24...

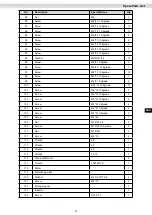
Page 29: ...Screw M8 75 10 9grade 1 99 Screw M4 6 10 9grade 2 100 Screw BT4 15 10 9grade 13 101 Screw M6 15 10 9grade 4 102 Screw M6 20 10 9grade 2 103 Screw M6 15 10 9grade 4 104 Screw M4 8 10 9grade 4 105 Scre...

Page 30: ...eriod for your training device starts on the date of purchase and applies solely to products which were purchased directly from the MAXXUS Group GmbH Co KG or one of the MAXXUS Group GmbH Co KG direct...

Page 31: ...s that must be completed Fault Description Please enter a short description of the error as precisely as possible below For example when where and how does the error occur Frequency after which period...

Page 32: ...Maxxus Group GmbH Co KG Nordring 80 D 64521 Gro Gerau Germany E Mail info maxxus de www maxxus com...

Reviews: