background image


PAGE 7


MAXTOR ONETOUCH III TURBO EDITION 


MACINTOSH INSTALLATION


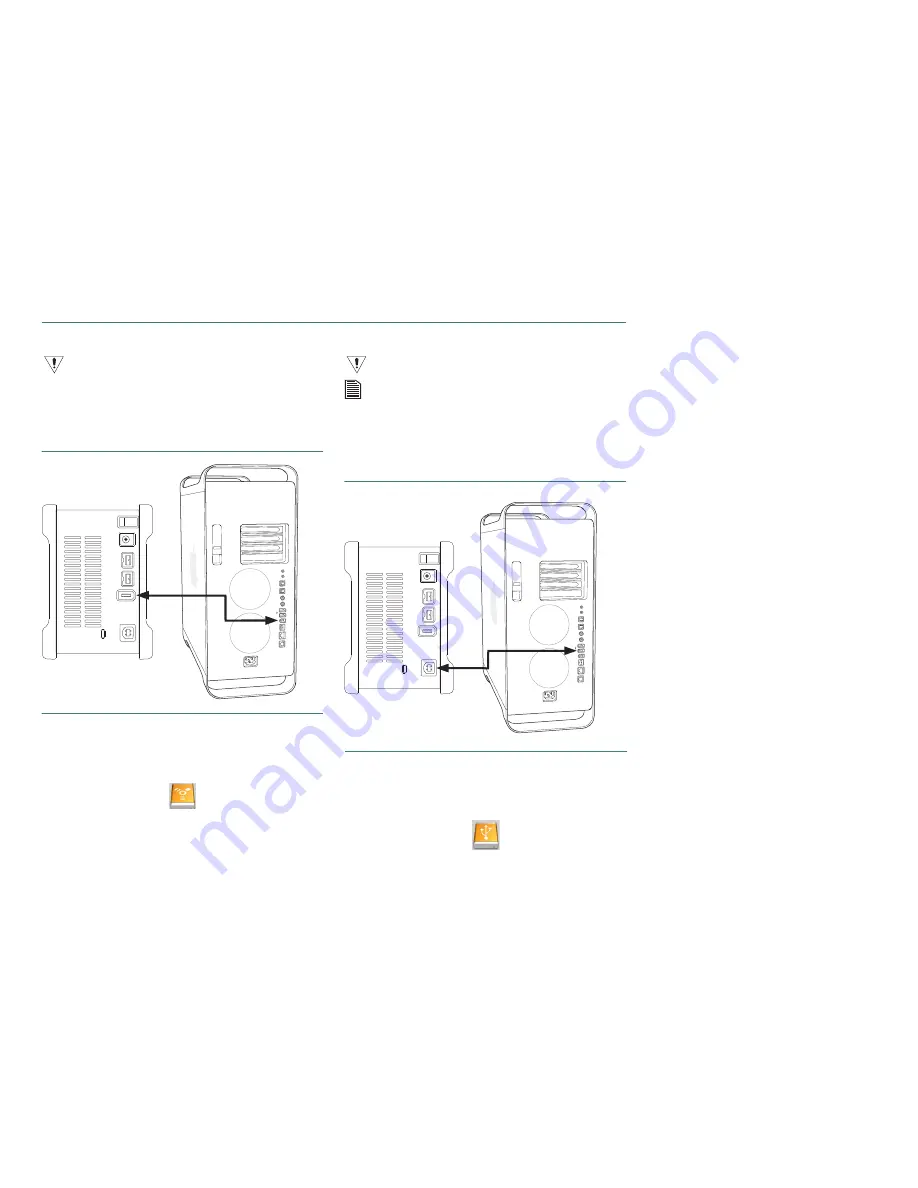
Connecting with a FireWire 400 Cable


Do not plug a FireWire cable into the drive when a USB cable is already connected 
to the drive. This drive will only operate with one interface at a time.


1. Plug one end of the FireWire cable into an available 

FireWire 400 port on your computer or to any other 
FireWire 400 device that is connected to your computer.


FIGURE 5 


CONNECTING TO A FIREWIRE 400 PORT


2. Plug the other end of the FireWire 400 cable into the 

FireWire 400 port on the back of the drive.

Once connected to your system, the Maxtor OneTouch III 
will mount on the desktop.

3. Proceed to Step 3 – Setup the Drive.


Connecting with a USB Cable


Do not plug a USB cable into the drive when a FireWire cable is already connected 
to the drive. This drive will only operate with one interface at a time.

The Maxtor OneTouch button, Power management, and OneTouch Settings utility 
program are not supported for USB on the Macintosh. You may, however, use your 
drive as external storage and utilize the Retrospect software to maintain backup 
copies of your files and complete system.


1. Plug the larger end of the USB cable into an available USB 

port on your computer.


FIGURE 6 


CONNECTING TO A USB PORT


2. Plug the smaller end of the USB cable into the USB port 

on the back of the drive.

Once connected to your system, the Maxtor OneTouch III 
will mount on the desktop.

3. Proceed to Step 3 – Setup the Drive.

Summary of Contents for OneTouch 3

Page 1: ...User s Guide TURBO EDITION MAXTOR ONETOUCH III ...

Page 2: ...on Maxtor may make changes or improvements to the product s described in this publication at any time and without notice Maxtor is a registered trademark of Maxtor Corporation All other brands or products are trademarks or registered trademarks of their respective holders Maxtor Corporation 500 McCarthy Blvd Milpitas California 95035 USA Windows Installation Introduction 33 About this Guide 33 Com...

Page 3: ...ire 400 and USB 2 0 Maxtor OneTouch button the simple way to backup your files EMC Retrospect Express software Maxtor DriveLock security feature password protects the contents in case of loss or unauthorized use Boot your Mac operating system directly from the drive Synchronization of data between 2 or more computers Simple Maxtor user interface for drive management security and backup scheduling ...

Page 4: ...on U S patents 5 150 473 and 5 966 730 Other patents pending Other trademarks are the property of their respective holders All rights reserved 10 05 PN 20310900 WINDOWS English Français Deutsch Español Italiano MACINTOSH English Français Deutsch Installation Software Maxtor OneTouch III Logiciel d installation Installationssoftware Software di installazione Installationsprogram Software de instala...

Page 5: ...ill void the product warranty Maxtor Product Support Maxtor Corporation provides a comprehensive product support section on its web site including the latest software drivers product specifications a complete troubleshooting section and the Maxtor Knowledge Base Maxtor USA Support Visit www maxtorkb com for the following information Search the Hard Drive Knowledge Base We store all resolved proble...

Page 6: ...ware in order to use the OneTouch button and other OneTouch III features Step 1 Install the Software 1 Turn on your computer 2 Insert the Maxtor Installation CD into your CD ROM drive After a few seconds the Install CD icon will appear on your desktop Double click this icon to get started 3 Select your language 4 Double click Install Retrospect Express 5 If prompted enter your Username and Passwor...

Page 7: ...ation as their default settings When you are ready click Install 8 The Setup Status window will appear briefly 9 During the installation you will see the following Click OK to add the OneTouch Manager to your Mac s dock or click Cancel if you wish not to do so 10 When finished you will be notified that the installation was successful Click Restart 11 After restart eject the Maxtor Install CD from y...

Page 8: ...er into your power source 4 Turn on the Maxtor OneTouch III using the power switch on the back of the drive The light on the front of the drive should illuminate Connecting with a FireWire 800 Cable Do not plug a FireWire cable into the drive when a USB cable is already connected to the drive This drive will only operate with one interface at a time 1 Plug one end of the FireWire cable into an ava...

Page 9: ...t on the desktop 3 Proceed to Step 3 Setup the Drive Connecting with a USB Cable Do not plug a USB cable into the drive when a FireWire cable is already connected to the drive This drive will only operate with one interface at a time The Maxtor OneTouch button Power management and OneTouch Settings utility program are not supported for USB on the Macintosh You may however use your drive as externa...

Page 10: ... sure the Maxtor Install CD is NOT in your CD ROM drive The bootable backup option requires either using the entire OneTouch III drive for the backup copy or creating a dedicated disk partition for the backup copy If you wish to store any files on the OneTouch III drive that are not included on the system drive you plan to copy they must be stored in another partition on the OneTouch III drive Pre...

Page 11: ...eral storage Enter the name Data 6 When finished click the Partition button 7 A warning message will appear Click the Partition button when you are ready After the partitioning process is completed Quit the Apple Disk Utility You should now see the two partitions as drive volumes on your Desktop Prior to creating a bootable backup you need to disable FileVaulting and adjust the Ownership settings ...

Page 12: ...is volume Type in your password and close the info window OneTouch Button Setup Press the OneTouch button You will see the following Click Register Now NOTE Click Register Later to perform this task at a different time or click Already Registered if you have done so with a previous product or have installed this software more than once Enter the appropriate information in the form provided If you ...

Page 13: ...xtor OneTouch Setup opens Click Next Step 1 Where do you want to copy from Select your Macintosh boot volume usually called Macintosh HD Click Next Step 2 What do you want to copy Click the All Files bootable backup copy Click Next Step 3 Where do you want to put your backup copy Select the volume volumename associated to the OneTouch III Click Next ...

Page 14: ... partitioning scheme for the OneTouch III Click Proceed A second warning will appear informing you that the Ignore Ownership Permissions needs to be disabled Click Proceed A congratulations screen is displayed Click Finish to close the setup program or Click Start Now to immediately start the backup ...

Page 15: ... III access System Preferences usually located in the System Dock The System Preferences window is displayed Click Startup Disk The following is displayed Select the volume associated with the OneTouch III and click Restart Click Restart once again when asked to confirm your choice The system will then reboot After restart you will notice that the system is now booted from the OneTouch III ...

Page 16: ... management features Security settings Diagnostic utilities Customizing the OneTouch button Using Retrospect Express to back up and restore data Maxtor OneTouch Manager Your Maxtor OneTouch III includes a utility that allows you to Find out more information about your drive Customize your OneTouch button to open a different application or synchronize folders Control power management settings for y...

Page 17: ...rmation displays drive volume information free space available serial number and firmware revision of the drive Diagnostics checks the health of your OneTouch III drive Backup launches Retrospect Express Directory Restore launches Retrospect Express Directory Settings allows you to customize the OneTouch button tune performance and apply password security Sync Now allows you to synchronize folders...

Page 18: ...n run the diagnostic test Click the Diagnostics button The diagnostic test will launch immediately A status bar will appear as well as the notification The drive is now being tested When finished a message will appear indicating The drive passed its most recent diagnostic test If the test finds your drive to be defective it will display a Return Material Authorization RMA diagnostic code you will ...

Page 19: ... launch the Retrospect Express Directory Click on Backup to create a Backup Script Click on Duplicate to create a Duplicate Script NOTE It is recommended that you store all Backup and Duplicate scripts created to a volume other than that where your Bootable Backup Copy is stored Failure to do so may result in lost data Please go to Maxtor s Knowledge Base for more infor mation regarding the creati...

Page 20: ...Maxtor s Knowledge Base for more information regarding the restoration of Backup and Duplicate scripts Disaster Recovery In the event of disk failure or data corruption you can restore your system from your OneTouch III Connect the OneTouch III containing the bootable back to your Mac and apply its power Turn on your Mac and immediately press and hold the Option Key A screen will display showing b...

Page 21: ...ON The Scripted Retrospect operations window is displayed Click the Scripts button The Scripts window appears Select the Maxtor OneTouch Duplicate script Click Edit A Script window will appear showing the configuration about the bootable backup script Click Source ...

Page 22: ...l see the following window indicating that the Source and Destination are the same This is temporary and will be corrected in the next step Click the Destination button You will see the following Choose the internal drive as the Destination Click OK You will be asked to confirm your change Click Replace Close the Script Window ...

Page 23: ...ystem Preferences to change your Startup Disk to boot from the internal disk NOTE After returning to the internal drive as the boot disk access Retrospect Express and edit the Maxtor OneTouch script Change the Source to the Internal Disk and the Destination to the OneTouch III Settings Click on the Settings button You will see the following The Settings tool allows you customize the OneTouch butto...

Page 24: ... have already setup the Sync feature Click the Synchronize button Close the OneTouch Manager Press the OneTouch button Your selected folders will automatically synchronize from your internal drive to the OneTouch III To Open an Application 1 Click on the Open button 2 Browse your Mac and select the application you wish to associate with the OneTouch button In this example Calculator was chosen Cli...

Page 25: ...assword the only other way to unlock the drive is to erase all of its contents Setting your Password 1 Click Security You will see the following 2 Enter and re enter a Password Your password must contain at least six characters and one digit For further security you may also choose a secret question from the list provided and type in the answer If you do not want to choose a secret question and an...

Page 26: ... question 6 Click Change Password and Q A You will return to the original security screen Close the Maxtor OneTouch Manager Disable Security If you decide you want to disable the password you created follow these steps 1 Open the Maxtor OneTouch Manager utility and click Security or click Open Utility from the Maxtor screen that asks you for your password 2 Enter your Password 3 Click Disable Secu...

Page 27: ...A window will appear asking you to confirm that you intend to destroy all data on this drive 5 Type the 5 digit number and click Erase Drive 6 The Erase procedure will begin 7 When completed a message will appear stating that the drive is erased Click OK 8 Remove and reapply power to the drive 9 When the erase process is complete a window will appear with the message that the disk is unreadable 10...

Page 28: ...ick the Sync tab You will see the following Click the add button located in the lower left corner 2 You will be asked to select your Sync My Mac Source In this example the user s iTunes folder was selected After making your selection click the Add Sync button 3 The following is displayed NOTE Repeat steps 1 3 to add more that one 1 folder in your Sync My Mac Source list Once all folders have been ...

Page 29: ...your computer to store folders that were originally copied to your OneTouch III using Sync on another computer Every time you move your OneTouch III between computers Sync will automatically compare the folders on your OneTouch III to the ones on your computer to look for files that have changed If any files have changed it will ask you if you would like to replace the older files with the newer v...

Page 30: ...ze this data To Manually Sync Folders There are three 3 ways to manually sync folders Using the OneTouch Manager Screen Launch the OneTouch Manager and click Sync Now Using the Sync Screen Click the Sync button then click the Sync Now button Using the OneTouch Button on Your OneTouch III Refer to OneTouch Button earlier in this section for additional information You only need to perform this custo...

Page 31: ...olders will remain on your Macintosh system RAID Settings By default your OneTouch III Turbo Edition is configured as a striped RAID 0 volume In this configuration the OneTouch III software combines the capacity of both enclosed hard drives giving you one large fast disk However if one drive fails you will lose all data stored To protect your data you can mirror RAID 1 the drives in your OneTouch ...

Page 32: ...ending on the capacity of your OneTouch III Turbo Edition WARNING Changing the RAID configuration will erase all data on your OneTouch III Turbo Edition Maxtor recommends that you backup any all data on the OneTouch III before proceeding 2 To continue click Erase 3 You will see the following Type the number displayed in the left field in this example the number is 27024 although this number is ran...

Page 33: ...rom the system Click OK to continue This process will take approximately 30 60 seconds depending on the capacity of the OneTouch III your Macintosh OS version and the interface cable connecting the OneTouch III Turbo Edition to your Macintosh 6 Once the RAID has been set you will see the following Click Initialize to proceed 7 Once initialized launch the Apple Disk Utility to format the volume Onc...

Page 34: ...er rate is approximately 1 MB per second Because of this installing applications on a drive using the USB 1 1 interface is not recommended Many applications installed on your drive will only run on the computer where the application was installed If you move your drive to another computer the application may not function Once the drive is reconnected to the computer the application was originally ...

Page 35: ... backup files EMC Retrospect Express HD software Maxtor DriveLock security feature password protects the contents in case of loss or unauthorized use System Rollback rolls back your PC system settings to a better point in time while keeping data current Data synchronization between 2 or more computers The Maxtor OneTouch Manager features include Security settings to password protect your critical ...

Page 36: ... trademarks of EMC Corporation U S patents 5 150 473 and 5 966 730 Other patents pending Other trademarks are the property of their respective holders All rights reserved 10 05 PN 20310900 WINDOWS English Français Deutsch Español Italiano MACINTOSH English Français Deutsch Installation Software Maxtor OneTouch III Logiciel d installation Installationssoftware Software di installazione Installation...

Page 37: ...ll void the product warranty Maxtor Product Support Maxtor Corporation provides a comprehensive product support section on its web site including the latest software drivers product specifications a complete troubleshooting section and the Maxtor Knowledge Base Maxtor USA Support Visit www maxtorkb com for the following information Search the Hard Drive Knowledge Base We store all resolved problem...

Page 38: ...l Double click the User Accounts icon If your account Logon is displayed at the bottom of this window with the description Computer Administrator you have the correct administrative privileges to install and run this software If your system shows another type of account status contact your IT Systems Administrator for further assistance 1 Turn on your computer 2 Insert the Maxtor Installation CD i...

Page 39: ...xt 6 The License Agreement screen will appear After reading the License Agreement click Yes 7 The Choose Destination Location screen will appear In the Destination Folder section of the screen you can see where the Maxtor software will be installed If you wish to change this click Browse and choose a new location When you are ready click Next ...

Page 40: ...l appear 9 The InstallShield Wizard Complete window will appear Click Finish 10 The Retrospect Express HD Installshield Wizard will appear automatically 11 You may see a message that the Microsoft NET software will be installed on your computer No intervention is necessary during this process ...

Page 41: ... Agreement screen will appear After reading the agreement select I accept and click Next 14 The Customer Information screen will appear Enter your User Name and Organization Make your choice and Click Next 15 The Setup Type screen will appear Choose the Recommended option to install all of the Retrospect Software Make your choice and click Next ...

Page 42: ...essage InstallShield Wizard Completed will appear Click Finish 18 A message appears asking you to restart Follow the on screen directions to restart your computer 19 The Welcome to Maxtor OneTouch Setup screen will appear and a Maxtor OneTouch shortcut icon will appear on your desktop 20 Eject the Maxtor Install CD from your computer 21 Proceed to Step 2 Connect the Drive ...

Page 43: ...rd electrical plug from the power adapter into your power source 4 Turn on the Maxtor OneTouch III using the power switch on the back of the drive The light on the front of the drive should illuminate Connecting with a FireWire 800 Cable Do not plug a FireWire cable into the drive when a USB cable is already connected to the drive This drive will only operate with one interface at a time 1 Plug on...

Page 44: ...r computer FIGURE 5 CONNECTING TO A FIREWIRE 400 PORT 2 Plug the other end of the FireWire 400 cable into the FireWire 400 port on the back of the drive 3 Proceed to Step 3 Setup the Drive Connecting with a USB Cable Do not plug a USB cable into the drive when a FireWire cable is already connected to the drive This drive will only operate with one interface at a time 1 Plug the larger end of the U...

Page 45: ...file structure Your drive must be re formatted for the NTFS file system in order to work properly with your Windows operating system The Format Drive window will appear and you will have the opportunity to format your drive with the NTFS file system This is necessary for Windows 2000 and XP users 3 Click Format Your new drive will appear in the same way as your other drives with a letter assigned to ...

Page 46: ...xtor 6 Once you ve made your selection the Retrospect Welcome screen will appear displaying the automatic backup settings for your computer Retrospect Express HD will back up all the files on your computer to your Maxtor OneTouch III drive every day at 10 PM 7 If you would like to start your first backup immediately Click Backup Now 8 To close Retrospect Express HD click the X located at the upper r...

Page 47: ... computer You can also restore your entire computer to its state at the time a restore point was created Once you set up a backup you can start it at any time by pressing the button on your Maxtor OneTouch III You can also schedule backups to take place automatically on specific days of the week In the Restoring your computer section later in this chapter we will show you how to restore all the file...

Page 48: ...hedule backups to run automatically on specified days of the week Duplicate When you duplicate Retrospect Express HD copies the selected files and folders from your computer to the Retrospect Duplicates folder on your Maxtor drive Each time you duplicate Retrospect Express HD replaces the entire contents of Retrospect Duplicates The only files and folders available are those from the most recent d...

Page 49: ...will display asking you what you would like to back up Click the My Entire Computer button Click Next 5 Select the disk s you want to save your backup to this would be the OneTouch III Click the checkbox that corresponds with your Maxtor OneTouch III Click Next 6 Select the days and the time that you wish to schedule automatic backups to run Click Finish ...

Page 50: ...ity to backup your entire computer to a Restore Point This is the default comprehensive backup setting In the future after using other Comprehensive Backup Duplicate options you may return to using this option Here is its setup procedure 1 Launch Retrospect Express HD 2 The main menu opens Click Setup 3 Select the type of backup click on the Comprehensive Backup button Click Next 4 A screen will d...

Page 51: ...the OneTouch III Click the checkbox that corresponds with your Maxtor OneTouch III Click Next 8 Select the days and the time that you wish to schedule automatic backups to run Click Finish 9 You will return to the Retrospect Express HD main menu Retrospect Express HD will now backup your selected files at the scheduled date and time Duplicates Let Me Choose Files and Folders 1 Launch Retrospect Ex...

Page 52: ...what you would like to duplicate Click the Let me choose files by type button Click Next 5 You will see the following By default all boxes are checked 6 Uncheck the boxes you do not wish to backup Click Next 7 Select the disk s you want to save your backup to this would be the OneTouch III Click the checkbox that corresponds with your Maxtor OneTouch III Click Finish ...

Page 53: ...r Backup Settings 1 Open Retrospect Express HD 2 The Welcome Screen will appear It should identify when the next scheduled backup is to take place Click Setup to make changes to your backup 3 Click Comprehensive Backup Click Next 4 A screen will display asking you what you would like to back up For this example click the My Entire Computer button Click Next 5 Select the disk you want to save to th...

Page 54: ...lick on the words all available This will launch a drop down menu Click on the triangle to open the menu Select from the options and click Next Select the days and the time that you wish to schedule automatic backups to run By default your comprehensive backup will run daily at 10 00 PM 6 Change the days of the week or the starting time of your backup Click Finish ...

Page 55: ... may be corrupted Fortunately Retrospect Express HD provides you with the ability to restore your crucial files The following procedure will walk you through the steps to restore your Entire Computer Prerequisites A prepared partitioned formatted hard disk Installation of your Operating System including all previous loaded Service packs and critical updates Installation of EMC Retrospect Express HD...

Page 56: ...ace a check in each box containing data you wish to restore Use the search field to find specific files Click Next 7 You will now be asked where you wish to restore your files to You have two options Their original location or the following location Desktop My Documents My Restored Files Restore 1 default Make your choice and click Restore 8 You will be asked to confirm that you want to overwrite the d...

Page 57: ...ore points window shows a calendar with the date in bold for the days that restore points were created It will also list all the restore points in ascending order in a list box When you select a date on the calendar the list of restore points will automatically scroll to show all those that are associated with that specific date The latest backup on that date will be highlighted The drive for the r...

Page 58: ...vent restore points from being deleted you must lock them 1 Open Retrospect Express 2 Click Restore 3 Highlight a restore point that you wish to use to lock your data and click Lock located in the upper right corner of the restore point screen 4 To unlock a restore point simply repeat this procedure and the restore point will be unlocked when you click Lock again Viewing Restore Point Logs There m...

Page 59: ...he delete button the red X located in the upper right corner of the Restore window 4 You will be prompted to confirm that you want to delete the restore point Click OK 5 When a restore point is deleted Retrospect Express HD will reclaim the disk space This process can take a long time Do not turn off your computer until the process is complete Restore Files in a Duplicate Restoring files from a Du...

Page 60: ... Launch Retrospect Express HD Perform an immediate Backup or Duplicate of your PC Turn On Off the Automatic Backup feature Exit Automatic Backup This feature will launch scheduled Comprehensive Backups of your computer By default the Automatic Backups option is turned On To Turn Off Automatic Backup This can be done two ways Launch Retrospect Express HD and click the Off button in the lower right ...

Page 61: ...ager by double clicking its desktop shortcut This launches the OneTouch Manager NOTE Serial Number entries will be populated with your Maxtor OneTouch III s information The OneTouch Manager program contains a myriad of utilities that help you protect your data Along with Retrospect Express HD the OneTouch Manager provides the following Access to Maxtor s Web based support Security through Maxtor s...

Page 62: ...at allow you to adjust and down times adjust performance said password level security and customize your OneTouch button Press the SETTINGS button to access these utilities Adjust Power Setting This feature allows you to spin down your Maxtor OneTouch III during times of inactivity By default the OneTouch III s spin down time is 1 hour To adjust the setting 1 Click the Settings button This will op...

Page 63: ...K 7 At any time you can return to the Adjust Power Setting menu and adjust the spin down time to meet your needs For example if you wish to return the drive back to its original default setting you can access the Adjust Power Setting menu Click Default 8 Click Apply followed by OK and your Maxtor OneTouch III s power settings will return back to its original spin down time of 1 hour ...

Page 64: ...ll open the Settings for My Maxtor OneTouch menu 2 Click the Customize OneTouch button 3 You will see the following menu Note that the Maxtor OneTouch button is set by default to launch a backup 4 To associate the button so that it launches an application click the Application button Click Browse 5 Browse your computer and select an application that you would like to associate with the OneTouch bu...

Page 65: ...ram To do this 1 Click the Settings button This will open the Settings for My Maxtor OneTouch menu 2 Click the Customize OneTouch button 3 You will see the following menu Note that the Maxtor OneTouch button is set by default to launch a backup 4 To associate the button so that it launches an application click the Synchronize folders using Sync button Click Apply 5 You will be notified that the On...

Page 66: ...lick the Adjust Security Setting button 3 In the fields provided enter a password and re enter your password The password must be at least six or more characters in length and include at least one digit for example abcdef would not be a valid password abcde1 would be a valid password Optional but Recommended You can also provide an answer to a secret question for greater protection in the advent t...

Page 67: ...the OneTouch III Click OK 8 From now on every time you restart your computer and the OneTouch III is attached or when you turn off your drive and turn it back on you will be prompted to enter your password or provide the answer to the secret question 9 If the proper information is entered you will see the following Click OK and your Maxtor OneTouch III will be accessible ...

Page 68: ... Adjust Security Setting button 3 You will see the following Click Change Password 4 Enter your current Password or click the Secret button to see the following Click Next 5 Create a new password following steps 3 7 in Set Password Disable Security 1 Click the Settings button This will open the Settings for My Maxtor OneTouch menu 2 Click the Adjust Security Setting button ...

Page 69: ...d on your Maxtor OneTouch III Click OK You can always re create a password on the OneTouch III Refer to the Set Password procedure for more information Unlock Drive Though not widely used the Unlock Drive feature can be accessed without having to turn off your OneTouch III or restarting your computer To use this option 1 Click the Settings button This will open the Settings for My Maxtor OneTouch ...

Page 70: ...NDOWS INSTALLATION 4 You will be prompted to enter your password Click OK 5 Or you can click the Secret button and provide the answer to the secret question Click OK 6 You will be informed that your Maxtor OneTouch III has been unlocked Click OK ...

Page 71: ...k on to try again at which point you can try an additional 5 times If you are not able to recover your password the only other way to unlock the drive is to erase all of its contents 1 Click the Settings button This will open the Settings for My Maxtor OneTouch menu 2 Click the Adjust Security Setting button You will see the following Click Erase Maxtor OneTouch 3 You will see the following warnin...

Page 72: ...ocess NOTE This process can take up to 3 hours to complete 5 When finished you will be notified that the drive is erased Click OK 6 Remove and reapply power to your Maxtor OneTouch III Upon doing so you will be prompted to Format the drive NOTE Refer to Formatting Procedures for more information ...

Page 73: ... RAID 1 is the loss of disk space A RAID 1 configuration will decrease the overall capacity of your OneTouch III Turbo Edition by 50 1 Launch the OneTouch Manager and click the Settings button 2 Click the RAID Settings button 3 The RAID Settings window is displayed To Configure a RAID 1 Volume on the OneTouch III 1 Click the RAID 1 Redundancy button WARNING Setting up this RAID configuration will ...

Page 74: ...e Maxtor OneTouch Manager program are shortcuts that enable you to access Retrospect Press HD from the OneTouch Manager interface Accessing Backup The Backup option can access Retrospect Express HD so you can edit your backup settings You can also launch a backup from here as well 1 Click the Backup button Click Edit My Backup Settings 2 This will launch Retrospect Express HD and take you to its W...

Page 75: ...hes zero 0 the backup will start Accessing Restore The OneTouch Manager s Restore option provides a quick path to Retrospect Express HD s Restore menu 1 Click Restore You will see the following This screen notifies you that Retrospect Express is currently running and cannot be launched from this window If it is closed you will see the following window From here you can select a Restore Point and p...

Page 76: ... for example and any folders within your My Documents folder You can sync folders between multiple computers This makes it convenient for you to move files between a computer at work and a computer at home Click the Sync button You will see the following Click Set Folders Check the folders that you wish to sync between your computer and the OneTouch III Click Apply To Edit Sync Settings Click the ...

Page 77: ...e the following Click Sync Status The status of your last Sync will be displayed Click OK Automatic Sync The Automatic Sync feature can be turned on or off By default this setting is On To turn Automatic Sync Off Click the Sync button then click the Off button in the upper right corner of the Sync screen Automatic Sync is now Off ...

Page 78: ...lect the local disk on the destination computer to store the synchronized folders from your OneTouch Every time you move your Maxtor OneTouch III between computers Sync will automatically compare the folders on your Maxtor OneTouch III to the ones on your computer to look for files that have changed If any files have changed it will ask you if you would like to replace the older files with their n...

Page 79: ...ing your computer back to a previous restore point will not cause you to lose any of your current work like documents email or web browser bookmarks Creating a Restore Point You may either create a restore point manually or set a regular time for a restore point to be created automatically Rolling Back Your System You may select a date in the past and a restore point to restore During the rollback...

Page 80: ... 1 1 interface the data transfer rate is approximately 1 MB per second Because of this installing applications on a drive using the USB 1 1 interface is not recommended Many applications installed on your drive will only run on the computer where the application was installed If you move your drive to another computer the application may not function Once the drive is reconnected to the computer t...

Page 81: ...NETOUCH III TURBO EDITION WINDOWS INSTALLATION Security Lock Your new Maxtor OneTouch III includes a security locking slot on the back of the drive The slot is compatible with most security locking cables Security Lock ...

Page 82: ...PN 20315803 ...

Reviews: