Maxtor Maxtor OneTouch 4 Mini User Manual Download Page 63

Maxtor OneTouch IV

60

Unlocking Your OneTouch Drive

Once you enable DrivePass, your OneTouch drive locks automatically each time you shut 

down your computer or remove the OneTouch drive. You must unlock the drive each time 
you restart your computer or reconnect your drive. You can unlock your drive in either the 
Maxtor Manager password window or the OneTouch application

If you selected 

Remember in keychain 

when you set your password, your drive unlocks 

automatically.

If you did not select 

Remember in keychain 

when you set your password, a Maxtor 

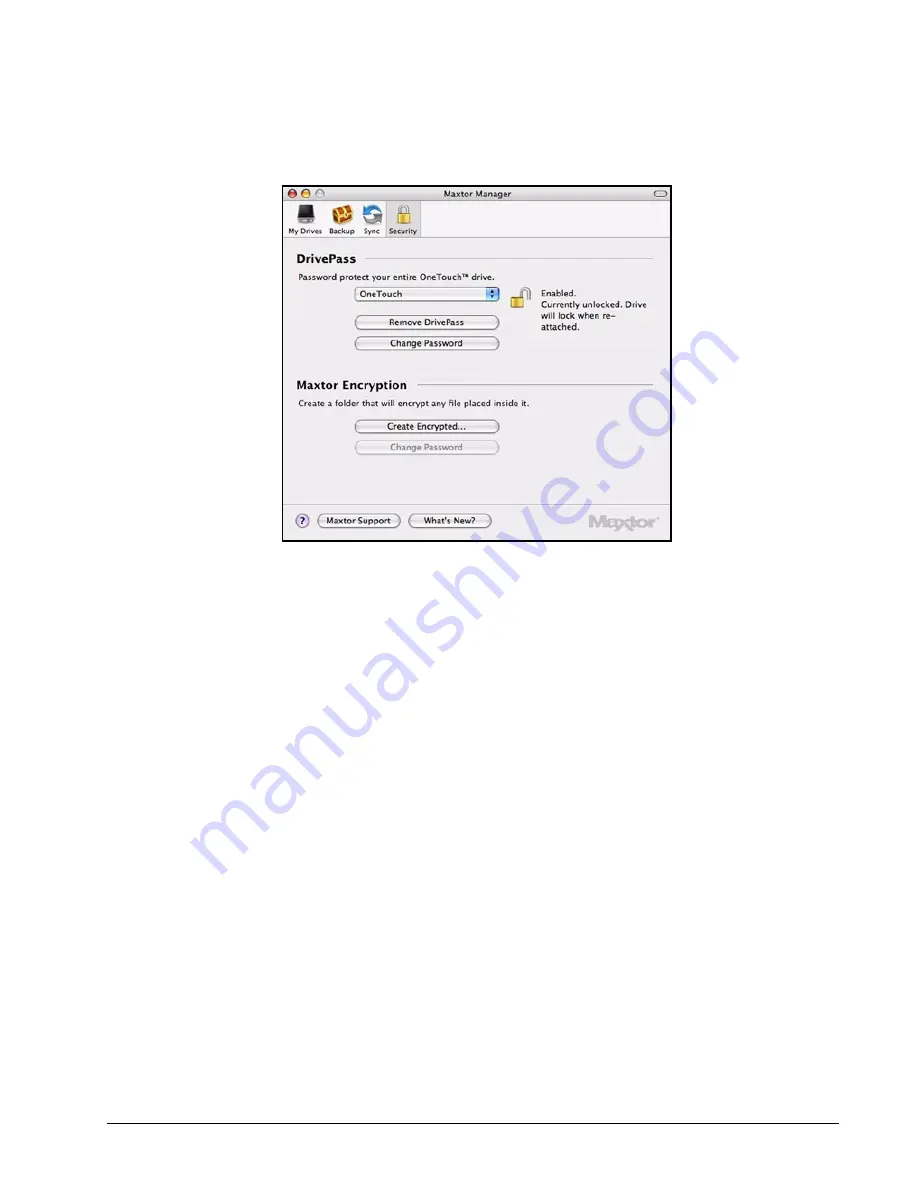
Manager password window opens when you restart your computer or reconnect your drive:

Figure 3:    DrivePass Enabled

Summary of Contents for Maxtor OneTouch 4 Mini

Page 1: ......

Page 2: ...lans 28 Using Simple Backup 28 Creating a Custom Backup Plan 32 Managing Backup Plans 39 Editing Backup Settings 39 Deleting Backup Plans 42 Backing Up Manually 43 Restoring Files 45 Synchronizing Fol...

Page 3: ...ord 67 Using Maxtor Encryption 72 Creating an Encrypted Folder 73 Encrypting Files and Folders 75 Managing the Encrypted Folder 78 Deleting an Encrypted Folder 81 From the Security View 81 From the Fi...

Page 4: ...ncryption of multiple files and folders in one location A customized OneTouch button to quickly open a frequently used program The Maxtor OneTouch software is loaded on your OneTouch drive Because the...

Page 5: ...icon The Mac OneTouch 4 Plus Formatter window opens Step 4 After you ve read the description of what the Formatting tool does click Format to format your OneTouch 4 drive for a Macintosh The remainder...

Page 6: ...con refreshes to display the name of the drive The OneTouch 4 Plus dmg file appears on your desktop The dmg file automatically creates a OneTouch 4 Plus installer The OneTouch 4 Plus installer Welcome...

Page 7: ...1 Connect your OneTouch 4 drive to your computer A New Volume icon appears on your desktop Step 2 Double click the New Volume icon The New Volume Finder window opens Step 3 Drag the Maxtor Manager xxx...

Page 8: ...Maxtor OneTouch IV 5 The Disk Utility window opens Step 5 Select OneTouch 4 in the list Figure 6 Disk Utility Figure 7 Disk Utility Erase...

Page 9: ...Maxtor OneTouch IV 6 Step 6 Click the Erase tab Figure 8 Disk Utility Erase Figure 9 Disk Utility Erase...

Page 10: ...Driver Step 8 Click Erase An Erase Disk warning sheet is displayed Step 9 Click Erase in the warning sheet Your OneTouch 4 drive is dismounted and then remounts with the name you entered Step 10 Clos...

Page 11: ...ow opens Step 12 Click the OneTouch 4 Plus or Mini icon The OneTouch 4 Plus or Mini Installer Welcome window opens Installing the Software To install the OneTouch software Step 1 In the Welcome window...

Page 12: ...pens Step 2 When you ve read the information click Continue The Software License Agreement window opens Step 3 Click Continue A sheet requires your agreement to continue the installation Figure 14 Rea...

Page 13: ...lect a Destination window opens Step 5 If it s not already selected select your Macintosh hard drive and click Continue Note The OneTouch 4 software can be installed only on the boot volume The Instal...

Page 14: ...k Install A sheet warns that you ll have to restart your computer Step 7 Click Continue Installation in the sheet A progress window keeps you informed as the installation proceeds Figure 18 Installati...

Page 15: ...is complete a Restart window opens Step 8 Click Restart to restart your computer and complete the installation When your computer has restarted a Maxtor Manager icon appears on your desktop Figure 20...

Page 16: ...Maxtor OneTouch IV 13 Step 9 Double click the Maxtor Manager icon to open the Maxtor Manager application You re ready to use your Maxtor OneTouch 4 drive 072407 Figure 22 Maxtor Manager Application...

Page 17: ...e automatically detected and listed in the My Drives view It can take several seconds for the Maxtor Manager software to detect your device If your device doesn t appear make sure it s properly connec...

Page 18: ...the My Drives view click OneTouch Button A sheet is displayed Step 2 Select Backup or Sync and click OK to link that action to the OneTouch button OR Select Open an Application to choose an applicatio...

Page 19: ...with the OneTouch button and click Open The application you ve chosen now appears in the sheet Step 4 Click OK You can now open the selected application by pressing the OneTouch button Figure 3 Appli...

Page 20: ...he diagnostic utility performs its tests without affecting the data on your drive To run Diagnostics In the My Drives view click Diagnostic A progress bar indicates the progress of the diagnostic When...

Page 21: ...s an error during testing the serial number of the bad device is displayed with instructions to contact Seagate for service and support Using RAID OneTouch III Users If your OneTouch III drive support...

Page 22: ...Maxtor OneTouch IV 19 To use RAID Step 1 In the My Drives view select your OneTouch III drive and go to Drives RAID Settings in the title bar Figure 7 My Drives...

Page 23: ...Maxtor OneTouch IV 20 The RAID Settings sheet is displayed Figure 8 RAID Settings Figure 9 RAID Settings...

Page 24: ...e Disk The RAID Drive Erase Confirmation sheet is displayed Step 3 Enter the number displayed and click Erase Drive A Disk Insertion dialog is displayed Step 4 Click Initialize to prepare your OneTouc...

Page 25: ...Maxtor OneTouch IV 22 Step 5 Select the Maxtor drive from the list The First Aid tab is displayed Step 6 Click the Erase tab Figure 12 Disk Utility Figure 13 Disk Utility...

Page 26: ...me Format select Mac OS Extended Any of the Mac OS Extended options will work For Name enter the name you want to give your OneTouch 4 drive Deselect Install Mac OS 9 Disk Driver Step 8 Click Erase An...

Page 27: ...se in the Erase Disk sheet Your OneTouch 4 drive is dismounted and then remounts with the name you entered Step 10 Close the Disk Utility Step 11 Click the Maxtor Manager desktop icon The My Drives vi...

Page 28: ...e automatically informs you each month of whether your software is up to date However you can manually check to see if an update is available or you can turn off the Software Update feature Note You c...

Page 29: ...pdate is selected by default Step 2 To turn off Software Update unselect Check for updates automatically Step 3 To check for updates now click Check Now A window informs you of whether your software i...

Page 30: ...Maxtor OneTouch IV 27 Step 4 Click OK Figure 19 Software Update...

Page 31: ...k Back Up Now in the Backup view You can create one Backup Plan to back up all your folders or you can create multiple Backup Plans for different sets of folders You can use either of two types of Bac...

Page 32: ...r OneTouch IV 29 Simple Backup appears in the Backup Plans list If this is your first time opening the Backup Plans view a sheet describes Simple Backup Figure 1 Backup View Figure 2 Simple Backup Wel...

Page 33: ...To re name the Simple Backup plan double click on Simple Backup in the Backup Plans pane so that it becomes editable and enter a name Step 5 Select Simple Backup or the name you ve given it and click...

Page 34: ...Maxtor OneTouch IV 31 When the backup is complete the date time and number of files in the backup are displayed Figure 4 Simple Backup Progress Figure 5 Simple Backup Completed...

Page 35: ...backup and set up a backup destination and schedule Step 1 Click Backup in the toolbar The Backup Plans Schedule tab view is displayed Step 2 Click the plus sign below the Backup Plans list to add a c...

Page 36: ...Maxtor OneTouch IV 33 Step 3 To name this Backup Plan double click untitled backup so that it becomes editable and enter a name Figure 7 Custom Backup Plan Figure 8 Name Custom Backup Plan...

Page 37: ...n it Custom Backup in the image above and select Enable Scheduled Backup in the Schedule tab view The Schedule tab view becomes active Step 5 Select the days and time for your backup and click Options...

Page 38: ...h IV 35 Step 7 Set your power options to accommodate your backup schedule and click OK Step 8 Click Folders in the Backup Plans view The Backup Plans Folders tab view is displayed Figure 10 Backup Sch...

Page 39: ...Maxtor OneTouch IV 36 Step 9 Click the plus sign below the Folders tab view to browse to a folder to back up An Open panel is displayed Figure 11 Backup Folder Options Figure 12 Maxtor Manager Panel...

Page 40: ...folder for backup and click Open The Folders tab view now displays the path of the folder you ve selected Step 11 Click Destination in the Backup Plans view The Backup Plans Destination tab view is d...

Page 41: ...sted are the drives currently connected to your computer Step 12 Select the destination drive for your backup and click Set The name and serial number of the selected drive are now displayed Figure 14...

Page 42: ...Backup Plans Editing Backup Settings To edit the settings for a Backup Plan Step 1 Click Backup in the toolbar The Backup Plans view displays your current Backup Plan names and schedule Figure 15 Bac...

Page 43: ...becomes editable and enter a new name b To edit the schedule select or deselect the days for the backup and change the backup time c To edit the power options click Options make the desired changes in...

Page 44: ...or OneTouch IV 41 Step 4 Select the path and click the plus sign below the Folders list An Open panel displays the currently selected folder Figure 17 Backup Folder Path Figure 18 Backup Folder Select...

Page 45: ...stination Listed are the drives currently connected to your computer Step 7 If you wish select a different destination drive for your backup and click Set The name and serial number of the selected dr...

Page 46: ...ns view Step 3 Click the minus sign The Backup Plan is removed from the Backup Plans list Backing Up Manually To manually generate an immediate backup of folders already selected for backup Step 1 Cli...

Page 47: ...Touch IV 44 Step 2 Click Back Up Now The progress bar below the Schedule tab view indicates a backup in progress When the backup is complete the date and time of the backup are displayed Figure 21 Bac...

Page 48: ...torical versions of each revised file stored on your OneTouch drive You can restore a saved historical version of a backed up file based on the date it was backed up or you can restore the most recent...

Page 49: ...Maxtor OneTouch IV 46 Step 2 Select a Backup Plan in the Backup Plans list Step 3 Click Restore Files The Restore options sheet is displayed Figure 23 Backup Plans...

Page 50: ...red Step 5 Select a location at which to restore the files a Select Original to restore the files to their original location on your computer b Select Temporary to restore the files to a temporary Max...

Page 51: ...stem or Applications folders for Sync You have these Sync options Note Make sure all computers participating in the Sync are set to precisely the same time to ensure that Sync works properly Using Pre...

Page 52: ...or Sync Step 3 Check Automatic Sync and if you wish Always overwrite older files Your first sync starts when you check Automatic Sync These folders will automatically be synchronized each time a file...

Page 53: ...on which to sync folders The Documents Music Pictures and Movies folders have been pre selected for Sync Step 3 Click to remove a folder from sync Step 4 Click to select folders to be synchronized The...

Page 54: ...Maxtor OneTouch IV 51 Step 5 Select folders to sync and click Add to Sync Step 6 The selected folders are listed in the Sync view Figure 3 Select Folders to Sync Figure 4 Custom Sync...

Page 55: ...ter on which the original Sync occurred and connect it to another computer on which you want to sync the selected folders You can connect the OneTouch drive to as many computers as you wish to include...

Page 56: ...lbar The Sync view is displayed Step 2 Select the folder to be removed from sync Step 3 Click The folder is removed from the list of synchronized folders Checking Sync Status To check the status of th...

Page 57: ...ting older versions with newer versions Your OneTouch drive must be connected during Automatic Sync By default Automatic Sync is turned off Turning Off Automatic Sync You can turn off Automatic Sync a...

Page 58: ...button if you ve customized it to sync files Synchronizing Manually To sync selected folders immediately Click Sync Now Using the Maxtor Synchronization Window Use the Maxtor Synchronization window to...

Page 59: ...e the Maxtor Synchronization window opens To expand and use the Maxtor Synchronization window Step 1 Click Show Details The Maxtor Synchronization window expands Step 2 Use the On checkbox to tell Max...

Page 60: ...der file versions are always replaced with newer versions When Automatic Overwrite is off the Maxtor Manager displays the Maxtor Synchronization window to allow you to decide whether to overwrite an o...

Page 61: ...ssword protect an entire OneTouch drive Enabling DrivePass To enable DrivePass Step 1 Click Security in the toolbar The Security view is displayed Step 2 Select a OneTouch drive from the dropdown menu...

Page 62: ...ect Remember in keychain to make sure you don t forget the password Step 5 If you wish select a security question from the dropdown menu and then enter and re enter the answer to that question You can...

Page 63: ...art your computer or reconnect your drive You can unlock your drive in either the Maxtor Manager password window or the OneTouch application If you selected Remember in keychain when you set your pass...

Page 64: ...sword or your security question if you ve created one from the dropdown menu Step 2 Enter the password or the answer to the security question Step 3 Click Unlock Step 4 Click the desktop Maxtor Manage...

Page 65: ...Touch IV 62 To unlock your drive in the OneTouch application Step 1 Click My Drives in the toolbar The My Drives view opens Step 2 Click Security in the toolbar The Security view is displayed Figure 6...

Page 66: ...Maxtor OneTouch IV 63 Step 3 Click Unlock Drive The Unlock your drive sheet is displayed Figure 7 Unlock Drive Figure 8 Unlock Your Drive...

Page 67: ...word and click Unlock The Security view indicates that your drive is unlocked Removing DrivePass To remove DrivePass from your OneTouch Step 1 Click Remove DrivePass in the Security view The Remove Dr...

Page 68: ...Maxtor OneTouch IV 65 Step 2 Enter the password and click Remove DrivePass The Security view now indicates that DrivePass is not enabled Figure 10 Remove DrivePass Figure 11 Security...

Page 69: ...ecurity view The Change DrivePass Password sheet is displayed Step 2 Enter your current password and enter and re enter the new password Step 3 If you wish enter and re enter the answer to a security...

Page 70: ...rd and are unable to unlock your drive you must reformat the drive in order to continue to use it Reformatting erases all data stored on the drive To securely erase your drive Step 1 Click I Forgot in...

Page 71: ...e sheet opens Step 2 Enter the number displayed and click Erase Now The light on your OneTouch drive begins to blink and continues until the reformat is complete The reformat can take several hours de...

Page 72: ...the DrivePass information remains intact and your drive is still locked When the reformat is complete a Disk Insertion dialog is displayed Step 3 Click Initialize to prepare your OneTouch for use The...

Page 73: ...Maxtor OneTouch IV 70 Step 5 Click the Erase tab Step 6 Enter this information For Volume Format select Mac OS Extended Figure 17 Disk Utility Figure 18 Disk Utility Erase...

Page 74: ...isk Driver Step 7 Click Erase An Erase Disk sheet is displayed Step 8 Click Erase in the Erase Disk sheet Your OneTouch 4 drive is dismounted and then remounts with the name you entered Step 9 Close t...

Page 75: ...d into your encrypted folder Already encrypted files Installer packages Applications Development Tools The Encryption operation is Copy only no files are moved on your computer Thus the original unenc...

Page 76: ...Encrypted Folder To create an encrypted folder Step 1 Click Security in the toolbar The Security view opens Step 2 Under Maxtor Encryption click Create Encrypted Folder A Create Encrypted Folder shee...

Page 77: ...l remember you ll need it each time you want to access the files and folders stored in the encrypted folder Note Your Encryption password is attached to the encrypted folder and not to the files and f...

Page 78: ...You can open your encrypted folder either from the Maxtor Manager Security view or by clicking the OneTouch 4 icon on your desktop To use your encrypted folder Step 1 In the Security view click Open E...

Page 79: ...Maxtor OneTouch IV 76 OR On your desktop double click the OneTouch 4 icon The Finder window displays the Encryption Folder mxef icon Figure 24 Security Figure 25 Encryption Folder...

Page 80: ...our Encryption password is attached to the encrypted folder and not to the files and folders stored within it You can select Remember in keychain to make sure you don t forget the password The Maxtor...

Page 81: ...you delete the original unencrypted versions from your computer Managing the Encrypted Folder You can move files and folders from your encrypted folder to another location on your computer or delete t...

Page 82: ...Maxtor OneTouch IV 79 OR On your desktop double click the OneTouch 4 icon The Finder window opens Figure 29 Security Figure 30 Maxtor Encryption Folder...

Page 83: ...can select Remember in keychain to make sure you don t forget the password The Maxtor Encryption window opens Step 4 To move a file or folder from your encrypted folder drag and drop it at the desired...

Page 84: ...it To retain your data be sure to remove files and folders from your encrypted folder before you delete the folder itself You can delete your encrypted folder from two locations the Security view or t...

Page 85: ...Maxtor OneTouch IV 82 Step 2 Click Delete Encrypted Folder A Delete Encrypted Folder sheet is displayed Figure 34 Security Figure 35 Delete Encrypted Folder...

Page 86: ...Enter your password and click Delete Folder A Delete Encrypted Folder warning sheet is displayed Step 4 Click Delete Now The Security view indicates that Maxtor Encryption is not enabled Figure 36 Del...

Page 87: ...eTouch IV 84 From the Finder Window To delete your encrypted folder from the Finder window Step 1 On your desktop double click the OneTouch 4 icon The Finder window opens Figure 37 Security No Encrypt...

Page 88: ...ncryption Password You can change your Encryption password in either of two locations the Security view or the Maxtor Encryption window From the Security View To change your Encryption password in the...

Page 89: ...Maxtor OneTouch IV 86 Step 2 Under Maxtor Encryption click Change Password A Change Encryption Password sheet is displayed Figure 39 Security Figure 40 Change Encryption Password...

Page 90: ...s that your Encryption password has been changed From the Maxtor Encryption Window To change your Encryption password from the Maxtor Encryption window Step 1 Open the Maxtor Encryption window Step 2...

Page 91: ...Step 3 Enter your password and enter and re enter the new password Step 4 Click Change A sheet confirms that your encrypted folder password has been changed Figure 43 Change Password Figure 44 Change...

Page 92: ...cted OneTouch 4 Mini Users Make sure to connect the interface cables in the following sequence 1 Power Data 2 Power Only 3 Type B Interface directly to the OneTouch 4 Mini Windows Users Make sure the...

Page 93: ...crypted folder This will delete all data stored within the encrypted folder Seagate strongly recommends that you create passwords that are easily remembered or record passwords and store them in a sec...

Page 94: ...disconnect the OneTouch 4 drive while data is being transferred between the computer and the drive Failure to properly disconnect the OneTouch 4 drive may result in data corruption or loss 10 What do...

Page 95: ...ndow 85 Checking Sync Status 53 Completing the Sync 52 Creating a Custom Backup Plan 32 Creating an Encrypted Folder 73 Creating Backup Plans 28 Creating a Custom Backup Plan 32 Using Simple Backup 28...

Page 96: ...s 14 Customizing the OneTouch Button 14 Running Diagnostics 17 Using RAID OneTouch III Users 18 P Preparing the Software Manually 4 R Removing DrivePass 64 Removing Files from Sync 53 Restoring Files...

Page 97: ...assword 67 Removing DrivePass 64 Unlocking Your OneTouch Drive 60 Using Folder Encryption 72 Changing Your Folder Encryption Password 85 Creating an Encrypted Folder 73 Deleting an Encrypted Folder 81...

Reviews: