


LIFT CORPORATION
Sht. 4 of 10 DSG#
M-16-05
Rev.
A
Date: 01/16/17
© MAXON Lift Corp. 2017
VIEW OF VEHICLE BODY & RH COLUMN
FIG. 4-1
1/8”
2 WELDS MIN,
MORE IF POSSIBLE
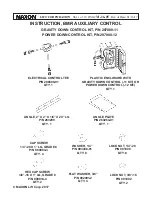
1.
Measure and mark 10” from the RH
column and 2” in from the edge of
the vehicle. Then position the angle
(Kit item) to crossmembers of vehicle
body
(FIG. 4-1)
.
`
Recommended practices for welding on steel parts are contained in the current AWS
(American Welding Society) D1.1 Structural Welding Code - Steel. Damage to Liftgate
and/or vehicle, and personal injury can result from welds that are done incorrectly.
WARNING
!
2.
Weld the angle to the truck/trailer crossmembers
(FIG. 4-1)
.
3.
Bolt the angle plate (Kit item) to angle
(FIG. 4-2)
.
CROSSMEMBER
RH COLUMN
HEX CAP SCREW, 3/8”-16
(2 PLACES)
FLAT WASHER, 3/8”
(2 PLACES)
LOCK NUT, 3/8”-16
(2 PLACES)
ANGLE PLATE
BOLTING ANGLE PLATE TO ANGLE (RH COLUMN SHOWN)
FIG. 4-2
10”
2”
2”X2” ANGLE
2”X2” ANGLE


