background image

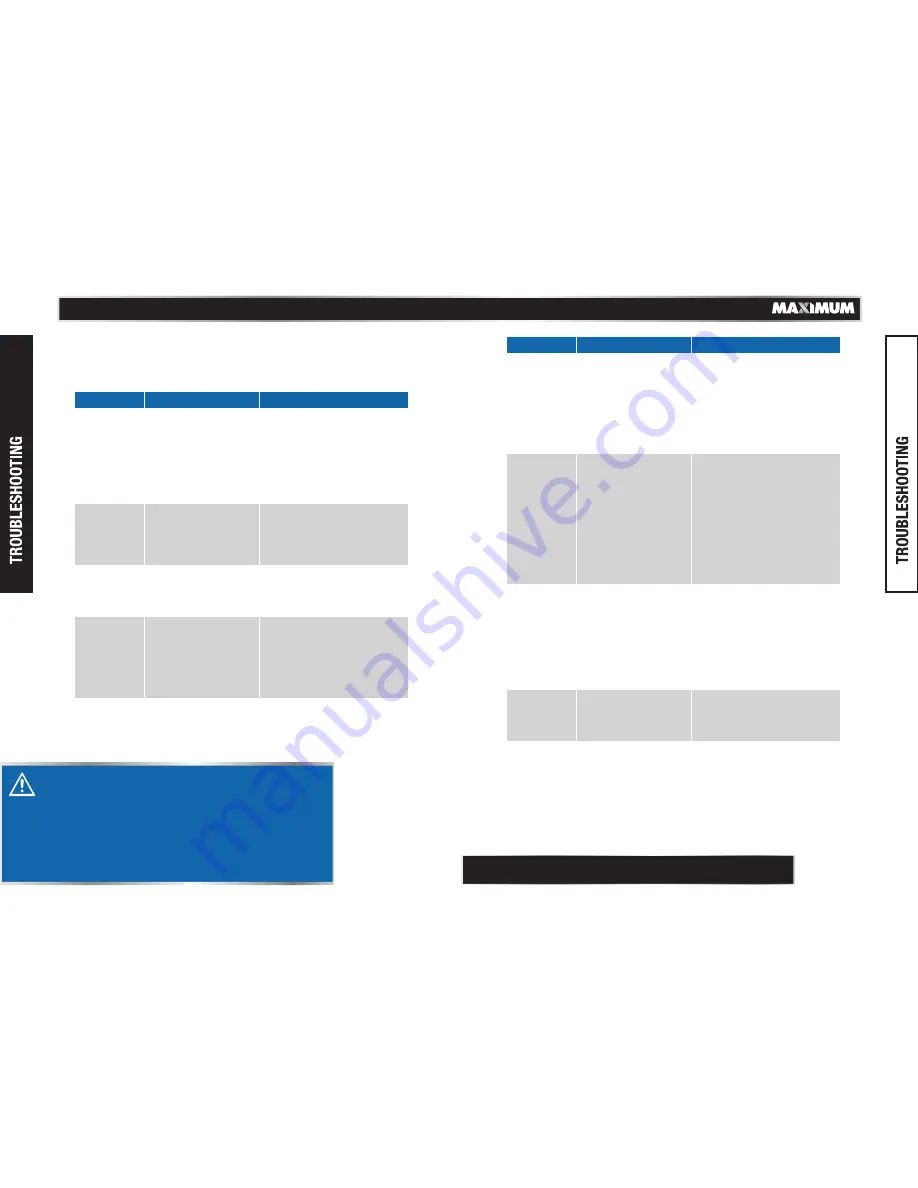
PROBLEM

POSSIBLE CAUSES

SOLUTIONS

Air leakage at 

the top of the 

tool or in the 

trigger area.

Have the tool serviced by a 

qualified service technician.

Have the tool serviced by a 

qualified service technician.

Have the tool serviced by a 

qualified service technician.

Air leakage 

between the 

bottom and 

the cylinder 

cap.

O-rings in the trigger 

valve are damaged.

The trigger valve 

heads are damaged.

Trigger valve stem, 

seal, or O-rings are 

damaged.

1.

2.

3. 

The air supply is 

inadequate.

Lubrication is 

inadequate.

The O-rings or seals 

are worn or damaged.

The exhaust port in 

the cylinder head is 

blocked.

1.

2.

3.

4. 

The screws are loose.

The O-rings or the 

bumper are worn or 

damaged.

1.

2. 

The screws are loose.

The O-rings or the 

seals are worn

or damaged.

1.

2. 

The bumper is worn.

The air pressure is

too high.

1.

2. 

Tighten the screws.

Inspect and replace the 

O-rings or the bumper.

1.

2. 

Tighten the screws.

Inspect and replace the 

O-rings or the seals.

1.

2. 

Replace the bumper.

Adjust the air pressure.

1.

2. 

Inspect and replace the 

O-rings.

Inspect and replace trigger 

valve heads.

Inspect and replace the 

trigger valve stem, seal, or 

O-rings.

1.

2.

3. 

Note: 

For further repair information, please call 1-888-670-6682.

Air leakage at 

the bottom of 

the tool.

The nails are 

being driven 

too deep.

PROBLEM

POSSIBLE CAUSES SOLUTIONS

The tool does 

not operate 

properly–it 

does not drive

the nail or 

operates

sluggishly.

Have the tool serviced by a 

qualified service technician.

The tool skips 

a nail.

The bumper is worn or 

the spring is damaged.

There is dirt in the 

front plate.

Nails cannot move 

freely in the magazine 

because of dirt or

damage.

The O-ring on the 

piston is worn or dry 

or there is not enough

lubrication.

The cylinder cover 

seal Is leaking.

  
Have the tool serviced by a 

qualified servicetechnician.

The tool jams.

Improper nails are 
used or nails are 
damaged.
The drive guide is 
damaged or worn.
The magazine screw 
is loose.
There is dirt in 
magazine.

See “Clearing a Jammed Nail.”

Air exhaust is 
being directed 
towards the
operator.

The direction of the air 

deflector requires 

adjustment.

Direct the air deflector away 

from the operator.

DANGER!

Potential hazard that will result in serious injury or 
loss of life.

• 

25

24

model no. 058-9345-0 |  contact us 1-888-670-6682

Troubleshooting 

• 

• 

The following chart lists common issues and solutions. Please read it 
carefully and follow all instructions closely.

If any of the following symptoms appear while the tool is in use, 
turn it off and disconnect it from the air supply immediately. 
Failure to comply will lead to serious injury or loss of life.
Disconnect the tool from the air supply before making any 
adjustments.

Repairs  must  be  performed  by  a  qualified  service  technician 

only.

TM

1.

2.

3.

4.

5. 

1.

2.

3.

4.

Verify that the air supply is 

adequate.

Pour up to 6 drops of oil into

 the air inlet.

Inspect and replace O-rings

or seals.

Replace the damaged 

internal parts.

1.

2.

3.

4. 

Use the proper nails.
Inspect and replace the 
drive guide.
Tighten the magazine.
Clean the magazine.

Replace the bumper or 

pusher spring.

Open the drive channel on 

the front plate.

Clean the magazine.

Replace the O-ring.

Replace the sealing washer.

1.

2.

3.

4.

5. 

1. 
2.
    
3.
4.

Summary of Contents for 058-9345-0

Page 1: ...INSTRUCTION MANUAL Air powered Clipped head Framing Nailer Model No 058 9345 0 IMPORTANT Please read this manual carefully before using this product and save it for reference ...

Page 2: ...all our toll free helpline at 1 888 670 6682 4 5 10 11 14 15 22 24 26 27 28 TABLE OF CONTENTS TECHNICAL SPECIFICATIONS SAFETY GUIDELINES KEY PARTS DIAGRAM TECHNICAL INFORMATION TYPES OF NAILS OPERATING INSTRUCTIONS MAINTENANCE TROUBLESHOOTING EXPLODED VIEW PARTS LIST WARRANTY TM ...

Page 3: ...s 70 110 PSI 4 8 7 5 bar 120 PSI 8 3 bar 0 095 CF cycle 90 PSI 1 4 18 NPT 8 lb 9 oz 3 9 kg SAFETY GUIDELINES These precautions are intended for the personal safety of the user and others working with the user Please take time to read and understand them Cubic Feet the volumetric flow rate of air corrected to standardized conditions of temperature and pressure This manual contains information that r...

Page 4: ...actory for this compressor s maximum pressure Tampering with the pressure switch or the safety valve may cause personal injury or property damage Risk of burns The pump and the manifold generate high temperatures In order to avoid burns or other injuries do not touch the pump the manifold or the transfer tube while the compressor is running Allow the parts to cool down before handling or servicing...

Page 5: ...ing valves of the tool as doing so may cause tool failure Handling and storage of oil Use with adequate ventilation Avoid contact of oil with eyes skin and clothing Avoid breathing spray or mist Store in a tightly closed container in a cool dry well ventilated area free from incompatible substances Potential hazard that may result in moderate injury or damage to equipment Disconnect the tool from ...

Page 6: ...ontrol and added comfort even during extended use a tool free driving depth adjustment for driving nails flush or countersunk into various materials which keeps projects moving additional trigger included to allow advanced bump fire use a rear loading magazine made of extruded aluminum for lighter weight and added durability a 360 air deflector that can be pointed in any direction The hardened claw t...

Page 7: ...or lubricator is not installed place up to 6 drops of compressor oil into the air inlet plug before each use If a filter regulator lubricator is installed keep the air filter clean A dirty filter will reduce the air pressure to the tool which will cause a reduction in power efficiency and general performance For optimal performance install a quick connector to the tool and a quick coupler on the hose ...

Page 8: ...d with a variety of shank types e g ring smooth spiral and a variety of coatings or nail compositions e g electro me chanical hot dipped galvanized or stainless steel etc 2 Take hold of the nailer firmly with one hand and use the other hand to press the sliding pusher 1 on the magazine and slide it back Fig D 1 Disconnect the tool 1 from the air supply 2 Fig C Operation Loading Nails DANGER Potenti...

Page 9: ... so may cause injury to the operators or others apart from damaging the tool Load the correct type of nails only and do not load different sized nails into the magazine as doing so may cause nails to jam Failure to comply could lead to serious injury or loss of life The MAXIMUM Air powered Clipped head Framing Nailer can be operated either in manual or automatic firing mode A black trigger is insta...

Page 10: ...ing materials the nail depth can be adjusted tool free with the depth adjustment dial Fig K Installing the New Trigger Place the new trigger 1 with your thumb holding the spring 2 in place Fig I Align the holes on top of the trigger and the holes on the casing of the nailer Insert the trigger pin 1 through the holes Put it back to where it was removed Fig J Push the O ring back on to the trigger p...

Page 11: ... Drain the compressor tank at least once per day WARNING Potential hazard that could result in serious injury or loss of life Disconnect the air hose from the tool and remove the non jammed nails from the tool before clearing a jammed nail The nails are under pressure and failure to comply could cause them to be fired out of the tool causing serious injury Operate the release latch and pull it back...

Page 12: ...aintain the tools in a warm condition using any safe convenient method Air operated tools must be inspected periodically and worn or broken parts must be replaced in order to keep tools operating safely and efficiently Inspect and replace worn or damaged O rings seals etc Tighten all screws and caps frequently in order to help prevent personal injury Inspect the trigger spring and safety mechanism ...

Page 13: ...per is worn or the spring is damaged There is dirt in the front plate Nails cannot move freely in the magazine because of dirt or damage The O ring on the piston is worn or dry or there is not enough lubrication The cylinder cover seal Is leaking Have the tool serviced by a qualified servicetechnician The tool jams Improper nails are used or nails are damaged The drive guide is damaged or worn The ...

Page 14: ...1 8 O ring 6 4 x 2 O ring 9 x 1 8 Switch spring Switch pipe O ring 2 4 x 1 6 O ring 18 x 2 65 Switch seat Compress spring 2 Adjuster seat Pin 3 x 30 Compress spring 3 Nut Washer 4 Safety shelf Adjust block Safety adjust screw Fixed compress spring Steel ball Hex bolt M6 x 10 Safety nose Safety tip Steel collar Bolt M5 x 10 Gasket 5 Driver guide protector Pin 2 5 x 18 Safety spacer II Trigger Trigg...

Page 15: ...re damage is caused by repairs made or attempted by others i e persons not authorized by the manufacturer and any such unauthorized repairs or attempted repairs shall void this warranty in its entirety FURTHER THE WARRANTIES SET OUT HEREIN ARE IN LIEU OF ALL OTHER WARRANTIES OR CONDITIONS WHETHER EXPRESS IMPLIED OR STATUTORY INCLUDING SUCH AS ARISE UNDER THE SALE OF GOODS ACT OR THE INTERNATIONAL ...

Page 16: ...anding any provision herein or entitlement of the purchaser at law in equity or otherwise in no event shall the liability of the retailer or manufacturer under this warranty whether in contract tort product liability or otherwise exceed in the aggregate the amount paid by the purchaser to the retailer for the product to which this warranty applies Notice to Consumer This warranty gives you specifi...

Reviews: