background image

GENERAL CONTENTS

INTRODUCTION 

PAGE 04

SAFETY RULES AND CAUTIONS 

PAGE 05

DESCRIPTION OF THE MACHINE 

PAGE 06

MACHINE OPERATIONS 

PAGE 07

1

st


STEP: TANK FILLING 

PAGE 

07

2

nd

  STEP: LOWER DRUM FILLING 

PAGE 

07

3

rd


STEP: TURNING ON 

PAGE 

08

STEAM FUNCTION IN MANUAL MODE 

PAGE 

09

BOILER WASHING 

PAGE 

09

4

th 

STEP: HOSE CONNECTION 

PAGE 

10

5

th


STEP: ACCESSORY STARTING 

PAGE 

10

ACCESSORIES EQUIPPED WITH THE MACHINE 

PAGE 11

HANDLE WITH HOSE 

PAGE 

12

MULTIFUNCTION BRUSH 

PAGE 

12

2A 

FITTING FOR LIQUID SUCTION 

PAGE 

12

2B


FITTING FOR CARPETS 

PAGE 

12

2C 

UNIVERSAL FITTING 

PAGE 

12

250 MM.  WINDOW CLEANER 

PAGE 

13

150 MM. NOZZLE 

PAGE 

13

4A 

WINDOW CLEANER FITTING 

PAGE 

13

4B 

BRISTLE FITTING 

PAGE 

13

STEAM NOZZLE ADAPTER 

PAGE 

13

6  EXTENSIONS 

PAGE 13

TANK FILLING BOTTLE 

PAGE 

13

ROUTINE MAINTENANCE 

PAGE 14


MOTOR SUPPORT 

PAGE 

14


FILTER AND SEPARATOR 

PAGE 

14


SPONGE FILTER 

PAGE 

15

TROUBLESHOOTING


PAGE 16

TECHNICAL SHEET 

PAGE 17

SAFETY 

PAGE 17

QUALITY AND SAFETY CHECK  

PAGE 18

WARRANTY COUPON 

PAGE 19

NOTES 

PAGE 20

SPARE O-RING  

PAGE 21

WARNING: Read the present manual before using the appliance.

Summary of Contents for ATHENA 6

Page 1: ...ATHENA USE MANUAL ...

Page 2: ......

Page 3: ...LTIFUNCTION BRUSH PAGE 12 2A FITTING FOR LIQUID SUCTION PAGE 12 2B FITTING FOR CARPETS PAGE 12 2C UNIVERSAL FITTING PAGE 12 3 250 MM WINDOW CLEANER PAGE 13 4 150 MM NOZZLE PAGE 13 4A WINDOW CLEANER FITTING PAGE 13 4B BRISTLE FITTING PAGE 13 5 STEAM NOZZLE ADAPTER PAGE 13 6 EXTENSIONS PAGE 13 7 TANK FILLING BOTTLE PAGE 13 ROUTINE MAINTENANCE PAGE 14 MOTOR SUPPORT PAGE 14 FILTER AND SEPARATOR PAGE 1...

Page 4: ... ECOLOGICAL MACHINE IT DOESN T NEED FILTERS OR BAGS TO BE REPLACED PERIODICALLY AND EXPLOITS THE NATURAL PROPERTIES OF WATER TO ENSURE MAXIMUM HYGIENE AND CLEANLINESS THANKS TO ITS SMALL OVERALL DIMENSION IT CAN BE HANDLED EASILY AND KEPT ANYWHERE WE RECOMMEND READING CAREFULLY THIS MANUAL TO DISCOVER ALL ATHENA FEATURES AND POTENTIALITIES MOREOVER WE RECOMMEND STRICTLY FOLLOWING THE ADVISES AND C...

Page 5: ...tions To disconnect the device pull only the plug never the cable Be careful that the supply cable does not touch hot surfaces Never use the device if the feeding cable or its other important parts are damaged for example safety devices high pressure flexible tubes handle with controls To avoid any risks of being electrocuted do not disassemble it Avoid connecting more powerful household appliance...

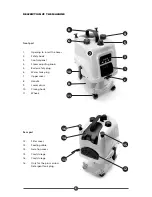
Page 6: ... Steam adjusting knob 5 Boiler safety plug 6 Water tank plug 7 Upper cover 8 Handle 9 Lower drum 10 Closing hook 11 Wheels Rear part 12 Filter cover 13 Feeding cable 14 Aeration cover 15 Cord storage 16 Cord storage 16 Only for the plus version Detergent tank plug 14 16 15 12 1 2 3 4 5 6 7 8 9 10 11 13 ...

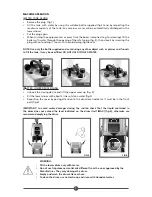
Page 7: ...ill the tank It may be overfilled DO NOT USE DISTILLED WATER 2nd STEP LOWER DRUM FILLING Unhook the closing device and lift the upper cover up fig 4 Fill the lower drum with about 2 litres of clean water fig 5 Reposition the cover by paying attention to the drum level indicator It must be in the front part fig 6 IMPORTANT to avoid motor damages during the suction check that the liquid contained in...

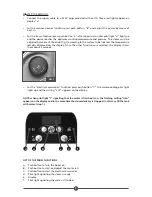
Page 8: ...ay Once the other functions are selected the display shows them about 5 seconds For the electrical accessories function press push button C the corresponding pilot light lights up and the writing aCC appears on the display NOTE when pilot light f signalling that the water is finished is on the flashing writing H2o appears on the display and in the meantime the steam delivery is stopped In this cas...

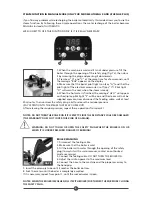
Page 9: ...eding cable wait at least 20 minutes then unscrew the safety plug a bit to release the residual pressure PAY ATTENTION TO THE STEAM THAT MAY COME OUT After releasing the residual pressure repeat these operations from point 1 NOTES DO NOT TURN THE BOILER ON IF IT IS EMPTY SINCE THE RESISTANCE COULD BE DAMAGED THE WARRANTY DOES NOT COVER THIS KIND OF DAMAGE WARNING DO NOT TOUCH OR OPEN THE SAFETY PL...

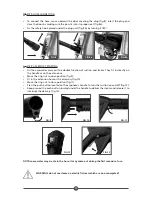
Page 10: ...ndle or on the extensions Move the ring nut to open position fig 9 Fit in the extension hose or the accessory fig 10 Move the ring nut to close position fig 11 Press the push button located on the ergonomic handle to turn the suction on and off fig 12 Keep pressed the push button located under the handle to deliver the steam and release it to interrupt the delivery fig 13 NOTE some water may creat...

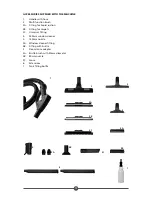
Page 11: ...iquid suction 2B Fitting for carpets 2C Universal fitting 3 250mm window cleaner 4 150mm nozzle 4A Window cleaner fitting 4B Fitting with bristle 5 Steam lance adapter 5A Bristle brush with 30mm diameter 5B 80mm nozzle 5C Lance 6 Extensions 7 Tank filling bottle 2B 2C 2A 4B 4A 5B 5A 5C 1 2 6 4 3 7 5 ...

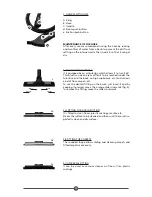
Page 12: ...he beds on high cupboards etc and various kind of floor carpets etc To use the desired fitting on the brush just insert it and by keeping it pressed move the orange sliders inwards fig 2 To remove the fitting move the sliders outwards 2A FITTING FOR LIQUID SUCTION It is fitted to clean floors plastic coatings marble etc Steam the surface to be cleaned and then suck the result is a perfectly clean ...

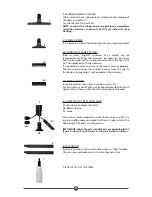
Page 13: ...We recommend using the window cleaner from the top to the bottom by keeping it well pushed on the window 4B BRISTLE FITTING It can be used to clean sofas armchairs seats etc For a correct use steam and suck by keeping pressed the brush against the surface so that the dirt can be easily removed 5 ADAPTER FOR THE STEAM LANCE 5A Bristle brush diameter 30mm 5B 80mm nozzle 5C Lance Particularly recomme...

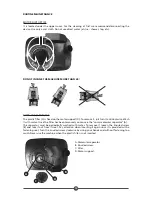
Page 14: ... anticlockwise Wash it with water Once the filter has been removed you can see the conic molecular separator A This separator must be periodically washed with water To remove it loosen the knurled screw B and take it out from its seat Pay attention when inserting it again since it is provided with a fastening seat Turn the knurled screw clockwise by using your hands and without fastening too much ...

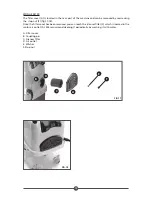
Page 15: ... the stop nut F fig 17 18 Once the filter cover has been removed you can reach the silencer filter C which is located in the motor air outlet D We recommend cleaning it periodically by washing it with water A Filter cover B Coupling pin C Silencer filter D Air outlet E Washer F Stop nut FIG 18 FIG 17 E F A C B D ...

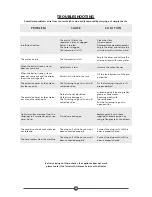
Page 16: ...stening ring nut is not in its correct position Fix the fastening ring nut in its proper position The extension hoses or the accesso ries are not coupled easily Gaskets are not lubricated Gaskets are damaged The fastening ring nut is not in its correct position Lubricate gaskets by using teflon grease or hand cream Replace gaskets with those supplied Put the fastening ring nut in open position Lig...

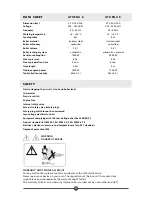
Page 17: ...ng the circuit at tank and boiler level Thermostat Pressure switch Engine fuse Internal safety valve External safety valve safety plug Safety plug which cannot be unscrewed Low voltage electrical controls Equipment complying with the Low Voltage directive 2006 95 EC Product standards EN 60335 1 EN 60335 2 2 EN 60335 2 79 Electrical electronic pressure and temperature safety EEC standards Degree of...

Page 18: ...ization and recycling take these products to the collecting points where they are accepted free Alternatively in some Countries the products could be given back to the local dealer when purchasing another equivalent product A correct disposal of this product will allow saving precious resources and avoid possible negative effects on the human health and on the environment For further details conta...

Page 19: ...19 WARRANTY COUPON DEALER STAMP DATE OF SALE WARRANTY COUPON DEALER STAMP DATE OF SALE ...

Page 20: ...20 NOTES NOTES ...

Page 21: ...21 O RING VITON 20 31 O RING VITON 20 21 GREASE GREASE i 16 ...

Page 22: ......

Page 23: ......

Page 24: ......

Reviews: