


MAULE AEROSPACE TECHNOLOGY, INC.
MAINTENANCE MANUAL
FOR
M-4-180V
11
Rev. A
4/13/16
5. Open zippers in headliner and inspect all control cables, pulleys,
fairleads and electrical connections and wires for security and chafing.
6. Remove wing root fairings and inspect control cables, fairleads, fuel
lines and connections, and electrical wires and connections for
security, chafing and leaks.
7. Remove wing strut fairings, top and bottom, and inspect attaching
fittings and bolts for security, corrosion and cracks. Carefully inspect
both sides of lift struts for abrasion, corrosion, pin holes and punctures.
Any paint loss or minor corrosion should be sanded down to bare
metal with fine sandpaper and metal primer should be applied. After
the primer is dried, a finish coat of the desired color may be added.
Powder coating is recommended if complete strut is being refinished.
NOTE: Sealed lift strut were installed on this aircraft during
manufacturing and are identified by two weld spots located at upper
end.
WARNING: Any unrepairable dents or punctures in strut are cause for
replacement of the strut.
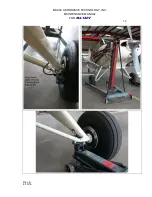
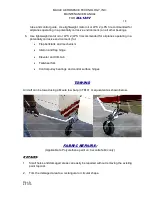
8. Remove wheels and inspect wheels, tires, brake disc, bearings, brake
lines and brake pad for wear, cuts, chafing, leaks and general
condition. Repack wheel bearings. (See page 12 for jacking
information)
9. Remove landing gear top fairings and inspect attaching fittings and
bolts for security, corrosion and cracks and inspect brake hose for
security, chafing and leaks.
10. Check resilience of oleo springs. A lax spring is indicated by a low
wing condition when the airplane is on the ground, or the
measurement between the inside faces of the brake caliper mount
rings exceeds 67 inches for an empty airplane, or 68 inches for one
with full fuel.
CAUTION: Use Steps 9 and 10, above as a guide for inspection after
an unusually hard landing or any time there is concern about the
condition of the main landing gears or their attachments.
11. If a lax oleo spring is suspected, disassemble subject oleo strut and
measure the free height of the spring. Less than 6 1/4 inch is
unacceptable.
12. Check fluid level in landing gear oleo struts. Fill to overflowing (no air).
13. Remove all inspection covers (includes 9 each inspection covers in
bottom side of left wing, 8 each inspection covers in bottom side of
right wing and 1 each in top side of each wing) and inspect all visible
control cables, pulleys, bellcranks, electrical wires and connections,
fuel lines and fittings, nuts, bolts, etc. for security, chafing, leaks, etc.
(See inspection cover locations in tail on page 13)