


44
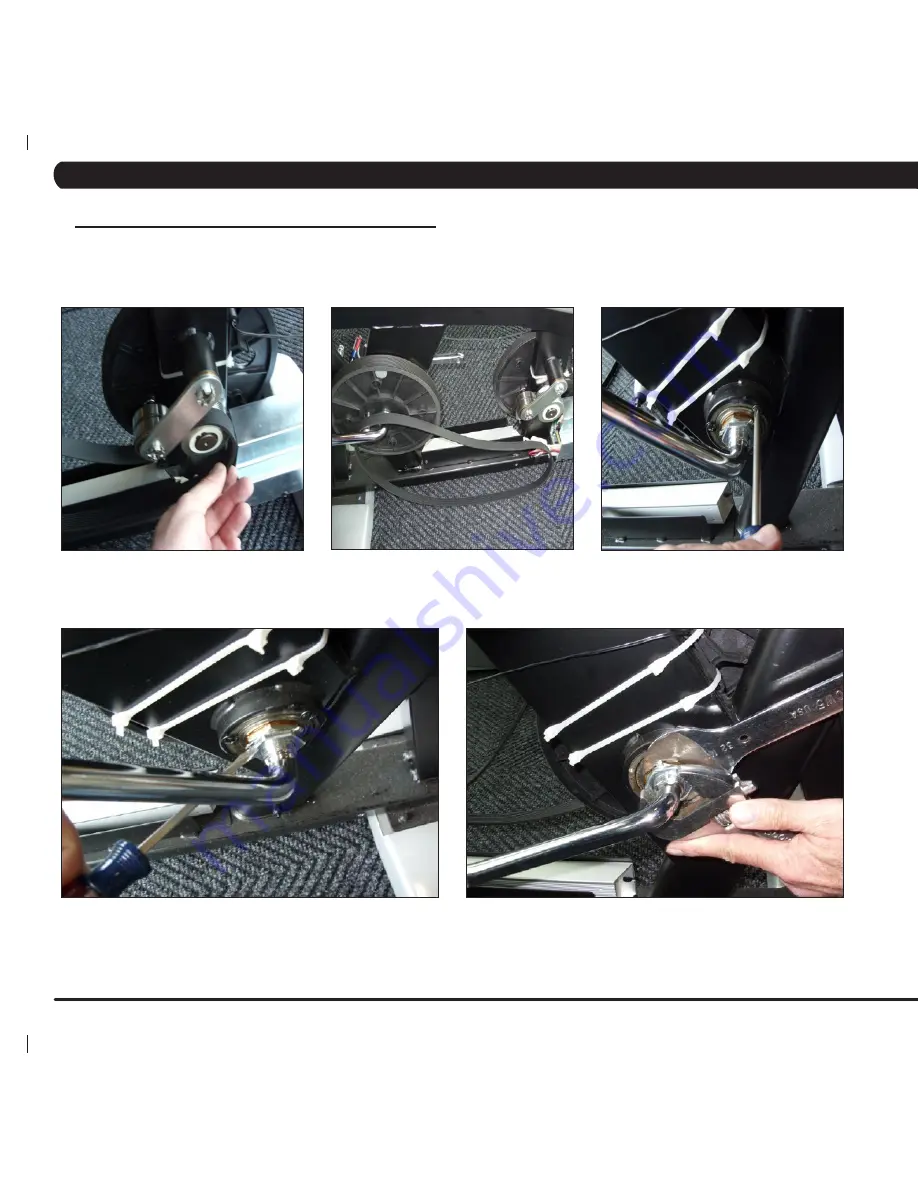
8.17 CRANk Axle SeT RePlACeMeNT
1) Remove the shrouds as outlined in Section 8.11.
2) Pull up on the tension assembly and walk the drive belt off of the pulley (Figure A).
3) Remove the drive belt (Figure B).
4) Remove the 3 screws holding the crank axle bearings in place on both sides (Figure C).
5) Bend the tabs of the nut on the left side of the frame so that this nut will turn (Figure D).
6) Use a 32 mm wrench to remove the crank axle nuts (Figure E).
note:
This nut is reverse threaded.
7) Once the nuts are removed, the crank axle can be removed from the frame from the right side.
8) Reverse Steps 1-7 to install a new crank axle set.
9) Test the bike as outlined in Section 8.20.
figURe A
figURe B
figURe C
figURe D
figURe e
CHAPTeR 8: PART RePlACeMeNT gUiDe
Summary of Contents for U5X-02
Page 1: ...U 5 x 0 2 B i k e S E R V I C E M A N U A l...
Page 2: ......
Page 6: ...2 1 1 Serial Number Location Chapter 1 Serial number location console serial number location...
Page 18: ...14 Chapter 7 TROUBLESHOOTING 7 1 Electrical Diagrams...
Page 19: ...15 7 1 Electrical Diagrams Chapter 7 Troubleshooting...
Page 20: ...16 Chapter 7 TROUBLESHOOTING 7 1 Electrical Diagrams...
Page 56: ...52 9 3 ASSEMBLY INSTRUCTIONS CONTINUED Chapter 9 bike specifications and assembly guide Step 5...
Page 61: ...57 NOTES...


