Matrix MW402 Manual For Installation, Use And Maintenance Download Page 20

20

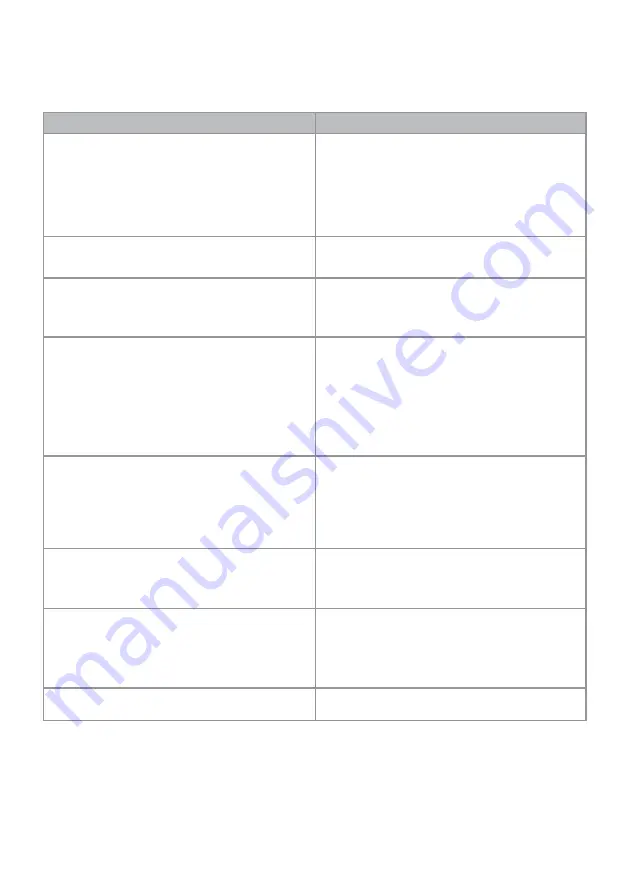
Failure Codes and Troubleshooting


Problem

Possible cause

The programme will not start.

Check the plug, fuse and circuit breakers of the 

mains supply.

The water tap is turned off.

The dishwasher door is not fully closed.

The water inlet filter or the machine filters are 

blocked.

Water remains inside the dishwasher at the end of a 

programme.

The water drain hose is blocked or kinked.

The filters are blocked.

The dishwasher stops in the middle of a programme.

Power failure.

Water inlet failure.

Programme is on standby.

Wash performance is of a low standard.

Poor loading of dishes hinders wash performance.

Insufficient detergent added.

Inappropriate wash programme selected.

Spray arm is blocked.

Filters clogged or incorrectly fitted.

Water drain pump is blocked.

White stains on the dishes.

Insufficient detergent added.

Rinse aid setting is too low.

Insufficient dishwasher salt added.

Water softener setting is too low.

Salt compartment cap may not be completely closed.

The dishes are not completely dry at the end of a 

programme.

A programme without a drying stage was selected.

Rinse aid setting is too low.

Dishes unloaded too soon (allow time for drying).

There are rust stains on the dishes.

Different sets of cutlery should be kept separate.
Too much salt (water softener setting is too high).

Salt compartment cap not completely closed.

Poor appliance earth (check mains electrical supply). 

The door is not opening or closing properly.

Door tension not correctly adjusted for the decor 

door.

Summary of Contents for MW402

Page 1: ...Integrated Dishwasher MW402 parts 1 year labour year guarantee www matrixappliances co uk Manual for installation use and maintenance...

Page 2: ...a programme 9 Cancelling a programme 9 Detergent 10 Salt 11 Softener adjustment 12 Rinse aid 14 Dishwasher baskets 15 Standard loading and test data 16 Programme listing 17 Care and maintenance 19 Fa...

Page 3: ...ns for best loading practice and also to ensure that sharp objects such as knives are placed blade down to prevent accidents Do not open the dishwasher door when a programme is running If it is necess...

Page 4: ...he hazards involved Children shall not play with the appliance Cleaning and user maintenance shall not be made by children without supervision The CDA Group Ltd cannot be held responsible for injuries...

Page 5: ...duct must be taken to a special local authority waste collection centre or to a dealer providing appliance recycling services Disposing of a household appliance separately avoids possible negative con...

Page 6: ...button 1 To switch the dishwasher on or off press the Power button 1 When you switch on the dishwasher the End of Programme light will illuminate and two dashes will appear on the display Programme S...

Page 7: ...Programme light will be switched on Press the Programme Selection button until the required programme is shown on the indicator lights Once a programme is selected the End of Programme light will swi...

Page 8: ...the door slightly to reduce the risk of water spillage Press and hold in the Programme Selection button until the End of Programme indicator flashes Close the door The dishwasher will run a drain cyc...

Page 9: ...ents designed specifically for use in dishwashers If using dishwasher tablets always use the detergent compartment do not put them in the main body of the dishwasher or in the cutlery basket The solub...

Page 10: ...on of the programme As a result it is recommended that powder detergents should be used in the shorter programmes to allow better performance CDA recommends the use of separate detergent rinse aid and...

Page 11: ...o ensure best efficiency the dishwasher is equipped with a system that reduces the hardness in the mains water supply The efficiency will increase when the system is correctly set To find out the wate...

Page 12: ...flash To adjust the level press the Programme Selection button until the required level is shown on the display The Programme lights will illuminate as in the table below To store the selected water...

Page 13: ...ed with food debris dirt etc increase the rinse aid level If blue stains appear on your dishes decrease the rinse aid level Always refill the rinse aid when the rinse aid indicator light on the contro...

Page 14: ...r Baskets To adjust the height of the upper basket Open the basket retaining clips Fig 9 turning them to the side Remove the upper basket and relocate the alternate set of wheels on the runner Fig 10...

Page 15: ...er basket should be adjusted to high position Cups should be placed onto the dish rack pins Detergent Rinse aid 5 25cm3 in accordance with EN50242 DIN 44990 IEC436 international norms Rinse aid dosage...

Page 16: ...ronmental temperature Laboratory measured value in accordance with European standard EN50242 Reference programme is ECO 50 Programme name and temperature Intensive 65 Express 65 Eco 50 Prewash Level o...

Page 17: ...y residues Filters You should clean the filters at least once a month Remove the lower basket Turn the micro filter anticlockwise and then lift it out Fig 13 Remove the coarse filter from the micro fi...

Page 18: ...To remove the upper spray arm first remove the nut on the upper spray arm by turning it You should clean and rinse the spray arms thoroughly before replacing them Ensure that the upper spray arm nut i...

Page 19: ...clean the filter Restart your machine contact Customer Care if the error resumes Continual fill error Close the tap and contact Customer Care The waste water in the machine cannot be discharged Drain...

Page 20: ...priate wash programme selected Spray arm is blocked Filters clogged or incorrectly fitted Water drain pump is blocked White stains on the dishes Insufficient detergent added Rinse aid setting is too l...

Page 21: ...ace fuse cover Important Do not use the appliance without the fuse cover in position How to connect an alternative plug If the fitted plug is not suitable for your socket outlet then it should be cut...

Page 22: ...d BLACK or BLUE The wire which is coloured BROWN must be connected to the terminal which is marked with the letter L or coloured RED or BROWN If in doubt regarding the electrical connection of this ap...

Page 23: ...re the appliance is level by adjusting the feet as necessary Problems with the level seating of the appliance can lead to issues with the door opening and closing Only use the water inlet supplied wit...

Page 24: ...used to secure this connection Observe the 150mm mini mum height distance between the spigot and drain hose support as per fig 15 The drain hose support fig 16 must be secured at a minimum of 60cm and...

Page 25: ...to fit the appliance into the cabinet secure it and fit and secure the decor door Adjust the dishwasher door hinge tension as necessary to ensure the appliance door opens and closes properly and safe...

Page 26: ...tions should be followed as normal However the fitting template needs to be located lower down the fascia door This is shown below The amount of offset Y depends upon the height of the fascia door and...

Page 27: ...258 kwh per year based on 280 standard cleaning cycles using cold water fill and the consumption of low power modes Actual energy consumption will depend on how the appliance is used Water consumptio...

Page 28: ...erviced by The CDA Group Ltd Harby Road Langar Nottinghamshire NG13 9HY Tel 01949 862012 Fax 01949 862003 Email customer care cda eu For our Customer Care Department or for Service please contact us o...

Reviews: