background image

11

Matrix SARVAM UMG Quick Start

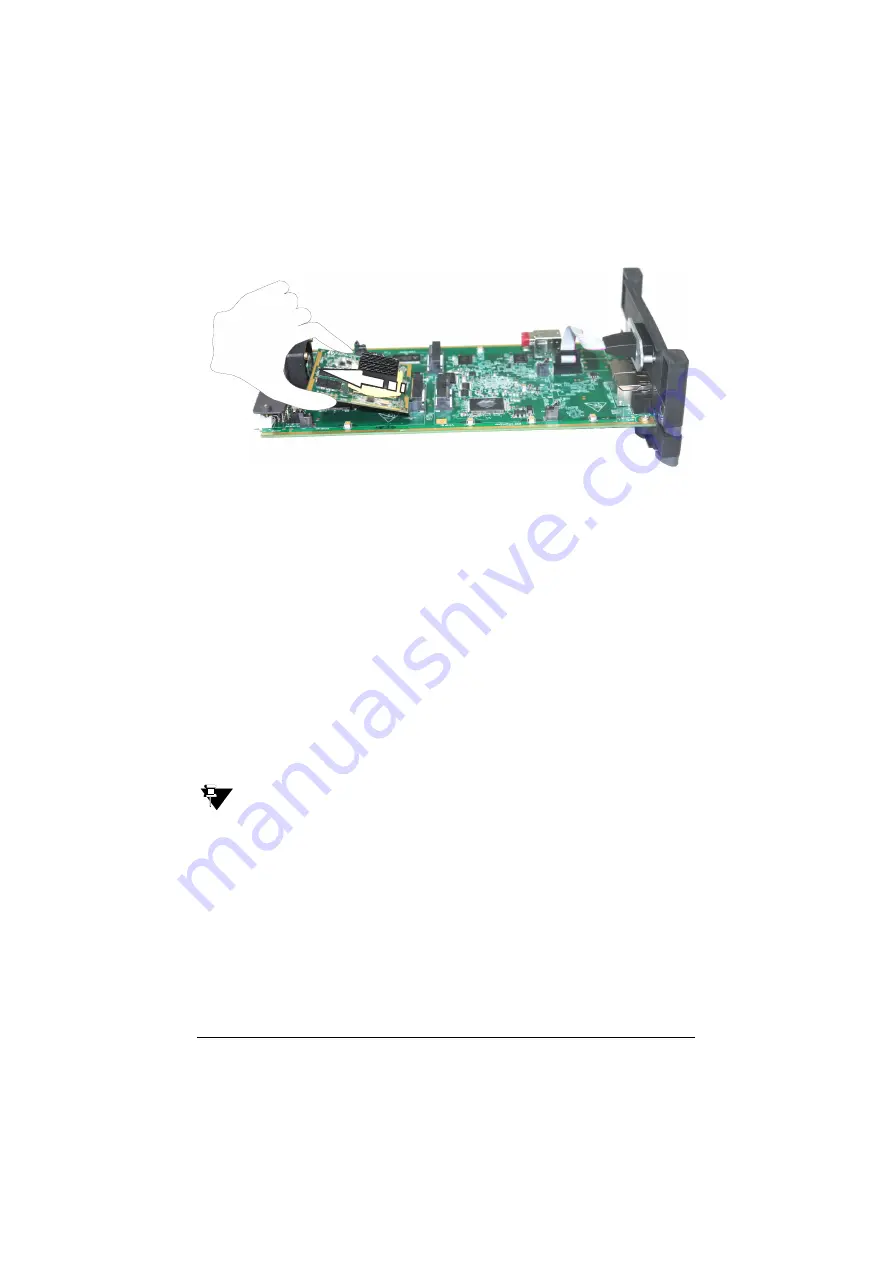
• Firmly hold the module and ease it out of the PCI connector carefully.

Installing SLT and CO Cards

• Unpack the SLT and/or CO cards. Remove the filler brackets of the universal slots and insert 

the cards. 

• Plug the MDF cables provided with each card into the connectors of the cards. 

• Terminate the free ends of the MDF cables from the card connectors into the Krone modules 

of the Main Distribution Frame. Refer the cable connections given in the 

“Appendix”

 for 

terminating the cables into the Main Distribution Frame. 

• Connect Single Line Analog Telephone instruments to the SLT ports over the MDF. 

• Connect Two Wire Trunk (Analog Trunk) lines to the CO ports over the MDF.

The CO Card supports Power Fail Transfer (PFT). Refer to the topic Power Fail Transfer in the SARVAM 
UMG System Manual for details.

Summary of Contents for SARVAM UMG

Page 1: ...SARVAM UMG Quick Start ...

Page 2: ...SARVAM UMG The Universal Media Gateway Quick Start ...

Page 3: ...very precaution has been taken in the preparation of this quick start Matrix Comsec assumes no responsibility for errors or omissions Neither is any liability assumed for damages resulting from the use of the information contained herein Neither Matrix Comsec nor its affiliates shall be liable to the purchaser of this product or third parties for damages losses costs or expenses incurred by the pu...

Page 4: ... Start 5 Installing the VOCODER Module 7 Removing the VOCODER Module 10 Installing SLT and CO Cards 11 Installing the BRI Card 12 Installing Mobile Card 17 Installing the T1E1PRI Card 21 Switching ON the system 24 Configuring ETERNITY GENX 25 Configuring SARVAM UMG 28 Activating License Key 30 Appendix 43 Cable Diagram for ETERNITY GENX Cards 43 ...

Page 5: ...The SARVAM UMG application when run on the ETERNITY GENX Platform acts as an IP based system providing value added voice services The system enables you to route calls from the Source port to the Destination port using Destination Number Determination and Destination Port Determination methods It also offers a robust SIP Stack which gives a thorough interoperability and usability with various SIP ...

Page 6: ...verview The Enclosure Firmware Version V1R3 and earlier The enclosure of ETERNITY GENX has fixed and universal slots The fixed slots are occupied by specific factory fitted cards ETERNITY GENX has 12 universal slots If you upgrade the system firmware to V1R4 the Expansion Slots license will be applicable for the universal slots No universal slots will be functional by default You must purchase the...

Page 7: ...e will provide the activation for next four universal slots in sequence For details see Expansion Slots topic under License Management in the System Manual Inside the enclosure of ETERNITY GENX are slot connectors located on the motherboard on the backplane of the enclosure Each slot has guide rails for inserting the cards Illustrated below is the design of the enclosure and the position of the sl...

Page 8: ...Matrix SARVAM UMG Quick Start 4 BRI BRI interface TE NT to connect BRI lines T1E1PRI T1E1 interface to connect T1 and E1 lines Card Type Description ...

Page 9: ...e provider network and the extension lines from the phones into the Main Distribution Frame The Cards of ETERNITY GENX as required One or more Single Line Telephone for testing Power supply The ETERNITY GENX works with input voltages ranging between 100 240VAC or with 48VDC Arrange for a separate power point and switch close to the system Power supply for the system must be separate from other hea...

Page 10: ...rs faulty electric chokes of tube lights device having a faulty coil to avoid electromagnetic effect For detailed instructions refer to the System Manual Unpack the system Make sure that your package contains all the below items If any item is missing or damaged please contact the source from where you have purchased the system ETERNITY GENX1 Two cables with RJ45 connectors on both ends 3 pin Powe...

Page 11: ...ocoder Channels You must purchase the modules separately The system provides 4 pre activated Vocoder channels by default which can be used after installing NX DBM VOCODER64 module If you require more channels you can purchase the licenses accordingly Matrix provides two licenses SARVAM VOCODER CHNL4 and SARVAM VOCODER CHNL16 If you require more than 64 Vocoder channels you can install another NX D...

Page 12: ... card As the card emerges from the slot ease it out of the slot Place the card carefully on a table with some packing underneath it Avoid any physical contact with the PCB part of the card as this could cause Electrostatic Discharge ESD and may damage the hardware The NX DBM VOCODER64 Module is to be mounted on the CPU board Locate the PCI Connector and PCI Latch on the main board PCI Connector PC...

Page 13: ... PCB area Insert the NX DBM VOCODER64 Module into the PCI Connector socket Press the Module with a finger to fix the latches perfectly into the mounting holes Make sure you do not touch the PCB area of the module except the yellow line provided for grounding at the front end of the module Do not apply excessive pressure ...

Page 14: ...0 Removing the VOCODER Module Locate the NX DBM VOCODER64 Module you want to remove from the CPU Card Press both the latches together Make sure you support the base of the latches from behind with your thumbs NX DBM VOCODER64 Module ...

Page 15: ...s Terminate the free ends of the MDF cables from the card connectors into the Krone modules of the Main Distribution Frame Refer the cable connections given in the Appendix for terminating the cables into the Main Distribution Frame Connect Single Line Analog Telephone instruments to the SLT ports over the MDF Connect Two Wire Trunk Analog Trunk lines to the CO ports over the MDF The CO Card suppo...

Page 16: ...iguration tool Jeeves Under Basic Settings click the BRI Port link click the desired port number and under General Parameters set the Orientation Type Depending on the installation and configuration scenario Termination Resistance of 100 should be inserted Inserting Termination Resistance on the BRI Port Termination Resistance should be inserted in the following cases 1 When the BRI Port is config...

Page 17: ...e position described below By default the Jumpers are set in AB position Feeding Power to Terminal Equipment When the BRI Port of the ETERNITY GENX is used as BRI NT you can feed power to the terminal equipment connected to the BRI NT Port from the ETERNITY GENX Power can be fed through Tx and Rx wires or through a separate pair of wires To Feed Power you must access the Web based configuration to...

Page 18: ... configured in the NT mode But the maximum power that can be fed to a single BRI Port is 50mA So connect ISDN Terminals to the BRI Port according to the power consumed by them which together do not exceed 50mA Insert the BRI card in any free Universal Slot and secure the card Use the cable supplied for each connector on the BRI card to connect the BRI Ports to the NT1 device supplied by your ISDN ...

Page 19: ...in NT Mode Pin Number Pin Details 3 Rx1 4 Tx1 5 Tx2 6 Rx2 Pin Number Signal Color 1 Orange White 2 Orange 3 TX A Green White 4 RX_A Blue 5 RX_B Blue White 6 TX_B Green 7 VOUT Brown White 8 VOUT Brown Pin Number Signal Color 1 Orange White 2 Orange 3 RX A Green White 4 TX_A Blue 5 TX_B Blue White 6 RX_B Green 7 VOUT Brown White 8 VOUT Brown ...

Page 20: ...om the application on the BRI Port For example if the current LED state is Green Red ON on the next command received the LED will be turned OFF It will remain OFF until the next com mand is received When the next command is received it will be turned Green Red ON again This process continues Events to Application from BRI Port Red Toggleb at each event b Same as above note ISDN Network Power 4 5 3...

Page 21: ...ng down into the SIM holders on the GSM Card Refer to the illustration given below If you do not want to use PIN protection insert the SIM in the mobile handset and disable PIN protection Failure to follow the instructions on PIN protection may cause your SIM Card to be blocked and you will require Personal Unblocking Number PUK to reactivate it again ETERNITY GENX support both types of Mobile Car...

Page 22: ...this value in SIM PIN for the Mobile Port using Jeeves For detailed instructions see Mobile Port in the System Manual If the wrong SIM PIN is entered thrice in a row by a user the SIM Card suspects the user and asks for the Personal Unlock Keyword PUK If you don t want to use PIN Protection Insert the SIM in the Mobile handset and disable PIN Protection Remove the SIM card from the Mobile handset ...

Page 23: ...again and release it Now insert the Mobile card in any of the free Universal slots and secure it Make sure you configure this value in SIM PIN for the Mobile Port using Jeeves For detailed instructions see Mobile Port in the System Manual If the wrong SIM PIN is entered thrice in a row by a user the SIM Card suspects the user and asks for the Personal Unlock Keyword PUK The Mobile cards with SIM H...

Page 24: ...n Continuous On Module Initialization Orange 200ms On 200ms Off 200ms On 200ms Off 200ms On 200ms Off 200msOn 200ms Off 200ms On 1200ms Off 5 Blinks PUK required Orange 200ms On 200ms Off 200ms On 200ms Off 200ms On 200ms Off 200msOn 1600ms Off SIM PIN faulty Orange 200ms On 200ms Off 200ms On 200ms Off 200ms On 2000ms Off 3 Blinks SIM Absent Orange 200ms On 200ms Off 200ms On 2400ms Off 2 Blinks ...

Page 25: ...o set 100 termination resistance for T1 connectivity set jumper J5 to AB position LED indication on ETERNITY GE Card T1E1PRI The ETERNITY GE T1E1 Card has 2 LEDs LED1 and LED2 LED patterns are defined as shown below for different state and signaling as shown below 1 Port Active Mode Signaling Type E1 PRI LED1 Pattern LED2 Pattern Jumper Position Meaning J5 BC To set termination resistance of 120 E...

Page 26: ...00 ms On 500 ms Off LOS Alarm Red Continuous On Port Status Color Cadence Layer 1 established successfully Green Continuous On Y Bit Alarm Green 100 ms On 100 ms Off AIS16 Alarm Red 100 ms On 100 ms Off RAI Alarm Red 500 ms On 500 ms Off AIS or LOS Alarm Red Continuous On Port Status Color Cadence No Alarm Green Continuous On BFA Alarm or MFA Alarm Red 500 ms On 500 ms Off AIS Alarm Red 100 ms On ...

Page 27: ...Matrix SARVAM UMG Quick Start 23 2 Port Disable Mode LED1 Pattern LED2 Pattern Port Status Color Cadence Port Disable Red Continuous On Port Status Color Cadence Port Disable Off Off ...

Page 28: ...ON the system Switch ON the system It takes 2 to 3 minutes for initiation Reset Cycle on ETERNITY GENX On completion of the initialization LED L1 will be turned ON Green continuously and LED L2 will be turned ON Green for 1 sec and OFF for 1 sec ...

Page 29: ...LAN a web browser either Internet Explorer 7 or later or Mozilla Firefox 3 5 1 or later must be installed on the PC If the computer for accessing Jeeves is connected in a LAN Switch and the WAN Port of SARVAM UMG is connected behind a NAT router make sure that both the LAN and WAN connections are in different Subnet Masks To login Open the browser Internet Explorer Mozilla Firefox on the PC Standa...

Page 30: ...ected to the HTTPS protocol for secure access Click the https 192 168 2 100 link on the page The Login page will open In Login Password enter 1234 the default Password Click the Login button On successful login the Home page of Jeeves opens The left navigation bar displays the links Application Selection License Information Status Firmware Management and Debug ...

Page 31: ...u to enable and configure the debug settings Application Selection Through Application Selection you can select the application you wish to run on the ETERNITY GENX Platform In Select an Application you must select the SARVAM UMG option Select the Always start the selected application when system restarts check box to enable The selected application will start whenever the system restarts Keep the...

Page 32: ...User Interface GUI Jeeves for configuration To access SARVAM UMG Jeeves In Login Password enter 1234 the default Password Click the Login button Before you start configuring the system if you wish to download the SARVAM UMG System Manual SARVAM UMG User Card you can click or scan the QR Code present on the login page of Jeeves ...

Page 33: ... 12 characters include atleast one upper case one lower case one number and one special character In Confirm New Password re enter the new password to confirm Click Submit You will be re directed to the Login page again In Login Password enter the new password As this password is meant for restricting access to the SE mode we strongly recommend you to Keep the password secret Select a complex pass...

Page 34: ... upgrading firmware and configuration system debug system restart Status allows you to view the system details and the status of all the ports Activating License Key You must activate the SARVAM UMG SME License to run ETERNITY GENX as the Universal Media Gateway Instructions for Matrix Channel Partners Your license voucher may be a paper or a PDF protected file You may activate your License Online...

Page 35: ...der Advanced Settings click License Management link The License Management page opens Note down or copy the current License Key on this page You can view the features and functions that are currently available to you under Service Profile Keep your Current License Key and the License Voucher ready ...

Page 36: ...Matrix SARVAM UMG Quick Start 32 Open a new window on your browser Enter http www matrixcomsec com MatrixLicense in the address bar Click Login to Access The Login to Access page will open ...

Page 37: ...atrix and click the Login button On successful login the License Activation page will open As Product Family select the option SAPEX In the field Current License Key paste or type the current product license key you noted from the License Management page of Jeeves Click View button ...

Page 38: ...RNITY GENX Click the Next button to continue When ETERNITY GENX is used as the Universal Media Gateway only UMG and Vocoder Channels Licenses are applicable Other licenses are applicable when you run the ETERNITY GENX as the Unified Communication Server The License Activation page opens ...

Page 39: ...35 Matrix SARVAM UMG Quick Start In the License PIN field on this page enter the License PIN from the Voucher ...

Page 40: ...t Variant Click the Next button Your Current License Profile and your New License Profile will appear on this page Click the Activate button and wait for a few seconds as the activation is initiated On successful activation the confirmation message will appear on your screen along with the activation date and time ...

Page 41: ...you A confirmation mail will also be sent to your e mail ID registered with Matrix You may Save Print or Email this information for your records by clicking the relevant button on the bottom of the page Note down or copy the New License Key generated on this page Go back to the Jeeves window or log in as System Engineer again if your session has ended ...

Page 42: ...Matrix SARVAM UMG Quick Start 38 Under Advanced Settings click License Management Paste or enter the new License Key generated in the field Enter License Key Click Submit button ...

Page 43: ... Key or have no internet access contact the Matrix License Support Centre for assistance in generating the new License key Instructions for Customers To activate your License you would need the License Voucher containing the 16 digit License PIN Contact your Dealer Distributor in this regard Your License Voucher may be a paper or a protected PDF file Open Jeeves Log in as System Engineer ...

Page 44: ... down the current License Key on this page You may view the features and functions that are currently available to you under Service Profile Send your Current License Key and the License PIN on the Voucher to the Matrix License Support Centre You will receive a new License Key Open Jeeves again Log in as System Engineer ...

Page 45: ...41 Matrix SARVAM UMG Quick Start Under Advanced Settings click License Management Enter the New License Key you obtained from Matrix in the field Enter License Key Click the Submit button ...

Page 46: ...st for a period of 60 days During the Demo Provision you can access and use all the features and functionalities1 supported by the application If you do not have the license for the SARVAM UMG Application and you do not start the Demo Period the system will allow configuring and making of calls but the connected calls from any port will be disconnected after 60 seconds You may now click the desire...

Page 47: ...and Connectors Port Connector Description LAN RJ45 Used for connecting the Ethernet cable into LAN Port to connect to a PC or a LAN Switch WAN RJ45 Used for connecting the Ethernet cable into WAN Port to connect to a Broadband Router Modem USB For future use COM DB 9 For future use USB L1 L2 LAN WAN COM 10101 ...

Page 48: ...Matrix SARVAM UMG Quick Start 44 ETERNITY GE SLT8 ...

Page 49: ... Green White SLT 03 Brown Brown White SLT 04 RJ45 2 Blue Blue White SLT 05 Orange Orange White SLT 06 Green Green White SLT 07 Brown Brown White SLT 08 RJ45 3 Blue Blue White SLT 09 Orange Orange White SLT 10 Green Green White SLT 11 Brown Brown White SLT 12 RJ45 4 Blue Blue White SLT 13 Orange Orange White SLT 14 Green Green White SLT 15 Brown Brown White SLT 16 ...

Page 50: ...reen Green White SLT 07 Brown Brown White SLT 08 RJ45 3 Blue Blue White SLT 09 Orange Orange White SLT 10 Green Green White SLT 11 Brown Brown White SLT 12 RJ45 4 Blue Blue White SLT 13 Orange Orange White SLT 14 Green Green White SLT 15 Brown Brown White SLT 16 RJ45 5 Blue Blue White SLT 17 Orange Orange White SLT 18 Green Green White Brown Brown White RJ45 6 Blue Blue White SLT 19 Orange Orange ...

Page 51: ...ection H w Port Offset RJ45 1 Blue Blue White CO 01 Orange Orange White 02 Green Green White 03 Brown Brown White 04 RJ45 2 Blue Blue White 05 Orange Orange White 06 Green Green White 07 Brown Brown White 08 CO CO CO CO CO CO CO RJ45 3 Unused RJ45 4 Unused L1 L2 1 2 3 4 ...

Page 52: ...hite 03 Brown Brown White 04 RJ45 Blue Blue White 05 Orange Orange White 06 Green Green White 07 Brown Brown White 08 RJ45 Blue Blue White 09 Orange Orange White 10 Green Green White 11 Brown Brown White 12 RJ45 Blue Blue White 13 Orange Orange White 14 Green Green White 15 Brown Brown White 16 CO CO CO 2 CO CO CO CO 3 CO CO CO CO 4 CO CO CO CO L1 L2 1 2 3 4 ...

Page 53: ... White SLT 05 Orange Orange White SLT 06 Green Green White SLT 07 Brown Brown White SLT 08 RJ45 3 Blue Blue White SLT 09 Orange Orange White SLT 10 Green Green White SLT 11 Brown Brown White SLT 12 RJ45 4 Blue Blue White SLT 13 Orange Orange White SLT 14 Green Green White SLT 15 Brown Brown White SLT 16 RJ45 5 Blue Blue White CO 01 Orange Orange White 02 RJ45 Blue Blue White 03 Orange Orange White...

Page 54: ...Version 1 August 2019 MATRIX COMSEC Head Office 394 GIDC Makarpura Vadodara 390010 India Ph 91 1800 258 7747 E mail Customer Care MatrixComSec com www MatrixTeleSol com ...

Reviews: