background image

36

37

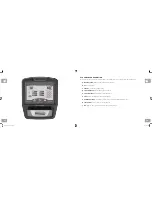
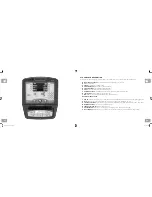
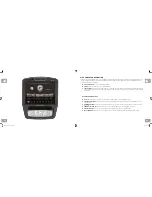
S7XE CONSOLE DESCRIPTION

The S7xe has a fully integrated touch screen display. All information required for workouts is explained on screen. Exploration of the 
interface is highly encouraged. The information explaining how to program for various workouts will give an explanation about the 
contents of each screen on the S7xe. 

A)  QUICK START/GO: 

One Touch Start and Quick Start.

B)  STOP: 

Ends workout and shows workout summary data.

C)  COOL DOWN: 

Puts stepper into Cool Down mode. Cool Down time is dependent on the length of the workout. Workouts 19 

minutes and shorter will have a cool down length of 2 minutes. Workouts 20 minutes and longer will have a cool down length 
of 5 minutes.

S7XE ENTERTAINMENT ZONE

D)  IPOD®:

 Will take the user directly to the iPod screen to allow for iPod control and playlist selection.

E)  VOLUME UP/DOWN: 

Adjusts the volume output through the headphone jack of either add-on TV, integrated console TV 

or iPod output.

F)  NUMBER KEYPAD: 

Allows for easy TV channel selections. These buttons work for either the add-on TV or the integrated 

console TV.

G)  CHANNEL UP/DOWN:

 Allows for channel selection on either the add-on TV or the integrated console TV.

H)  DISPLAY MODE: 

Allows user to cycle through console display options, iPod, TV or profile display.

I)  LAST CHANNEL: 

Allows the user to cycle between the current channel and the previous channel they were viewing.

stepper_om_r1.6.indd   36-37

9/9/11   10:11 AM

Summary of Contents for S3x

Page 1: ...STEPPER OWNER S MANUAL S7xe S7x S5x S3xe S3x stepper_om_r1 6 indd 1 9 9 11 10 11 AM ...

Page 2: ...It is the responsibility of the owner to ensure that all users of this product are adequately informed of all warnings and precautions If you have any questions after reading this guide contact Customer Tech Support at the number listed on the back panel of the OWNER S MANUAL This product is intended for commercial use To ensure your safety and protect the equipment read all instructions before op...

Page 3: ... supply cord or use the cord as a handle Do not use other attachments that are not recommended by the manufacturer Attachments may cause injury Use the unit only as described in the unit guide and owner s manual Disconnect all power before servicing or moving the equipment To clean wipe surfaces down with soap and slightly damp cloth only never use solvents See MAINTENANCE The unit should never be...

Page 4: ...und from one circuit to the next In addition to the dedicated circuit requirement the proper gauge wire must be used from the circuit breaker box to each outlet that will have the maximum number of units running off of it If the distance from the circuit breaker box to each outlet is 100 ft or less then 12 gauge wire may be used For any distance greater than 100 ft from the circuit breaker box to ...

Page 5: ... continues to function with a low battery however user and program information is lost once the user stops If the battery must be recharged use the optional power adapter charging unit The charger should be connected to the Stepper for a minimum of eight hours to ensure a thorough charge After a completion of charge the battery light turns from red into green see illustration If LOW BATTERY still ...

Page 6: ... in the front of the machine near the stabilizer tube Some units have a power switch located next to the power jack Make sure it is in the ON position Unplug cord when not in use NOTE Some units have an ON OFF switch located behind the console WARNING WARNING MOUNTING THE STEPPER 1 Stand behind the unit 2 While holding both of the rear arm handles place one foot on the corresponding footpad Wait u...

Page 7: ... directly over your sternum with the logo facing out NOTE The chest strap must be tight and properly placed to receive an accurate and consistent readout If the chest strap is too loose or positioned improperly you may receive an erratic or inconsistent heart rate readout BACKSIDE OF CHEST TRANSMITTER APPLY MOISTURE HERE LOGO TROUBLESHOOTING MAINTENANCE Heart rate monitoring systems may be inaccur...

Page 8: ... They contain important information If unreadable or missing contact Matrix Fitness Systems for a replacement 1 866 693 4863 www matrixfitness com MAINTAIN ALL EQUIPMENT Preventative maintenance is the key to smooth operating equipment Equipment needs to be inspected at regular intervals Defective components must be replaced immediately Improperly working equipment must be kept out of use until it...

Page 9: ...eem loose and may cause irritating noises To prevent damage to the stepper the assembly instructions must be reviewed and corrective actions should be taken Before proceeding find your unit s serial number located ENTER YOUR SERIAL NUMBER AND MODEL NAME IN THE BOXES BELOW Refer to the SERIAL NUMBER and MODEL NAME when calling for service The console serial number can be found in the Manager Mode W...

Page 10: ...ER 6x130mm Z03 Z02 PURPLE PURPLE 1 1 Z01 5mm ALLENWRENCH PURPLE 2 Z07 Z06 ARCWASHER 4 8 Z02 Z09 Z03 Z01 Z05 LOCKWASHER BUTTON HEAD BOLT M5x15L 8 4 BUTTON HEAD BOLT M8x16L SOCKET HEAD BOLT M8x16L DESCRIPTION FASTENERS SKETCH 2 8 4 QUANTITY BUTTON HEAD BOLT M8x40L SCREW SET REFERENCE Z02 LOCKWASHER 4 Z02 LOCKWASHER 2 Z34 SOCKET HEAD BOLT M8x25L 2 PACKAGE COLOR WHITE WHITE BLUE BLACK YELLOW ORANGE OR...

Page 11: ...VER and place it in one of the holes inside the MAIN FRAME E Attach the GUIDE RAIL SET to the MAIN FRAME using 4 BOLTS G 4 FLAT WASHERS H 4 SPRING WASHERS I and 4 NUTS J BLACK HARDWARE BAG CONTENTS ASSEMBLY STEP 1 A Open HARDWARE BAG 1 B Attach the STABILIZER TUBE to the MAIN FRAME using 2 BOLTS A 2 SPRING WASHERS B and 2 ARC WASHERS C on each side Z07 Qty 4 Z09 BUTTON HEAD BOLT M5x15L Qty 4 BUTTO...

Page 12: ... on the opposite side of the stepper Z34 SOCKET HEAD BOLT M8x25L Qty 2 BLUE HARDWARE BAG CONTENTS ASSEMBLY STEP 3 A Open HARDWARE BAG 2 B Attach the GUIDE RAIL SET to the MAIN FRAME using 4 BOLTS F 4 SPRING WASHERS E and 4 FLAT WASHERS D C Attach the GUIDE RAIL SET to the INCLINE BRACKET using 4 BOLTS G 4 FLAT WASHERS H 4 SPRING WASHERS I and 4 NUTS J 6 Z04 x 3 Z05 x 3 Z03 Z06 Z05 x 4 Z03 Z06 Z05 ...

Page 13: ... FRAME using PRE INSTALLED BOLTS AND WASHERS D Slide WAVY WASHER L over CRANK followed by PEDAL ARM as shown Rest PEDAL ARM WHEEL on GUIDE RAIL E Attach the PEDAL ARM to the CRANK using 1 FLAT WASHER K 1 SPRING WASHER B and 1 BOLT M F Repeat steps D E on the opposite side of the stepper Z34 SOCKET HEAD BOLT M8x25L Qty 2 BLUE HARDWARE BAG CONTENTS ASSEMBLY COMPLETE 3X 3XE CONSOLE ASSEMBLY stepper_o...

Page 14: ...e machines It may be accessed by pressing ENTER 1 0 0 1 Enter To change a setting press Enter on the keypad and use the Level buttons and numeric keypad to change the values Pressing Enter again will save the change Pressing Back will bring you to the previous menu To exit manager s mode press the Home key Below is a list of the settings Maximum Time Default Time Default Level Default Age Default ...

Page 15: ... C ENTER To confirm each program setting D UP DOWN LEVEL Use to adjust level selection E UP DOWN TIME Use to adjust workout time F STOP Ends workout and shows workout summary data G COOL DOWN Puts the console into Cool Down mode H TOGGLE DISPLAY Allows user to select what information is displayed on each of the three windows on the console Press and hold to enable disable scrolling stepper_om_r1 6...

Page 16: ...djustment during workout I COOL DOWN Puts the console into Cool Down mode S3XE ENTERTAINMENT ZONE J TV Will take the user to directly the TV screen K VOLUME UP DOWN Adjusts the volume output through the headphone jack of either integrated console TV or iPod output L NUMBER KEYPAD Allows for easy TV channel selections M CHANNEL UP DOWN Allows for channel selection N DISPLAY MODE Allows user to cycl...

Page 17: ...R To confirm each program setting D UP DOWN LEVEL Easy information and level selection E UP DOWN TIME Easy information and time adjustment F STOP Ends workout and shows workout summary data G NUMBER KEYPAD Workout data input for workout setup Level adjustment during workout H COOL DOWN Puts the stepper into Cool Down mode I FAN Allows for fan speed selection fan has three operating speeds stepper_...

Page 18: ...N Allows for fan speed selection fan has three operating speeds S7X ENTERTAINMENT ZONE J POWER If add on TV is present acts as the power control button If add on TV is not present acts as a display toggle button K IPOD Will take the user directly to the iPod screen to allow for iPod control and playlist selection L VOLUME UP DOWN Adjusts the volume output through the headphone jack of either integ...

Page 19: ...s Workouts 20 minutes and longer will have a cool down length of 5 minutes S7XE ENTERTAINMENT ZONE D IPOD Will take the user directly to the iPod screen to allow for iPod control and playlist selection E VOLUME UP DOWN Adjusts the volume output through the headphone jack of either add on TV integrated console TV or iPod output F NUMBER KEYPAD Allows for easy TV channel selections These buttons wor...

Page 20: ...DEFINED PROGRAMS FIT TEST WORKOUT OPERATION Fit Test program is to monitor the development of your cardiovascular system and measure your fitness level based on your average heart rate during specific test stages When the 5 minute test is completed the display provides a fitness score and fitness category To enter into this workout on a 3x use the following guidelines 1 Select the FIT TEST button ...

Page 21: ...ing 1 3XE 5X 7X 7XEWORKOUT DESCRIPTIONS QUICK START OPERATION Press the GO button and the machine will enter into a manual mode of operation All energy expenditure values will be calculated using the default weight measurement MANUAL WORKOUT OPERATION Manual is a workout that allows you to manually adjust the level values at anytime The manual workout also contains a setup screen which allows you ...

Page 22: ...nd press ENTER 2 Enter age using the ARROW KEYS or the NUMBER KEYPAD and press ENTER 3 Enter the desired percent of maximum heart rate using the ARROW KEYS and press ENTER 4 Enter the desired workout length using the ARROW KEYS or the NUMBER KEYPAD and press ENTER 5 Enter user weight user weight is used to calculate the caloric expenditure value providing an accurate weight helps to ensure an accu...

Page 23: ... USB FEATURES SOFTWARE UPDATES The USB port is used to update the console firmware Copy the updated software file to the root directory of your USB drive and insert into the USB port with the console at the main screen The console will beep once to indicate it has recognized the USB stick and beep twice when the firmware upgrade is complete USB CHARGING The USB port on the consoles is capable of p...

Page 24: ...46 47 PRODUCT SPECIFICATIONS stepper_om_r1 6 indd 46 47 9 9 11 10 12 AM ...

Page 25: ...S VIA LIVESTRONG COM YES VIA LIVESTRONG COM YES VIA LIVESTRONG COM VIRTUAL ACTIVE COMPATIBLE YES YES NO TECH SPECS OVERALL DIMENSIONS L X W X H 45 X 31 X 70 5 114 3CM X 78 7CM X 179 1CM 45 X 31 X 70 5 114 3CM X 78 7CM X 179 1CM 45 X 31 X 70 5 114 3CM X 78 7CM X 179 1CM MAXIMUM USER WEIGHT 400 LBS 182 KG 400 LBS 182 KG 400 LBS 182 KG WEIGHT 259 LBS 117 7 KG 256 LBS 116 7 KG 255 LBS 116 KG SHIPPING ...

Page 26: ...1 866 693 4863 www matrixfitness com Matrix Fitness 1600 Landmark Drive Cottage Grove WI 53527 Matrix Steppers 1 6 2011 Matrix Fitness stepper_om_r1 6 indd 50 9 9 11 10 12 AM ...

Reviews: