background image

CAUTION !

Read all precautions and instructions in this manual before using this equipment. Keep this manual 

for future reference.

Improper assembly, maintenance or use can void the warranty terms.

Version 1.0  2013  IC-MXSB-01 Copyright by Indoorcycling Group GmbH 2013 

|

 www.indoorcycling.com    

ENG 1

ENG

ESP

Matrix S-series 

Model no. IC-MXSB-01

Manufactured by:

Indoorcycling Group GmbH

Happurger Str. 86

90482 Nuremberg | Germany

www.indoorcycling.com

[email protected]

MATRIX Fitness Systems Corp

.

1610 Landmark Drive

Cottage Grove, WI 53527

Toll-free: 866.693.4863

Local: 608.839.8686

www.matrixfi tness.com

Summary of Contents for IC-MXSB-01

Page 1: ...n 1 0 2013 IC MXSB 01 Copyright by Indoorcycling Group GmbH 2013 www indoorcycling com ENG 1 ENG ESP Matrix S series Model no IC MXSB 01 Manufactured by Indoorcycling Group GmbH Happurger Str 86 90482...

Page 2: ...page 20 25 Spare part reference list page 26 Limited warranty page 27 Technical specifications The Matrix S Series Bike is according to EN 957 a Class S product for professional and or commercial use...

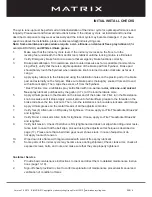
Page 3: ...e Matrix S Series Indoor Cycle should not be used by persons weighing more than 290 pounds 130 kg Always wear appropriate athletic clothes and shoes while operating the Matrix S Series Indoor Cycle Do...

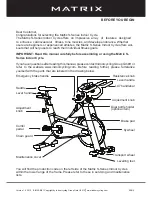
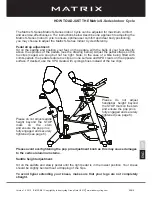
Page 4: ...reading this manual please contact Indoorcycling Group GmbH or refer to the website www indoorcycling com Before reading further please familiarize yourself with the parts that are labeled in the draw...

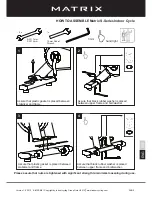
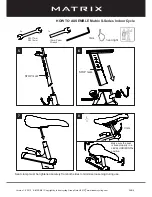
Page 5: ...nch 1x Assure that plastic gasket is placed between stabilizer and frame Assure that plastic gasket is placed between stabilizer and frame Assure that black rubber washer is placed between upper frame...

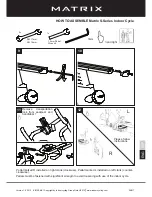
Page 6: ...ENG 6 5 6 8 STOP mark STOP mark HOW TO ASSEMBLE Matrix S Series Indoor Cycle SW 17mm SW 14mm 3mm hand tight 2x 1x 13 mm Seat clamp must be tightened securely from both sides to minimize loosening dur...

Page 7: ...7 11 12 HOW TO ASSEMBLE Matrix S Series Indoor Cycle SW 17mm SW 14mm 3mm hand tight 2x 1x Pedal marked R installed on right crank clockwise Pedal marked L installed on left crank counter clockwise Pe...

Page 8: ...olvent free spray lubricant purchased by the gallon 3 7 L at the local hardware store 5 Apply Lithium grease to the threads on the lower end of the brake rod First turn the Resistance knob clockwise u...

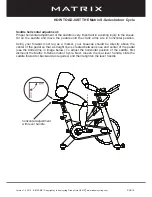
Page 9: ...clips on one surface and SPD cleats on the opposite surface If desired use the SPD cleats with cycling shoes instead of the toe clips Saddle height adjustment Sit on the saddle and slowly pedal until...

Page 10: ...so that a straight line is created between knee and center of the pedal see the dotted line in image below To adjust the horizontal position of the saddle first dismount the Matrix S Series Indoor Cy...

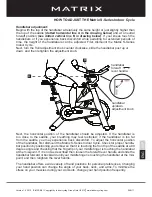
Page 11: ...rt To adjust the horizontal position of the handlebar first dismount the Matrix S Series Indoor Cycle Check for proper handle bar position by positioning your elbow so that it is touching the front ti...

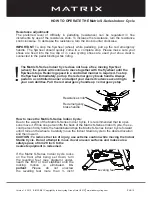
Page 12: ...red cadence according to your own abilities Pull the red emergency handle up emergency stop How to move the Matrix S Series Indoor Cycle Due to the weight of the Matrix S Series Indoor Cycle it is rec...

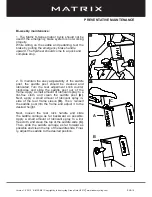
Page 13: ...or Cycle on page 12 2 After each user finishes exercising the Matrix S Series Indoor Cycle should be disinfected and cleaned to maintain a hygienic environment First apply a disinfectant spray to the...

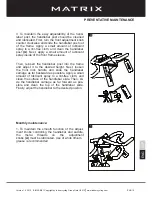
Page 14: ...iage as far backward as possible Apply a small amount of lubricant spray to a lint free cloth and clean the top of the saddle slide C Then slide the saddle carriage as far forward as possible and clea...

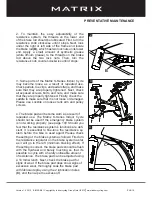
Page 15: ...handle and slide the handlebar carriage as far backward as possible Apply a small amount of lubricant spray to a lint free cloth and clean the surface of the handlebar slide Then sli de the handlebar...

Page 16: ...rake pad does show signs of excessive wear thoroughly soak the brake pad with lubricant spray using the 2 lubrication holes C and then wipe the excess off 3 Some parts of the Matrix S Series Indoor Cy...

Page 17: ...ing belt tension To check for a loose belt sit on the saddle place your feet on the pedals move the pedals until the crank arms are horizontal Next pull up the emergency brake handle and hold it Then...

Page 18: ...nd cleaning of the bike daily page 13 Servicing brake pads detailed cleaning of the entire bike weekly page 13 Check emergency brake function bi weekly page 14 16 Clean and lubricate saddle and handle...

Page 19: ...Taken Result Name date Bi Weekly maintenance Checklist Bike No Production code Observations Action Taken Result Name date Version 1 0 2013 IC MXSB 01 Copyright by Indoorcycling Group GmbH 2013 www in...

Page 20: ...mbH 2013 www indoorcycling com ENG 20 02 40 C S 08 02 40 CrMo R SX 08 02 40 90 02 40 BE 02 40 C MD20 08 02 40 CrMO L SX 08 02 40 C 2RS Drive Gear Parts Brake parts 02 50 A SX 02 50 02 02 50 01 02 50 0...

Page 21: ...13 IC MXSB 01 Copyright by Indoorcycling Group GmbH 2013 www indoorcycling com ENG 21 02 40 H L 02 40 02 Handlebar 02 10 B 08 02 30 02 LX7 02 10 L 02 40 08 S 12 02 40 H 02 30 02 PK 02 30 02 PK SPARE P...

Page 22: ...opyright by Indoorcycling Group GmbH 2013 www indoorcycling com ENG 22 02 10 A 2010 RA S Silver 02 42 01 E 08 02 42 03 S E 12 02 99 03 02 42 02 S 12 02 42 04 Chain Guard 02 99 02 10 FR optional item 0...

Page 23: ...Version 1 0 2013 IC MXSB 01 Copyright by Indoorcycling Group GmbH 2013 www indoorcycling com ENG 23 Protection Plates 02 99 11 02 99 10 02 99 02 10 HB 02 10 B 08 SPARE PARTS ENG ESP...

Page 24: ...2013 IC MXSB 01 Copyright by Indoorcycling Group GmbH 2013 www indoorcycling com ENG 24 Saddle Support 01 21 VL 3125 SW 02 21 AK 02 10 L Pedals 01 40 A2 pair 02 21 05 AL 02 30 02 PK 2pcs SPARE PARTS 0...

Page 25: ...B 01 Copyright by Indoorcycling Group GmbH 2013 www indoorcycling com ENG 25 Rear Stabilizer Front Stabilizer 02 11 06 02 11 B 02 11 A 02 11 06 02 11 E 02 11 05 B 02 11 05 B SPARE PARTS 02 11 01 SX 08...

Page 26: ...2 03 S E 12 Left flywheel cover 02 99 03 Allen bolt M4x15 Pedals 01 40 A 2 Combi Pedals pair 01 40 A 3 Toe strap pair Frame 2010 RA S S Series frame Silver 02 10 A Vertical insert sleeve 02 20 04 Rubb...

Page 27: ...uct may cause denega tion of the manufacturer warrenty Version 1 0 2013 IC MXSB 01 Copyright by Indoorcycling Group GmbH 2013 www indoorcycling com ENG 27 LIMITED WARRANTY Matrix S Series 10 years war...

Page 28: ......

Page 29: ...montaje mantenimiento y funcionamiento del aparato El uso y manejo inapropiado montaje incorrecto y la falta de mantenimiento puede causar cancelaci n de la garant a Matrix S series Modelo n IC MXSB 0...

Page 30: ...ta de piezas de recambio 26 Garant a 27 Especificaciones t cnicas La bicicleta Matrix S Series corresponde conforme a EN 957 a la clase de usuario S y est clasificada para el uso en un entorno control...

Page 31: ...ificado La bicicleta est dise ada para un peso m ximo de usuario de 130 kg La bicicleta Matrix S Series no debe ser usada por personas que excedan este peso m ximo admisible Use ropa de deporte o de c...

Page 32: ...dad de funcionamiento sin proble mas durante muchos a os Version 1 0 2013 IC MXSB 01 Copyright by Indoorcycling Group GmbH 2013 www indoorcycling com ESP 4 Importante El c digo de producci n de la bic...

Page 33: ...pl stico est colocada entre el estabilizador y el marco Aseg rese de que la guarnici n de pl stico est colocada entre el estabilizador y el marco La arandela negra de pl stico tiene que estar colocada...

Page 34: ...6 5 6 8 Marca STOP Marca STOP SW 17mm SW 14mm 3mm Apretado a mano 2x 1x 13 mm Las abrazaderas del sill n deben estar bien apretadas para evitar que se suelten durante el uso Aseg rese que el sill n es...

Page 35: ...R montado en sentido horario en la biela derecha R Pedal izquierdo marcado con la letra L montado en sentido antihorario en la biela izquierda L Preste atenci n a que los pedales est n bien montados y...

Page 36: ...lene con el lubricante sin aerosol y sin cido para proteger el medio ambiente 5 Aplique grasa de litio sobre las roscas de metal en el extremo inferior del tirante de freno Primero gire el bot n regul...

Page 37: ...a en la ilustraci n Nota Si la bicicleta est equipadao con un el sistema de pedales combi con calas SPD el usuario podr optar por zapatillas con calas o zapatillas normales de deporte Ajuste de la alt...

Page 38: ...del pedal creando una l nea perpendicular entre rodilla y centro del pedal ver la l nea rayada en la ilustraci n de abajo Para ajustar la posici n horizontal del sill n desm ntese primero de la bicic...

Page 39: ...l sill n puede ser que Vd se sienta restringido al respirar y si el manillar est demasiado lejos del sill n puede ser que le duela la espalda Para ajustar la posici n horizontal del manillar desmonte...

Page 40: ...a rueda hasta que la rueda pare por completo Por favor controle siempre sus movimientos y reduzca la velocidad de forma controlada Para detener de inmediato la rueda de inercia tire la palanca roja de...

Page 41: ...llas de nive laci n debajo del estabilizador delantero o trasero hasta que el movimiento de balan ceo quede eliminado 2 Limpieza La limpieza y desinfecci n peri dica de la bicicleta Matrix S Series de...

Page 42: ...f cil y suave marcha de la gu a corredera de ajuste de los sillines tiene que limpiar y engrasar en intervalos regulares el soporte del sill n tija Gire el bot n de aju ste en sentido antihorario y s...

Page 43: ...nuevo el manillar en el tubo del marco aplique bastante spray lubri cante de modo uniforme en las correderas de pl stico para garantizar una f cil y suave mar cha del ajuste vertical Limpie antes los...

Page 44: ...y sustituir piezas que muestren desgaste deterioro o da os ocasionados por el uso de la m quina for ros de freno sill n calzapi s correas pedales calas del sistema SPD 4 Pastilla de freno Dependiendo...

Page 45: ...edales hasta que las bielas del pe dal est n en posici n horizontal Luego accione el freno de emergencia y balancee de pie en los pedales hacia delante y atr s Los pedales no deben tener juego longitu...

Page 46: ...anas P gina 14 16 Limpieza y lubricaci n de barras y tubos del sill n y manillar Cada 2 semana P gina 14 15 Lubricaci n de los botones de ajuste y fijaci n Cada mes P gina 15 Comprobaci n y lubricaci...

Page 47: ...ombre DWxg Version 1 0 2013 IC MXSB 01 Copyright by Indoorcycling Group GmbH 2013 www indoorcycling com ESP 19 LISTA DE CHEQUEO Y PLAN PARA ACTIVIDADES DE MANTENIMIENTO Lista de chequeo para cada 2 se...

Page 48: ...2013 www indoorcycling com ESP 20 Sistema de accionamiento Sistema de frenos 02 40 C S 08 02 40 CrMo R SX 08 02 40 90 02 40 BE 02 40 C MD20 08 02 40 CrMO L SX 08 02 40 C 2RS 02 50 A SX 02 50 02 02 50...

Page 49: ...013 IC MXSB 01 Copyright by Indoorcycling Group GmbH 2013 www indoorcycling com ESP 21 02 40 H L 02 40 02 Manillar 02 10 B 08 02 30 02 LX7 02 10 L 02 40 H 02 30 02 PK 02 30 02 PK PIEZAS DE RECAMBIO 02...

Page 50: ...13 www indoorcycling com ESP 22 02 10 A 2010 RA S Plateado 02 42 01 E 08 02 42 03 S E 12 02 99 03 02 42 02 S 12 02 42 04 Protector de cadena 02 99 02 10 FR accesorio opcional 02 10 A PIEZAS DE RECAMBI...

Page 51: ...Version 1 0 2013 IC MXSB 01 Copyright by Indoorcycling Group GmbH 2013 www indoorcycling com ESP 23 Placas protectoras 02 99 11 02 99 10 02 10 B 08 PIEZAS DE RECAMBIO ESP ENG 02 99 02 10 HB...

Page 52: ...IC MXSB 01 Copyright by Indoorcycling Group GmbH 2013 www indoorcycling com ESP 24 Soporte de sill n tija 01 21 VL 3125 SW 02 21 AK 02 10 L Pedales 01 40 A2 02 21 05 AL 02 30 02 PK 2 piezas PIEZAS DE...

Page 53: ...ight by Indoorcycling Group GmbH 2013 www indoorcycling com ESP 25 02 11 06 02 11 B 02 11 A 02 11 06 02 11 E 02 11 05 B 02 11 02 SX 08 02 11 01 SX 08 02 11 05 B PIEZAS DE RECAMBIO Estabilizador traser...

Page 54: ...L Palanca de bloqueo 02 10 B 08 Bot n ajuste Pop pin Soporte de sill n tija 01 21 VL 3125 SW Sill n 02 21 AK Abrazadera de montaje sill n 02 21 05 AL Soporte de sill n horizontal y vertical 02 10 L P...

Page 55: ...uso o manejo inadecuado pueden causar la cancelaci n de la garant a Matrix S Series 10 a os de garant a Rotura de la estructura del marco errores de soldadura 3 a os de garant a Manillar y ensamblaje...

Page 56: ......

Reviews: