10
Mac Plus
–
User and Installation Manual
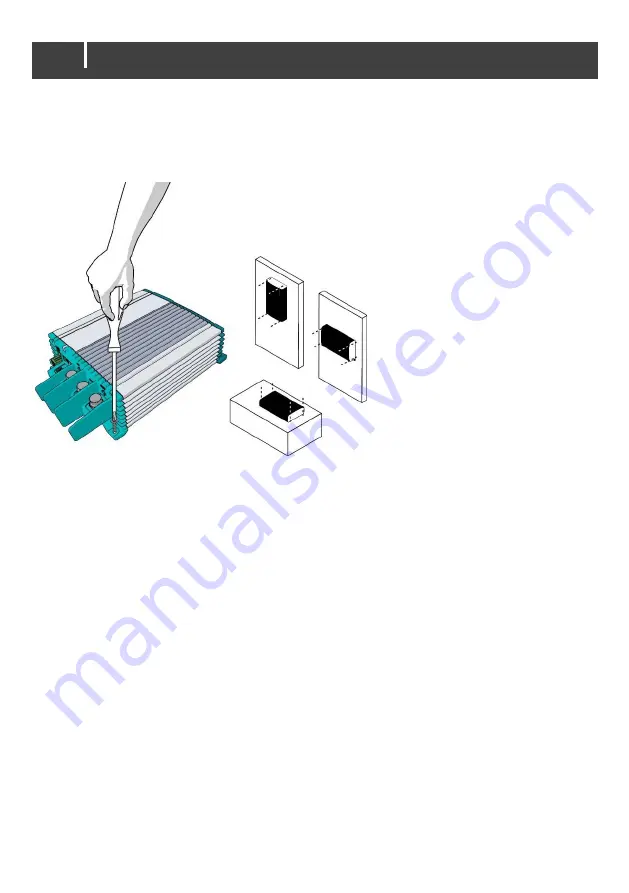
5. Placement and mounting
Mount the Mac Plus with four M5 screws (3/16") to a solid flat surface.
Page 1: ...te downloaden naar onze website Um diese Anleitung in anderen Sprachen herunterzuladen besuchen Sie bitte unsere Website Pour t l charger ce manuel dans d autres langues consultez notre site Web Para...
Page 2: ...nt panel 8 4 INSTALLATION INSTRUCTIONS 9 5 PLACEMENT AND MOUNTING 10 6 CONNECTION 11 Installation drawing A 11 Installation drawing B 11 Remote switch input 12 Battery temperature sensor included 12 V...
Page 3: ...consistent with the locally applicable standards and regulations 5 Make sure that all wiring is properly installed and in good electrical condition and that wire size is large enough for DC ampere rat...
Page 4: ...s 3 DANGER To reduce the risk of explosion Never use the Mac Plus in situations where there is danger of gas or dust explosion or area in which ignition protected equipment is required Warnings regard...
Page 5: ...r batteries 11 If it is necessary to remove a battery always remove grounded terminal from battery first Make sure all accessories are off so as not to cause an arc 12 Be sure that the area around bat...
Page 6: ...ts are subject to continual development and improvement Therefore additions or modifi cations to the products may cause changes to the technical data and functional specifications No rights can be der...
Page 7: ...er supply The Mac Plus can only be used in installations with a negative ground For different system voltages the following models are available Overview of the Mac Plus models Model Input Output Prod...
Page 8: ...anel 1 Status LED 2 Output 3 Ground 4 Input 5 MasterBus 2x 6 DIP switch 7 Accessories connector Pin 1 battery voltage sense input Pin 2 battery voltage sense input Pin 3 not used Pin 4 remote switch i...
Page 9: ...through the heatsink is prevented This device requires a minimum of 100 mm 4 of clearance on every side Do not install the Mac Plus in the same compartment as the batteries Do not mount the Mac Plus...
Page 10: ...10 Mac Plus User and Installation Manual 5 Placement and mounting Mount the Mac Plus with four M5 screws 3 16 to a solid flat surface...
Page 11: ...Manual 11 6 Connection Mac Plus as a battery charger see installation drawing A Mac Plus as a stabilized DC power supply see installation drawing B Use properly sized fuses and wiring Installation dr...
Page 12: ...Battery temperature sensor included By installing the Mastervolt temperature sensor the charge voltages are automatically adapted for deviating temperatures Figure 1 Temperature compensated charging W...
Page 13: ...settings You may need to remove the MasterBus cables or Terminator to be able to access the DIP switches For an overview of the various DIP switch settings see the following three tables where a 0 ind...
Page 14: ...ry type 6 7 8 0 0 0 Follow MasterBus setting see chapter 9 and 10 Default factory setting Flooded battery 0 0 1 Flooded Bulk 14 25 Abs 14 25 Float 13 25 V 0 1 0 Gel Bulk 14 25 Abs 14 25 Float 13 80 V...
Page 15: ...ption The Mac Plus enters sleep mode when the sleep delay has passed to reduce the no load power consumption Every 5 seconds the Mac Plus scans if the configured battery charger meets the switch on co...
Page 16: ...nd a push of a button See www mastervolt com for all available options New devices can be added to the existing network in a very easy way by just extending the network This gives the MasterBus networ...
Page 17: ...e Voltage at the output read only Output current Current of the output read only Bat volt sense Battery voltage measured by the battery voltage sensor If the Shunt device function is enabled for a Mas...
Page 18: ...erShunt or voltage of the MLI Ultra battery Configuration Value Meaning Factory setting Adjustable range Device Language Language that is displayed on a monitoring device connected to the MasterBus En...
Page 19: ...nput limit Maximum input current 50 A 30 A 0 50 A 0 30 A Current ramp up Charge current ramp up after enabling the charger 5 A s 0 50 A s Temp compensate Temperature compensation for charge voltage 0...
Page 20: ...ge Constant output voltage 13 25 26 50 V 8 15 16 30 V Input alarm High alarm on High input voltage alarm on 16 00 32 00 V 8 16 16 32 V High alarm off High input voltage alarm off 15 50 31 00 V 8 16 16...
Page 21: ...t that triggers an action for example Battery pre low See Event source list Event x target Select the device that should take action for example the generator Selectable targets are system dependent E...
Page 22: ...en the Mac Plus is configured as an event target by another device this device can initiate an event command and an event action to be performed by the Mac Plus Event command Meaning Standby Command t...
Page 23: ...d Nothing this is normal when the battery is almost fully charged High ambient temperature Nothing if ambient temperature is more than the setting limit the charge current is automatically reduced Bat...
Page 24: ...Error in the MasterBus wiring Check the MasterBus cables No terminating device placed at the ends of the network MasterBus needs a terminating device on both ends of the network Check if connected Mas...
Page 25: ...24 V Output voltage range 10 15 V 20 30 V 10 15 V 20 30 V Max output current 50 A 30 A 50 A 30 A Flat battery charge yes reduced 25 charge current at low 9 V 18 V battery voltage Protection against ov...
Page 26: ...Battery settings Charging specifications Battery type Flooded default Gel AGM Spiral Li Ion MLI Traction NiCad Bulk voltage 14 25 V 14 25 V 14 25 V 14 55 V 14 50 V Max bulk time 480 min 480 min 480 mi...
Page 27: ...Mac Plus User and Installation Manual 27 Characteristics Figure 2 Typical charge characteristic at 25 C 77 F For a 24 V battery charger multiply the voltages by two...
Page 28: ...sa mastervolt com Location Shipping Power Products LLC N85 W12545 Westbrook Crossing Menomonee Falls Wisconsin 53051 United States Asia Pacific Customer Service Phone 64 9 415 7261 Option 1 Email enqu...