

23
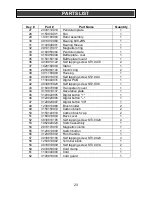
Key #
Part #
Part Name
Quantity
27
2030110019
Pendulum plate
1
28
3150010071
Fan
1
29
1010180003
Rotor assembly
1
30
4010010060
Bearing 608-2RS
1
31
3140040001
Bearing Sleeve
1
32
2010170017
Magnetism ring
1
33
4100050004
Pendulum plate
1
34
3150050046
Baffle plate - rear
1
35
3150160134
Baffle plate mount
1
36
4030010122
Self tapping screw ST3.9X70
2
37
1020180003
Stator
1
38
2050060140
Electric ring
2
39
3011180003
Housing
1
40
4030010019
Self tapping screw ST2.9X4
1
41
1130040031
Digital PCB
1
42
4030010020
Self tapping screw ST2.9X6
1
43
3160070009
Transparent cover
1
44
3110010137
Decorative plate
1
45
3120020095
Digital button "+"
1
46
3120020096
Digital button "
–"
1
47
3120020097
Digital button "I/0"
1
48
1230010066
Brush holder
2
49
3150150019
Carbon brush
2
50
3150140018
Carbon brush cap
2
51
3160010043
Back cover
1
52
4030010105
Self tapping screw ST3.9X20
4
53
1062020029
Switch assembly
1
54
2010170019
Magnetic column
1
55
3120010049
Switch button
1
56
3120070072
Front handle
1
57
4030010106
Self tapping screw ST3.9X20
3
58
1250010002
Terminal block
1
59
4030010099
Self tapping screw ST3.9X14
2
60
2030050002
Cord clamp
1
61
1190040004
Cord
1
62
3140010004
Cord guard
1
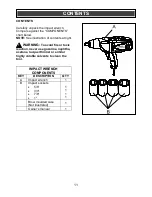
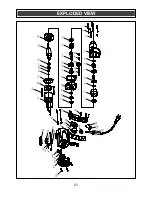
PARTS LIST
Summary of Contents for 054-1265-6
Page 21: ...21 EXPLODED VIEW...