background image

7

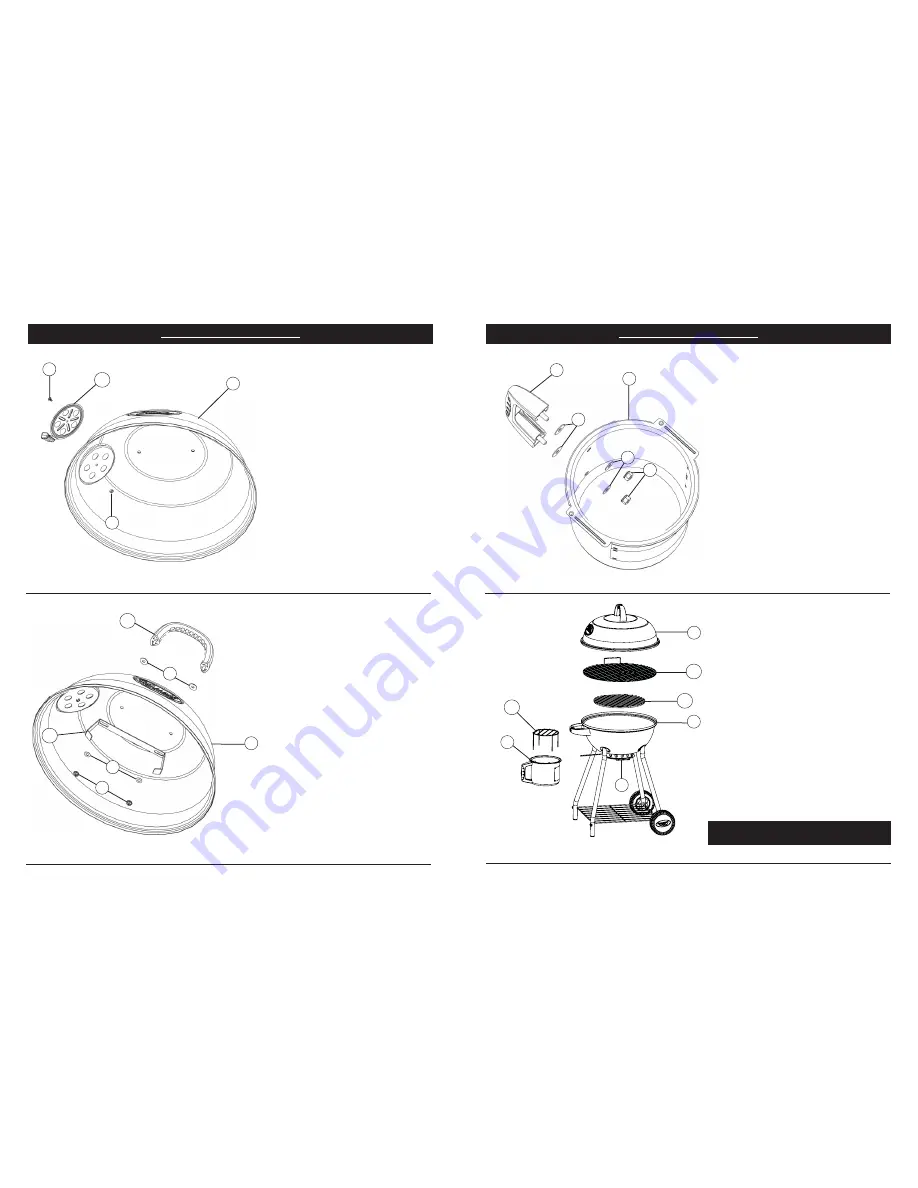
STEP 7.  

Place heat insulations washers (H) on ash can 
handle as shown. Insert handle (6) into ash can 
(5) and secure using aluminum flat washers (F) 
and hex nuts (D).

6

STEP 6. 


Place heat insulation washers (H) on lid
handle (10) as shown. Insert screws on lid 
handle (10) into holes in kettle lid (1).  Add lid 
hook (12) then aluminum flat washers (F) and 
secure with hex nuts (D).

STEP 5.  

Note: Do not over tighten.  Damper should 
move freely.

Attach air damper (13) to kettle lid (1)  using 
phillips head screw (B) and hex lock nut (C).

B

C

1

H

F

D

1

5

H

F

D

8

ASSEMBLY INSTRUCTIONS

ASSEMBLY INSTRUCTIONS

1

7

2

STEP 8.  

Insert lighting grate (18) into assembled ash 
can (5) as shown below.

Slide assembled ash can (5) onto guides of 
ash can spacer ring (7).

Place charcoal grate (16) inside kettle base (2).  

Rest cooking grate (15) on kettle base (2) as 
shown.

Place kettle lid (1) onto kettle base (2).

GRILL IS READY FOR USE

13

10

12

18

15

16

5

Summary of Contents for 20040311

Page 1: ... contains important information necessary for the proper and safe use of this grill Read and follow all warnings and instructions before using grill and during use Keep this manual for future reference WARNING Masterbuilt Manufacturing Inc 1 Masterbuilt Court Columbus Georgia 31907 Customer Service 1 800 489 1581 Tools required for assembly Adjustable Wrench Phillips Head Screwdriver Approximate a...

Page 2: ...ate to state Keep a fire extinguisher accessible at all times while operating grill Never leave grill unattended while in use Never use inside an enclosed area such as a patio garage building or tent Never use inside a vehicle not even a recreational vehicle such as a motor home camper or truck bed Never operate this grill under any overhead construction such as roof coverings carports awnings or ...

Page 3: ...es 160 F degrees internally Turn patties once during cooking and brush once or twice with sauce during the last five minutes Serve burgers on buns Optional few dashes bottled hot pepper sauce American cheese slices lettuce leaves tomato slices onion slices and pickle slices HERB MUSTARD CHICKEN QUARTERS 2 tbsp creamy Dijon style mustard blend 1 tbsp snipped fresh parsley 1 tbsp snipped fresh orega...

Page 4: ...20 to 25 min lb 145 160 F 62 71 C Ribs back cut in 1 rib portions 10 min side med 160 F 71 C half 2 3 lbs 0 9 1 3kg 10 to 12 min side med rare 145 F 62 C Tenderloin whole 4 6 lbs 1 8 2 7kg 12 to 15 min side med 160 F 71 C PORK SIZE GRILLING TIME INTERNAL TEMP Chops bone in 3 4 2cm thick 3 to 4 min side med 160 F 71 C Chops bone out 1 1 2 4cm thick 7 to 8 min side med 160 F 71 C Tenderloin 1 2 1 1 ...

Page 5: ... empty ash can after use only when ashes have completely cooled This will help prolong ash can life Clean grill including special surfaces such as cooking grates with mild cleaning agents Wipe outside of grill with damp rag DO NOT use oven cleaner ALWAYS cover and store cold grill in a protected area Indoor storage of grill is permissible only if the charcoal has burned to a complete ash AND is co...

Page 6: ...loves when adjusting Never overfill charcoal grate This can cause serious injury as well as damage the unit Only use charcoal lighting fluid never use gasoline alcohol or other highly volatile fluids to ignite the charcoal These fluids can explode causing injury or death REMINDER NEVER OPERATE THIS GRILL UNDER ANY OVERHEAD CONSTRUCTION MAINTAIN A MINIMUM DISTANCE OF 10 FT 3M FROM OVERHEAD CONSTRUC...

Page 7: ...n charcoal bag and in manual before using 1 Load three crumpled sheets of newspaper on top of grate inside ash can Place ash can in position below grill 2 Pile charcoal directly above ash can on charcoal grate Open holes in bottom air damper and ignite paper in ash can 3 Spread charcoal out on grate and cook in as little as 20 minutes NEVER USE GASOLINE TO LIGHT CHARCOAL OVERFILLING CHARCOAL GRATE...

Page 8: ...ith hex nuts D STEP 5 Note Do not over tighten Damper should move freely Attach air damper 13 to kettle lid 1 using phillips head screw B and hex lock nut C B C 1 H F D 1 5 H F D 8 ASSEMBLY INSTRUCTIONS ASSEMBLY INSTRUCTIONS 1 7 2 STEP 8 Insert lighting grate 18 into assembled ash can 5 as shown below Slide assembled ash can 5 onto guides of ash can spacer ring 7 Place charcoal grate 16 inside ket...

Reviews: