Master Forge H30XL Operating Instructions And Owner'S Manual Download Page 8

8

Operating Instructions and Owner’s Manual

Master Forge Wood Pellet Fire Stove

INSTALLATION

CONTACT INFORMATION

If you have any questions regarding ventilation options 
of your stove, contact either:
The manufacturer Enerco Group, Inc. at 

1-800-251-0001. 

Our office hours are 8:00 AM – 5:00 PM, EST, Monday 

through Friday.

The National Fire Protection Association (NFPA) and 
request a copy of the latest editions of NFPA Standard 
211. The mailing address of the NFPA is Batterymarch 
Park, Quincy, MA 02269.

 WARNING: WHEN THIS STOVE IS NOT 

PROPERLY INSTALLED, A HOUSE FIRE MAY 
RESULT. TO REDUCE THE RISK OF FIRE, 
FOLLOW THE INSTALLATION INSTRUCTIONS. 
CONTACT LOCAL BUILDING OR FIRE 
OFFICIALS ABOUT RESTRICTIONS AND 
INSTALLATION INSPECTION REQUIREMENTS 
IN YOUR AREA. 

 CAUTION: ANY DEVIATION OR ALTERATION 

FROM THESE INSTALLATION INSTRUCTIONS 
MAY RESULT IN DAMAGE TO YOU, THE 
STOVE, YOUR CHIMNEY, AND YOUR HOME. 
YOUR WARRANTY MAY BECOME VOID. READ 
AND FOLLOW ALL INSTRUCTIONS. Contact 
Master Forge with any comments, concerns, 
or questions.

 CAUTION: CONTACT LOCAL BUILDING OR 

FIRE OFFICIALS ABOUT RESTRICTIONS AND 
INSTALLATION INSPECTION REQUIREMENTS 
IN YOUR AREA.

PLANNING

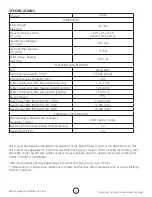
Make sure that you have selected the correct stove 
for your heating requirements by checking the 
specifications table on page 3. 
Take measurements of your space and plan for 
your chimney system as detailed in the following 
instructions. 
This stove may be installed for use in a mobile home. 
In addition to the following instructions, review and 
adhere to the mandatory requirements on page 11.

ELECTRICAL CONSIDERATIONS

The rear of the stove will need to be within power cord 
distance, which is roughly 80 inches (203 cm), of an 
electrical outlet. Lay the power cord out such that it will 

not come into contact with the stove’s surface.

FRESH AIR AND VENTILATION REQUIREMENTS

When deciding the location of the stove ensure 
that the space will always have a source of fresh air 
available. Failure to do so may result in air starvation 
of other fuel burning appliances and the possible 
development of hazardous conditions. 

Provision for outside combustion air may be necessary 
to ensure that fuel-burning appliances do not discharge 
products of combustion into the house. Guidelines to 
determine the need for additional combustion air may 
not be adequate for every situation. If in doubt, it is 
advisable to provide additional air. Outside combustion 
air may be required if these or other indications 
suggest that infiltration air is inadequate: 

• 

The wood pellet fired stove does not draw steadily, 
experiences smoke roll-out, burns poorly, or back-
drafts, whether or not there is combustion present.

• 

Existing fuel-fired equipment in the house, such as 
fireplaces or other heating appliances, smell, do 
not operate properly, suffer smoke roll-out when 
opened, or back-draft, whether or not there is 
combustion present.

• 

Any of the above symtoms are alleviated by opening 
a window slightly on a calm (windless) day.

• 

The house is equipped with a well-sealed vapour 
barrier and tight fitting windows and/or has any 
powered devices which exhaust house air. 

• 

There is excessive condensation on windows in the 
winter.

• 

A ventilation system is installed in the house. 

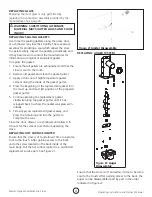
Additional combustion air may be directly provided 
from the outdoors to the wood pellet fired stove by 
using the included air intake kit to connect to the 
inlet at the bottom and rear of the stove. Any such 
installation must satisfy Clause 4 of CSA Standard  
B365. 

 CAUTION: NEVER DRAW OUTSIDE 

COMBUSTION AIR FROM:

• 

A WALL, FLOOR OR CEILING CAVITY.

• 

AN ENCLOSED SPACE SUCH AS AN ATTIC, 
GARAGE OR CRAWL SPACE.

 CAUTION: 

IF USING AN AIR INTAKE 

CONNECTION THEN THE STOVE MUST BE 
INSTALLED SUCH THAT IT IS ATTACHED TO THE 
STRUCTURE.

Summary of Contents for H30XL

Page 1: ...TO DETERMINE ANY NEED TO OBTAIN A PERMIT OBSERVE ALL LOCAL BUILDING CODES OPERATING INSTRUCTIONS AND OWNER S MANUAL Model H30XL READ INSTRUCTIONS CAREFULLY Please read this entire manual before instal...

Page 2: ...MATERIALS PAPER OR CARDBOARD A SAFE DISTANCE AWAY FROM THE STOVE AS RECOMMENDED BY THE INSTRUCTIONS NEVER USE THE STOVE IN SPACES WHICH DO OR MAY CONTAIN VOLATILE OR AIRBORNE COMBUSTIBLES OR PRODUCTS...

Page 3: ...HR kW HIGH 23 945 7 02 Heat Output Rate BTU HR kW MED 10 965 3 21 Heat Output Rate BTU HR kW LOW 10 796 3 16 ELECTRICAL SPECIFICATIONS Electrical Supply Requirements Voltage Frequency Phase 120V 60 H...

Page 4: ...OORING MATERIAL on page 6 Manufactured venting of 3 80mm in diameter of type L or PL which is listed to UL 641 ULC S609 Standard for 650 C Factory Built Chimneys or ULC ORD C441 Install per chimney ma...

Page 5: ...E FLU WITH HEADACHE DIZZINESS AND OR NAUSEA IF YOU HAVE THESE SIGNS STOVE MAY NOT BE WORKING PROPERLY GET FRESH AIR AT ONCE HAVE STOVE SERVICED SOME PEOPLE PREGNANT WOMEN PERSONS WITH HEART OR LUNG DI...

Page 6: ...of clearance from the rear to the nearest body Vertical runs of vent pipe must be at least 3 77 mm from any wall Finally the area which the wood pellet fire stove is installed shall have a floor to c...

Page 7: ...ear of the stove Once any necessary assembly of the display panel screen is complete you may briefly plug your stove in to make sure that it functions properly before proceeding with installation Unpl...

Page 8: ...ct with the stove s surface FRESH AIR AND VENTILATION REQUIREMENTS When deciding the location of the stove ensure that the space will always have a source of fresh air available Failure to do so may r...

Page 9: ...Factory Built Residential Type and Building Heating Appliance UL 103 A International Conference of Building Officials ICBO standards for solid fuel Stoves code approved masonry chimney VENT TERMINATIO...

Page 10: ...hannels separated from combustibles by a minimum of 6 inches 152 mm of glass fiber insulation Opening shall be covered and thimble supported with a sheet steel support minimum 24 gauge in thickness Fi...

Page 11: ...ured and can not be moved tipped or have ventilation seals compromised The stove must be provided a permanently ducted source of outside air to support combustion which meets the following requirement...

Page 12: ...sites of chimney manufacturers will be able to provide stove pipe that is rated to these standards This listing indicates that the Chimney is rated for high temperatures up to 2100 F 1 149 C Only use...

Page 13: ...he pellet sediment debris at the bottom of the pellet container Store pellets in sacks made of environmentally neutral or biologically degradable plastic or from paper 2 3 layers similar to cement pac...

Page 14: ...hrough the following stages Cleaning Cycle The firepot draws dust ash remenants out Feeding Cycle Pellets will be transported from the Pellet Hopper into the fire pot by the auger This can take 5 to 1...

Page 15: ...e but also monitor its settings try installing the Smart Stove app SMART STOVE WIFI CONNECTION This stove can be monitored controlled and programmed by using the smart stove app by NHHATC which is ava...

Page 16: ...email Eco Mode There are two ECO settings which can be selected which will conserve wood pellets while maintaining the desired temperature Pressing the ECO button will allow you to toggle whether a s...

Page 17: ...the top right of the multi function display screen R Room temperature S Exhaust temperature P Protection Temperature Sensor Press to increase the temperature which the stove is intended to heat the r...

Page 18: ...hange the current selection 5 Press the Settings button to go back to home TO PROGRAM AUTOMATIC ON OFF 1 Press and hold the Settings button for 2 seconds 2 Cycle through the settings using the Confirm...

Page 19: ...ry day Whichever is more frequent Ash Drawer After 50 bags of wood pellets Passageways After 100 bags of wood pellets Blower After 100 bags of wood pellets CLEANING FIRE POT PAN CAUTION IF STOVE IS IN...

Page 20: ...rmance and failure to remove creosote may result in a dangerous chimney fire CLEANING PIPE CLEANERS This model features pipe cleaners attached which can be pumped in order to scrape within the passage...

Page 21: ...of the gasket gutter 4 Press the beginning of the replacement gasket into the most up and most left position of the prepared gasket gutter 5 Continue pressing the replacement gasket clockwise along th...

Page 22: ...ed in the firebox by a leak opening the door to the firebox a blocked flue or an unsealed ash drawer then the switch will shut the stove off as a precaution Error code E5 will appear on the display pa...

Page 23: ...in fire pot 2 Check that the firepot is sitting in the holder correctly and that the igniter is not obstructed 3 Check that the exhaust gas temperature sensor switch beside the combustion fan is not...

Page 24: ...is no problem the blower does not turn on until the stabilization cycle The blower does not turn on during Stabilization Cycle No power in stove or in control panel Check the power and wires Mother b...

Page 25: ...nit so that it will not start suddenly and then unblock the auger 2 Check that the auger is not blocked If it is blocked remove the cause of the jamming 3 Check that the auger screw fastening the auge...

Page 26: ...2 Replace the 30 o C temperature switch The fire extinguishes and the power shuts off continued Requested temperature has been reached This is normal ECO mode behavior The stove will automatically swi...

Page 27: ...n Fan Blower L FUSE N Igniter Auger motor Display panel Vaccum switch Exhaust sensor Protection sensor Room sensor NC NO C k NOTE IF ANY OF THE ORIGINAL WIRE AS SUPPLIED WITH THE APPLIANCE MUST BE REP...

Page 28: ...cuum Switch 16 66674 Door Hinge NO PART NUM DESCRIPTION 17 66608 Igniter 18 66607 Combustion Blower 19 66675 Circulation Blower 20 66735 Rear Cover 21 66677 Side Seal Cover 22 66678 Side Seal Gasket 2...

Page 29: ...rating Instructions and Owner s Manual Master Forge Wood Pellet Fire Stove THIS PAGE INTENTIONALLY LEFT BLANK ESTA P GINA INTENCIONALMENTE SE DEJA EN BLANCO CETTE PAGE A T INTENTIONNELLEMENT LAISS E V...

Page 30: ...e and address of the dealer from whom you purchased our product The foregoing is the full extent of the responsibility of the Company There are no other warranties express or implied Specifically ther...

Page 31: ...EZ TOUS LES CODES DE LA CONSTRUCTIONS LOCAUX GUIDE DU PROPRI TAIRE ET INSTRUCTIONS D UTILISATION No de mod le H30XL LIRE LES INSTRUCTIONS ATTENTIVEMENT Veuillez lire le pr sent manuel au complet avant...

Page 32: ...LE CARTON OU LE PAPIER UNE DISTANCE S CURITAIRE DU PO LE SELON LES RECOMMANDATIONS DU MANUEL NE JAMAIS UTILISER LE PO LE DANS UN LIEU AYANT OU QUI A POSSIBILIT D AVOIR DES MATI RES VOLATILES EN SUSPEN...

Page 33: ...de sortie de chaleur BTU HR kW haute 23 945 7 02 Taux de sortie de chaleur BTU HR kW moyen 10 965 3 21 Taux de sortie de chaleur BTU HR kW faible 10 796 3 16 SP CIFICATIONS LECTRIQUES Exigences d alim...

Page 34: ...Tournevis Phillips manuel ou lectrique Localisateur de montants Fil plomb Scie sauteuse Silicone haute temp rature ou scellant haute temp rature ou ruban de conduit de fum e haute temp rature Protecti...

Page 35: ...ES TOURDISSEMENTS ET OU NAUS ES SI VOUS SOUFFREZ DE CES SYMPT MES LE PO LE POURRAIT EN TRE LA CAUSE EN RAISON DE MAUVAIS FONCTIONNEMENT OBTENEZ DE L AIR FRAIS RESPIRER SUR LE CHAMP FAITES UN ENTRETIE...

Page 36: ...gagement minimum de 229 mm 9 po de chaque cot de l appareil Qu il y ait un d gagement minimum de 239 mm 9 4 po l arri re de l appareil Que le tuyau d chappement vertical soit d gag d au moins 77 mm 3...

Page 37: ...r s tout assemblage requis du panneau d affichage vous pouvez brancher votre po le temporairement pour vous assurer du fonctionnement de l afficheur avant de continuer l installation Apr s avoir confi...

Page 38: ...Lorsque vous d cidez de la localisation du po le assurez vous que l aire sera toujours approvisionn e d air frais Un manque d air pourrait appauvrir tous les appareils combustion de vos quartiers et p...

Page 39: ...de ma onnerie certifi e ICBO International Conference of Building Officials pour les po les combustible solide CAPUCHON D VENT Installer l vent d chappement en respectant les distances de d gagement...

Page 40: ...e et la section de chemin e support e et fix e deux montants d acier de calibre minimum no 24 La quincaillerie de fixation de la section de chemin e ne doit pas perforer sa paroi interne TECHNIQUES DE...

Page 41: ...e fa on compromettant une a ration ad quate Une canalisation permanente d admission d air frais pour entretenir la combustion devra tre install e en r pondant aux exigences suivantes La canalisation d...

Page 42: ...on domiciliaires les quincailleries et les magasins de fournitures CVCA ainsi que les sites Web de fabricants de chemin es pourront vous fournir des tuyaux de po le isol s r pondant ces normes Cet enr...

Page 43: ...s sacs deux ou trois couches de papier comme ceux des sacs de ciment ou faits de produits synth tiques biologiquement d gradables et neutres au point de vue environnemental L utilisation de grenailles...

Page 44: ...sur le bouton d alimentation durant 3 secondes Le po le proc dera automatiquement effectuer ce qui suit Cycle de nettoyage Le pot de combustion est nettoy des cendres poussi res et r sidus accumul s...

Page 45: ...tat de fonctionnement du po le installez l application Smart Stove sur votre t l phone intelligent CONNEXION WI FI SMART STOVE L tat de votre po le peut tre surveill contr l et programm en utilisant l...

Page 46: ...Il existe deux modes ECO pouvant tre s lectionn s qui conomiseront les grenailles de bois tout en maintenant la temp rature d sir e L actionnement du bouton ECO permettra de basculer entre ces modes o...

Page 47: ...rieur droit de l afficheur multi fonction R Temp rature de la pi ce S Temp rature d chappement P R glage du capteur de protection Actionner pour augmenter la temp rature laquelle le po le devra r cha...

Page 48: ...pour changer l heure actuelle 5 Appuyez sur le bouton Settings pour revenir l accueil POUR FAIRE LE R GLAGE MARCHE ARR T AUTOMATIQUE 1 Tenez enfonc le bouton Settings pendant 2 secondes 2 Parcourez l...

Page 49: ...Selon la premi re ventualit Tiroir de cendre Apr s 50 sacs de grenailles de bois Canalisations internes Apr s 100 sacs de grenailles de bois Ventilateur Apr s 100 sacs de grenailles de bois NETTOYAGE...

Page 50: ...restreindre le d bit de gaz qui affectera la performance du po le et ne pas retirer la cr osote pourrait r sulter en un dangereux feu de chemin e NETTOYAGE ESSUIES PIPE Certains mod les ont des essui...

Page 51: ...t froid 2 Retirer le joint us et nettoyer le sillon d insertion 3 Appliquer un mince film de ciment joint d tanch it r sistant aux temp ratures lev es l int rieur du sillon 4 Presser l extr mit du joi...

Page 52: ...lac e sous le fond de la tr mie Si ce capteur est expos une temp rature d passant 70 C 158 F le po le sera teint 3 Thermostat de temp rature lev e dans le tuyau d chappement Une protection de temp rat...

Page 53: ...bstruction devant l allumeur 3 S assurer que le capteur de temp rature de gaz d chappement adjacent au ventilateur de combustion est en bon tat et n a pas subi de dommage 4 S assurer que l allumeur n...

Page 54: ...se met en marche qu au cycle de stabilisation Le ventilateur ne se met pas en marche durant le cycle de stabilisation Le po le panneau de commande n est pas sous tension V rifier l alimentation et les...

Page 55: ...duise pas de d marrage inattendu et d gager le blocage de la tari re 2 V rifier que la tari re ne soit pas bloqu e Si c est le cas d gager le produit causant le coincement 3 S assurer que la vis de fi...

Page 56: ...nnect s 2 Remplacer le thermostat de 30 C La combustion s arr te et le po le interrompt son fonctionnement suite La temp rature r gl e a t atteinte Ceci est le fonctionnement normal du mode ECO Le po...

Page 57: ...ustion Ventilateur L FUSIBLE N Allumeur Moteur de tari re Afficheur Pressostat Capteur T d chappement Capteur de protection Capteur T de la pi ce NC NO C FUSIBLE REMARQUE SI DES FILS QUELCONQUES DOIVE...

Page 58: ...a paule droite 12 66671 Nettoyage des tuyaux 13 66672 Carte m re 14 66673 Pot de feu 15 66628 Commutateur de vide 16 66674 Charni re de porte No No de pi ce DESCRIPTION 17 66608 Allumeur 18 66607 Souf...

Page 59: ...propri taire et instructions d utilisation Master Forge po le grenailles de bois THIS PAGE INTENTIONALLY LEFT BLANK ESTA P GINA INTENCIONALMENTE SE DEJA EN BLANCO CETTE PAGE A T INTENTIONNELLEMENT LA...

Page 60: ...uer la date d achat ainsi que les nom et adresse du d positaire o vous avez achet votre produit Ce qui suit est la description compl te de la responsabilit de la Soci t Aucune autre garantie explicite...

Reviews: