7
OPERATION INSTRUCTIONS
IMPORTANT:
If your grill is equipped with a rotisserie burner, only that burner should be used for
cooking when the rotisserie is mounted and in operation. The main burners on the grill must be
turned OFF when the rotisserie burner is in use.
I
MPORTANT:
Do not use the rotisserie burner and the main burner at the same time while using the
rotisserie. Do not use side burners and the rotisserie simultaneously.
1. Slide one of the meat prongs onto the rod (prongs toward the food). Center the food on the rod,
followed by the other meat prongs. Then push the meat forks firmly together. Tighten the
thumbscrews. Wrap food with butcher’s string (never use nylon or plastic string) to secure loose
portions.
2. Once the food is secure, insert the pointed end of the rotisserie rod into the motor assembly and
rest the other end on the support on the other side of the grill.
3. Check for clearance with the cooking grates. The grates can be removed if additional clearance is
required. IMPORTANT: If grates are removed, make sure food is not touching burner(s).
NOTE:
If you are using the grill model #296447, do not close the grill hood.
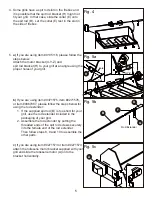
9. Place counterweight washer (F) onto the spit rod (B)
followed by the counterweight (G). Then attach the
handle (D) to the spit rod (B) securely.
Note: The counterweight (G) should be in the space
between the counterweight washer (F) and the
handle (D). If the counterweight (G) interferes with
the side table on your grill, adjust the height of the
counterweight (G) by loosening the handle (D).
Fasten the counterweight (G) to the proper position
with the loop on counterweight (G).
10.Place the end of the spit rod (B) into the
rotisserie motor (A). Make sure the spit rod (B)
is aligned properly with the rotisserie motor (A)
before turning on power.
B
Fig. 8
Fig. 9


