background image

4

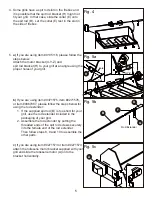
2.  Use bolt (AA) to attach motor bracket (X-Y-Z) to the 
     outside of the grill's left side (or right, depending on 
     the grill).  Place a washer (CC) on the end of each 
     bolt (AA) and secure assembly with nuts (BB). 
     Note: Do not overtighten.  Attach spit rod bracket (G) 
     to the opposite side of the motor bracket (X-Y-Z) 
     using the same procedure.

ASSEMBLY

1.  Measure the proper position where the spit rod (B) 
     should be placed.  Make sure it won't interfere with 
     the grill hood or any part of grill.  Then decide which
     holes of motor bracket (X-Y-Z) and 
     spit rod bracket (H) to attach to grill.

Hardware Used

AA

x4

Bolt

BB

x4

Nut

CC

x4

Washer

3.  To accommodate several styles/designs of grills, the 
     motor bracket (X-Y-Z) is adjustable.  Should the 
     motor bracket (X-Y-Z) as assembled not fit your grill, 
     please adjust the piece: Use a Phillips screwdriver 
     and pliers to loosen the screws on part Z of 
     motor bracket (X-Y-Z).  Decide where you want to 
     mount the motor on the grill and move part Z to the 
     proper hole, tightening the screws securely. 

Z

Z

Y

X

X

Fig. 3

Y

Fig. 2

AA

CC

BB

X-Y-Z

X-Y-Z

A

B

H

Fig. 1

F

D

E

G

Summary of Contents for FL-6002H-2S

Page 1: ...ssing parts Before returning to your retailer call our customer service department at 1 800 963 0211 8 a m 6 p m EST Monday Thursday 8 a m 5 p m EST Friday ATTACH YOUR RECEIPT HERE Serial Number Purch...

Page 2: ...ore attempting to assemble operate or install the product If you have any questions regarding the product please call customer service at 1 800 963 0211 8 a m 6 p m EST Monday Thursday 8 a m 5 p m EST...

Page 3: ...st risk of electrical shock connect only to properly grounded outlets 16 A short power supply cord is provided to reduce the risk of becoming entangled in or tripping over a longer cord 17 Longer deta...

Page 4: ...th the grill hood or any part of grill Then decide which holes of motor bracket X Y Z and spit rod bracket H to attach to grill Hardware Used AA x4 Bolt BB x4 Nut CC x4 Washer 3 To accommodate several...

Page 5: ...luded in the packaging of your grill 2 Assemble the rod extender by putting the threaded ends of the spit rod screws securely into the female end of the rod extender Then follow steps 8 9 and 10 to as...

Page 6: ...position that works best with your grill 6 Slide rotisserie motor A over motor bracket X Y Z The rotisserie motor A can be mounted one of two ways depending on if you want the spit rod B higher or lo...

Page 7: ...e rod into the motor assembly and rest the other end on the support on the other side of the grill 3 Check for clearance with the cooking grates The grates can be removed if additional clearance is re...

Page 8: ...nbalanced rotisserie rod will damage the motor 7 Check food frequently and adjust burner temperature based on observations This will require some experimentation as each grill has different heating an...

Page 9: ...at 1 800 963 0211 8 a m 6 p m EST Monday Thursday 8 a m 5 p m EST Friday PART DESCRIPTION PARTS C D F X Y Z H BB AA CC BB AA CC G E C D E F G X Y Z H 4 Prong Meat Fork Handle Collar Counterweight Was...

Page 10: ...er l article au d taillant appelez notre service la client le au 1 800 963 0211 entre 8 h et 18 h HNE du lundi au jeudi ou entre 8 h et 17 h HNE le vendredi JOIGNEZ VOTRE RE U ICI Num ro de s rie Date...

Page 11: ...rou Qt 4 CONSIGNES DE S CURIT Assurez vous de lire et de comprendre l int gralit de ce manuel avant de tenter d assembler d utiliser ou d installer le produit Si vous avez des questions veuillez t l p...

Page 12: ...el un lectricien qualifi NE tentez PAS de modifier la fiche ou d ignorer les consignes de s curit figurant sur l tiquette d avertissement de l appareil et dans ce mode d emploi 12 N utilisez pas l app...

Page 13: ...c t gauche du barbecue ou du c t droit selon le type de barbecue Mettez une rondelle CC l extr mit de chaque boulon AA puis fixez le tout l aide d crous BB Remarque vitez de serrer excessivement Fixe...

Page 14: ...sur le barbecue alignez la pi ce Z sur le trou appropri puis serrez fermement les vis Z Z Y X X Fig 3 Y b Si vous utilisez l article 0371575 0271576 ou 0067087 veuillez suivre les tapes ci dessous afi...

Page 15: ...utilisez l article 0271573 ou 0271574 fixez le support de moteur fourni avec votre barbecue puis glissez horizontalement le moteur du tournebroche A sur le support d Si vous utilisez l article 0296460...

Page 16: ...urnebroche est en marche n utilisez pas simultan ment le br leur de tournebroche et le br leur principal N utilisez pas simultan ment les br leurs lat raux et le tournebroche 9 Placez la rondelle du c...

Page 17: ...eu profonde sous les aliments pour r cup rer le jus et ainsi faciliter le nettoyage du barbecue 5 Branchez l appareil sur une prise de courant Mettez l interrupteur la position marche ON pour mettre l...

Page 18: ...00 963 0211 entre 8 h et 18 h HNE du lundi au jeudi ou entre 8 h et 17 h HNE le vendredi PI CE DESCRIPTION R F DE PI CE C D F X Y Z H BB AA CC BB AA CC G E C D E F G X Y Z H Broche viande quatre dents...

Page 19: ...tienda llame a nuestro Departamento de Servicio al Cliente al 1 800 963 0211 de lunes a jueves de 8 a m a 6 p m y los viernes de 8 a m a 5 p m hora est ndar del Este ADJUNTE SU RECIBO AQU N mero de se...

Page 20: ...ant 4 AA CC BB Tuerca Cant 4 INSTRUCCIONES DE SEGURIDAD Lea y comprenda completamente este manual antes de intentar ensamblar usar o instalar el producto Si tiene preguntas relacionadas con el product...

Page 21: ...ridad que se indica en la etiqueta de advertencia del producto y en este manual 12 No utilice el electrodom stico para otro fin que no sea el especificado 13 No se debe usar ning n tipo de combustible...

Page 22: ...uierdo de la parrilla o del costado derecho dependiendo de la parilla Coloque una arandela CC en el extremo de cada perno AA y asegure el ensamble con tuercas BB Nota No apriete demasiado Fije la abra...

Page 23: ...motor en la parilla y mueva la parte Z al orificio adecuado Apriete los tornillos firmemente Z Z Y X X Fig 3 Y b Si usa los art culos 0371575 0271576 o 0067087 siga los pasos a continuaci n para usar...

Page 24: ...illa Fig 7 c Si usa los art culos 0271573 o 0271574 fije la abrazadera del motor del rostizador proporcionada con la parilla y deslice horizontalmente el motor del rostizador A en la abrazadera d Si u...

Page 25: ...lt neamente el quemador de rostizado y el quemador principal mientras el rostizador est en uso No utilice los quemadores laterales y el rostizador al mismo tiempo 9 Coloque la arandela del contrapeso...

Page 26: ...nchufe la unidad a un tomacorriente Coloque el interruptor de encendido en la posici n ON ENCENDIDO para arrancar el motor del rostizador Para comenzar coloque los quemadores en la configuraci n m s b...

Page 27: ...s a jueves de 8 a m a 6 p m y los viernes de 8 a m a 5 p m hora est ndar del Este PIEZA DESCRIPCI N PIEZAS C D F X Y Z H BB AA CC BB AA CC G E C D E F G X Y Z H Tenedor para carne de 4 dientes Manija...

Reviews:

Related manuals for FL-6002H-2S