Master Chef 085-3230-2 Assembly, Use And Care Manual Download Page 16

TF2115701-MC-00 Eng                                                          Page 16 of 19                                                                  20161205-Ver.4 

The following safety measures are recommended when using your fry set.   


LOCATION MATTERS 

Select a safe place to fry your turkey. It should be in an open area, outside, and on a cement or brick surface. Place the 
liquid propane gas tank and fryer so that if any wind blows the heat from the fryer will blow away from the LP gas tank. 
Never use your fryer in an enclosed area, near a wall or on a wooden deck. Keep a minimum clearance of 10' (3 m) 
from the sides, front and back of the fryer to any construction.   
 

PREPARE PROPERLY 


Remove and discard any thermometer buttons, leg holders and giblet packs 

contained inside the completely thawed turkey. 

Do not attempt to fry a frozen or partially 

frozen turkey. Ensure your turkey is completely thawed prior to proceeding.

 The 

USDA recommends thawing 24 hours (1 day) for every 4-5 pounds in refrigerator. 


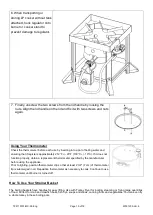
Insert the T-Star stand up through the cavity of turkey so that the legs are at the top. 


Determining the maximum fill level when using a vessel without a maximum fill line


Place the turkey (or other food product) on the lifter. 


Place the turkey and lifter into the empty pot. 


Fill the pot with water just until the turkey is completely submerged. There must be a 
minimum of 3" (8 cm) between the water level and top of the pot. 


Remove the turkey from the pot and either mark the water level on the side of the pot 
or measure the amount of water in the pot. 


Remove the water and completely dry the pot and the turkey. 


This is the amount of peanut oil the pot is to be filled with to cook the turkey. 


Use marinade by injecting it into the thicker areas of the turkey breasts and thighs. 


To use, load the injector with marinade and insert the needle into the turkey. Withdraw 
the needle slowly while pushing the plunger, minimizing large pockets of marinade and 
spreading it more evenly. Discard any unused marinade. 


Completely pat dry the inside and outside surfaces of the turkey. This is very important 

as it reduces the splattering of oil. After patting the turkey dry, add herb rubs or 

seasonings to the skin 


FRY WITH CARE 


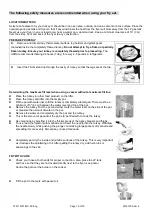
Check your hose at both ends for proper connection. Also, place the LP tank 

and hose so that they are not located directly next to the fryer (see photo). 

Centre the pot over the burner on the cooker. 


Fill the pot to the mark with peanut oil. 


Summary of Contents for 085-3230-2

Page 1: ...installer or person assembling this appliance Leave this manual with this appliance for future reference This instruction manual contains important information necessary for the proper assembly and sa...

Page 2: ...ause property damage personal injury or death DANGER 1 Never operate this appliance unattended 2 Never operate this appliance within 10 3 0 m of any structure combustible material or other gas cylinde...

Page 3: ...se may cause overflow and severe burns from hot oil and water splatter When frying with oil grease all food products MUST be completely thawed and towel dried before being immersed in the fryer 14 Do...

Page 4: ...liquid Never drop food or accessories into hot cooking liquid Lower food and accessories slowly into the cooking liquid in order to prevent splashing or overflow When removing food from the appliance...

Page 5: ...n tanks will vary by temperature A frosty regulator indicates gas overfill Immediately close LP tank valve and call LP gas dealer for assistance Do not release liquid propane LP gas into the atmospher...

Page 6: ...death Never attempt to attach this appliance to the self contained LP gas system of a camper trailer or motorhome The pressure regulator and hose assembly supplied with the appliance must be used Repl...

Page 7: ...cooker while lighting Step Procedure Illustration 1 Read all instructions before lighting 2 Turn regulator control valve to OFF position 3 Fully turn timer control knob clockwise 4 Fully open LP tank...

Page 8: ...flame to go out 8 If ignition does not occur in 5 seconds turn the regulator and LP tank valve off wait 5 minutes and repeat the lighting procedure 9 Check the position of thermocouple make sure the f...

Page 9: ...eing put into operation The replacement hose assembly shall be that specified by the manufacturer Clean and inspect the pressure regulator and hose assembly prior to use Cleaning the Burner CAUTION Ch...

Page 10: ...r enclosed free and clear from debris Clean all cooking surfaces of vessels aluminum pots and pan with warm soapy water and a nylon cleaning pad to avoid oxidation corrosion and rusting CAUTION All cl...

Page 11: ...TF2115701 MC 00 Eng Page 11 of 19 20161205 Ver 4 Product Diagram 3A...

Page 12: ...Legs 4 pcs 3 Pot lid 1 pc 4 36 qt 34 L aluminum pot 1 pc 5 Burner 1 pc 6 Timer control box 1 pc 7 Heat shield 1 pc 8 T star stand 1 pc 9 Lifter 1 pc 10 Strainer basket 1 pc 11 15 38 1 cm Thermometer...

Page 13: ...M6x12 bolts A per leg 2 Attach the burner 5 to automatic shut off valve in the timer control box 6 by turning the burner clockwise Do not fully tighten the burner to the valve tighten until 3 threads...

Page 14: ...ith rectangle lip and burner support bar G 5 Align timer control box 6 to the timer box support bar H and fix it with 2 pieces M6x12 screws by going through the support bar H and then to the time box...

Page 15: ...oximately 212 F 20 F 100 C 10 C If it does not function properly obtain a replacement thermometer specified by the manufacturer before using the appliance Prior to lighting position thermometer clip s...

Page 16: ...e turkey or other food product on the lifter Place the turkey and lifter into the empty pot Fill the pot with water just until the turkey is completely submerged There must be a minimum of 3 8 cm betw...

Page 17: ...nto the cooking liquid in order to prevent splashing or overflow When removing food from the appliance care shall be taken to avoid burns from hot cooking liquids Adjust the burner to maintain 325 F 1...

Page 18: ...e is not in direct flame path of burner Ensure the thermocouple is assembled in right position and the nut is tightened on the thermocouple See Assembly Instructions step 3 for detail Make sure the fl...

Page 19: ...nated shipping address 5 This limited warranty is given to and covers the ORIGINAL PURCHASER ONLY and such coverage terminates 1 year from the date of purchase 6 DAMAGE LIMITATION WARNING IN NO EVENT...

Reviews: