background image

19 L Bo le

12 L Bo le

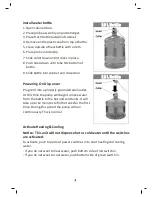
Powering On Dispenser

Install water bo le

1. Open cabinet door.

2. Place probe assembly on probe hanger.
3. Place fresh bo le outside of cabinet.

4. Remove en re plas c cap from top of bo le.

5. Clean outside of new bo le with a cloth.

6. Place probe into bo le.

7. Slide collar down un l it clicks in place.

8. Push head down un l tube hits bo om of

    bo le.

9. Slide bo le into cabinet and close door.

Plug cord into a properly grounded wall outlet.

At this  me the pump will begin to move water
from the bo le to the hot and cold tanks. It will
take up to 12 minutes to fill the tanks for the first

me. During this period the pump will run

con nuously. This is normal.

Ac vate Hea ng & Cooling

No ce: This unit will not dispense hot or cold water un l the switches 
are ac vated.

To ac vate, push top side of power switches in to start hea ng and cooling
water.

-  If you do not want to heat water, push bo om side of red switch in.
-  If you do not want to cool water, push bo om side of green switch in.

Summary of Contents for 043-2338-4

Page 1: ...Model No 043 2338 4 Bottom load Water Dispenser FOR CUSTOMER SERVICE Call toll free helpline 1 855 803 9313...

Page 2: ......

Page 3: ...DIRECTORY PARTS LIST SAFETY PRECAUTIONS GETTING STARTED DISPENSING WATER TROUBLESHOOTING CLEANING MACHINE INSTALLATION LIMITED WARRANTY 8...

Page 4: ...for Room Tamp Water Cooling Pilot Lamp Heating Pilot Lamp Water Collector Hot Water Outlet PARTS LIST This machine is suitable for 12 L or 19 L bo les Do not use bo les lled with hard water This mach...

Page 5: ...penser in a dry place away from direct sunlight Do NOT use outdoors Install and use only on a hard at and level surface Do NOT place dispenser in an enclosed space or cabinet Do NOT operate dispenser...

Page 6: ...y If the supply cord is damaged it must be replaced by a special cord from the manufacturer or its service agent available machine Thermostat has been adjusted No need to adjust it yourself When the i...

Page 7: ...nd close door Plug cord into a properly grounded wall outlet At this me the pump will begin to move water from the bo le to the hot and cold tanks It will take up to 12 minutes to ll the tanks for the...

Page 8: ...ieved Dispensing Hot Water A er setup hot water will be available in 15 20 minutes 1 Posi on bo le glass pitcher or cooking pot below spout 2 Slide red bu on away from you and depress hot water contro...

Page 9: ...the power supply before opera on according to the following instruc ons TROUBLE SHOOTING Water is leaking Unplug dispenser remove bo le and replace it No water is coming from the spout Make sure the b...

Page 10: ...hould be done every six months avoid damaging 4 To Remove Mineral Deposits MACHINE INSTALLATION To prevent the machine from swaying or falling install the bracket accordingly 1 Loosen the screw from e...

Page 11: ...Warranty This product carries a one 1 year warranty against defects in workmanship and materials If found defective return to place of purchase with proof of purchase This product is not guaranteed ag...

Page 12: ...Imported by Trileaf Distribution Trifeuil Toronto Canada M4S 2B8 9...

Page 13: ...VEUILLEZ LIRE ATTENTIVEMENT CE GUIDE AVANT D UTILISER CET APPAREIL N de mod le 043 2338 4 GUIDE D UTILISATION Refroidisseur d eau chargement inf rieur SERVICE LA CLIENT LE sans frais 1 855 803 9313...

Page 14: ......

Page 15: ...TABLE DES MATI RES LISTE DES PI CES CONSIGNES DE S CURIT PREMIERS PAS DISTRIBUTION DE L EAU D PANNAGE NETTOYAGE INSTALLATION DE L APPAREIL GARANTIE LIMIT E 8...

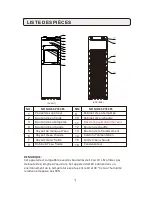
Page 16: ...de Robinet d eau temp r e Robinet d eau chaude Bac de r cup ra on de l eau Bouton de chau e Bouton de refroidissement Cordon d alimenta on Sor e d eau chaude Condensateur REMARQUE Cet appareil est com...

Page 17: ...la lumi re directe du soleil NE l u lisez PAS l ext rieur Installez le uniquement sur une surface dure et plane NE placez pas le refroidisseur dans un placard ou un endroit ferm N u lisez PAS le refr...

Page 18: ...s lors de r cep ons et pour tout autre v nement non commercial Ne stockez pas de substance explosive comme des bombes a rosol contenant un gaz propulseur in ammable dans cet appareil Si le cordon d al...

Page 19: ...de la chaleur et du refroidissement Remarque Cet appareil ne distribuera pas d eau chaude ou froide tant que les boutons ne seront pas mis en posi on de marche Pour les me re en marche enfoncez la par...

Page 20: ...n d lai de 15 20 minutes 1 Placez une bouteille un verre un pichet ou une casserole sous le bec 2 Faites glisser le bouton rouge l oppos de vous et abaissez le bouton d eau chaude pour faire couler de...

Page 21: ...surez vous que le bouton rouge l arri re du refroidisseur est sur ON Assurez vous que le refroidisseur se trouve sur une surface plane NETTOYAGE Pour viter les accidents coupez le courant avant de sui...

Page 22: ...minutes plus tard vacuez le liquide puis rincez l appareil l eau trois ou quatre fois Id alement ce processus doit tre e ectu tous les six mois Ne tentez pas de d monter l appareil a n de ne pas l end...

Page 23: ...cle comprend une garantie d un 1 an contre les d fauts de fabrication et de mat riaux Si l article est d fectueux retournez le au lieu d achat avec la preuve d achat Cet article n est pas garanti cont...

Page 24: ...Import par Trileaf Distribution Trifeuil Toronto Canada M4S 2B8 9...

Reviews: