background image

Umbaubericht

Lokomotiven


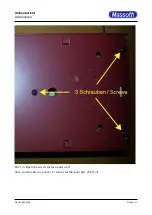
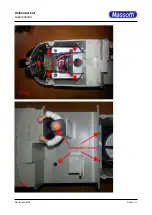
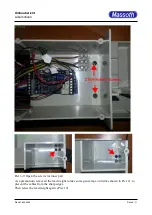
Pict 6-9: Open the screws for inner part. 
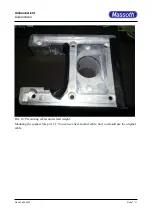
As a precaution i removed the lead weight to take some gauze tape on it (like shown in Pict. 2), to 
prevent the cables from the sharp edges. 
Then screw the lead weight again. (Pict. 10) 


Stand 18.04.2020

Seite 6 / 11

Summary of Contents for Piko VT 11.5 TEE

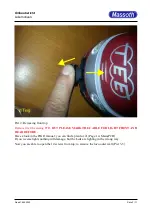
Page 1: ...nstall 2 speaker you HAVE TO USE 4 Ohm speakers instead and connect them serial Opening the locomotive is quite easy remove at the traction unit in front the rear plastic cover Press lightly on top and pulls the upper part backwards Then turn the roof backwards and remove it Pict 1 Pict 1 Removing roof To remove the front top pull down the coupler and in the same time push in front of the top unde...

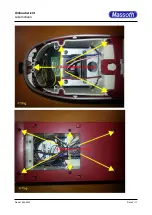
Page 2: ...FOR LIGHT FRONT AND REAR BEFORE Have a look in the PIKO manual you can find a plan for it Page 14 Main PCB If you reverse lights nothing will damage but the Leds are lighting in the wrong way Now you are able to open the 14 screws from top to remove the loco outer wall Pict 3 5 Stand 18 04 2020 Seite 2 11 ...

Page 3: ...Umbaubericht Lokomotiven Stand 18 04 2020 Seite 3 11 ...

Page 4: ...Umbaubericht Lokomotiven Pict 3 5 Open the screws for loco outer wall Then you are able to open the 13 screws for the inner part Pict 6 9 Stand 18 04 2020 Seite 4 11 ...

Page 5: ...Umbaubericht Lokomotiven Stand 18 04 2020 Seite 5 11 ...

Page 6: ...Open the screws for inner part As a precaution i removed the lead weight to take some gauze tape on it like shown in Pict 2 to prevent the cables from the sharp edges Then screw the lead weight again Pict 10 Stand 18 04 2020 Seite 6 11 ...

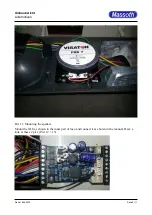
Page 7: ...Umbaubericht Lokomotiven Pict 10 Preventing cables under lead weight Mounting the speaker like pict 11 You can see here another cable but you should use the original cable Stand 18 04 2020 Seite 7 11 ...

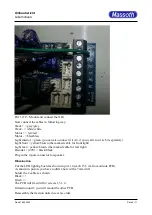
Page 8: ...aubericht Lokomotiven Pict 11 Mounting the speaker Mount the XLS as shown in the inner part of loco and connect it as shown in the manual Have a look at these 2 pict Pict 12 13 Stand 18 04 2020 Seite 8 11 ...

Page 9: ...e for front light Light rear yellow brown the marked cable for rear light Decoder 22V black black Plug in the 2 pole connector for speaker Illumination Cut the LED lighting board as shown in pict 14 each 13 5 cm from outside PCB As shown in picture you have to drill a hole with a 7mm drill Solder the 2 cables as shown Black Green The PCB will fixed with 2 screws 1 5 x 4 In traction unit 2 you will...

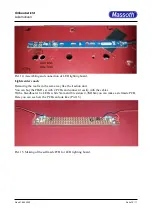
Page 10: ...me way like the traction unit You can buy the PIKO set with 2 PCBs and connect it easily with the cables With a breadboard 8 x LEDs white 5mm and 8 resistors 4 7KOhm you can make a slefmade PCB Here you can see how the PCB can look like Pict 15 Pict 15 Making of the selfmade PCB for LED lighting board Stand 18 04 2020 Seite 10 11 ...

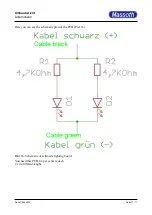
Page 11: ...richt Lokomotiven Here you can see the schematic plan of the PCB Pict 16 Bild 16 Schematic of selfmade lighting board You need this PCB 4 x per center coach 2 x in different lenght Stand 18 04 2020 Seite 11 11 ...

Reviews: