MARTIN
®
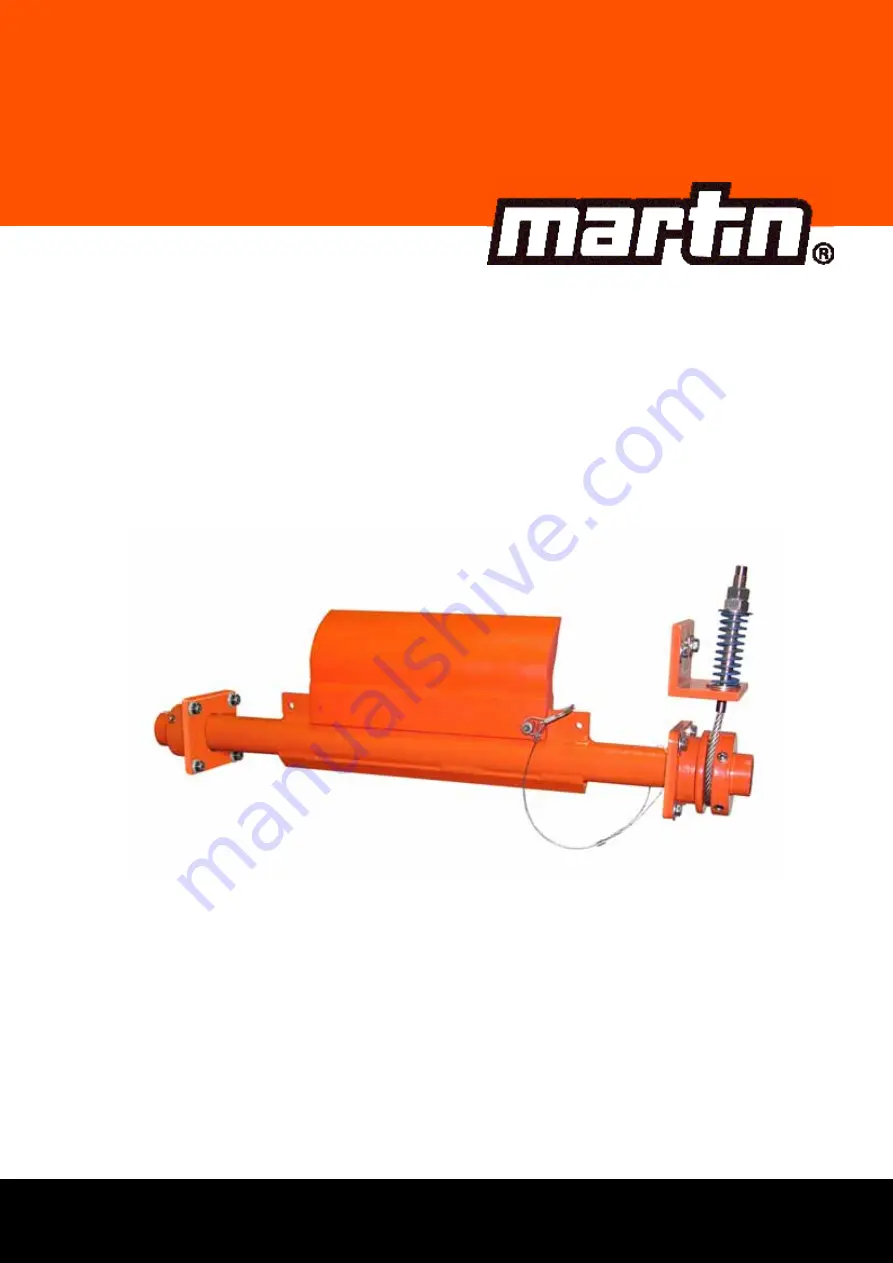
PIT VIPER™
Pre-Cleaner
Installation instructions
M3735UK
Page 1: ...MARTIN PIT VIPER Pre Cleaner Installation instructions M3735UK...
Page 2: ...Martin Engineering GmbH M3735UK 09 15...
Page 3: ...3 3 Type clarification 10 4 Preparing for the installation 11 4 1 Before the installation 11 4 1 1 Required materials and tools 11 4 1 2 Preparatory measures 11 5 Installation 13 5 1 Safety informati...
Page 4: ...32 8 4 Disposal 32 9 Part numbers 33 9 1 Explanation of part numbers 33 9 2 Inline Reversing tensioner 34 9 3 Martin Inspection Doors 34 9 4 Installation manuals 34 9 5 Accessories 34 9 6 Warning labe...
Page 5: ...nt require the written consent of Martin Engineering The technical standard at the time of delivery of the product and its technical documentation is decisive for as long as no other information is pr...
Page 6: ...IN Inspection door Publication no M3127 Installation manual for MARTIN TWIST Tensioner Publication no M3296 Installation manual for MARTIN Cable Tensioner Publication no M3734 The following standards...
Page 7: ...nts a possibly hazardous situation which could lead to serious bodily injuries or death if not avoided CAUTION Represents a possibly hazardous situation which could lead to minor bodily injuries and o...
Page 8: ...s MARTIN Inline mount plates can be used on open transfer systems Martin Engineering or one of its representatives can assist with the position or with special solutions in cases where the installatio...
Page 9: ...onveyor systems and their accessories must always be performed during shut down The procedures described in the applicable installation instructions for shutting down the conveyor system must always b...
Page 10: ...derstood these installation instructions 2 3 3 Authorised personnel Personnel are considered authorised when they have suitable training and technical experience can demonstrate knowledge of the appli...
Page 11: ...cleaning result 3 2 Tensioners The cleaner and its specially developed Martin Engineering Inline Reversing tensioners offer the best possible results and correspond to the general state of the art The...
Page 12: ...uct 3 3 Type clarification Blades for the MARTIN PIT VIPER Pre Cleaner are available in various material designs The required material can be selected in accordance with the material conditions The se...
Page 13: ...belt cleaner see delivery note for weight data 4 1 2 Preparatory measures 1 Inspect the delivery for the following conditions Is the delivery complete Does the number of pallets crates containers deli...
Page 14: ...med by the shipper All damaged products must be kept for inspection 3 The delivery should include the following parts depending on the scope of the order MARTIN PIT VIPER Pre Cleaner possible accessor...
Page 15: ...ivation Use warning signs WARNING RISK OF EXPLOSION Increased risk when using a cutting torch or welding device in closed rooms Check the gas and dust content of the air before usage NOTE The chute wa...
Page 16: ...ransfer system with pre existing installation openings and air line brackets for belt cleaners Follow the instructions given in Section 5 2 3 Installation on an open transfer system Use the equipment...
Page 17: ...Fig 1 3 Determine radius R 4 Draw the arc of a circle 4 Fig 1 with radius R NOTE The pre cleaner is installed exclusively in the lower front quarter of a head pulley Always comply with the specified i...
Page 18: ...cular at this point 2 Fig 2 7 The point of intersection 3 Fig 2 with the arc of the circle is the installation position of the pre cleaner 8 Repeat steps 1 to 7 on the far side of the chute wall 5 2 2...
Page 19: ...clamping pin 4 Fig 8 3 Open the retaining clip 4 Remove the pin hitch 5 Fig 3 5 Remove the blade from the mainframe 6 Follow the corresponding instructions for your specific tensioner for installing...
Page 20: ...tion 7 Place the blade onto the mainframe and insert it into the wooden dowel pin 8 Insert the pin hitch 5 Fig 4 9 Tighten the retaining clip Fig 4 NOTE Position the blade in a way that its tip points...
Page 21: ...ame in parallel to the head pulley Fig 5 Pos Description 1 Chute wall 2 Head pulley 3 Blades Tab 2 Centring the mainframe Fig 6 Pos Description 1 Top view of the blades 2 Head pulley 3 Head pulley fra...
Page 22: ...ns on how to configure it Section 2 1 4 Fig 7 Pos Description 1 Head pulley 2 Head pulley frame 3 Blades 4 Chute wall Tab 4 Aligning the mainframe horizontally CAUTION RISK OF DAMAGE Excess or uneven...
Page 23: ...uries and property damage Always remove any tools from the installation site and conveyor belt upon completion of the installation work before switching on the power supply WARNING RISK OF INJURY Body...
Page 24: ...n wear is normal This stops as soon as the blades have adjusted to the shape of the conveyor belt Bulk material accumulation No bulk materials must accumulate between the blades and return side 6 Note...
Page 25: ...ARNING Body parts and or clothing may get caught and pulled in by rotating parts or by the moving conveyor belt Before any installation or maintenance work is carried out ensure that all power sources...
Page 26: ...any loose connections 4 Check the cleaner tension and re tighten if necessary 5 Check the blades for wear damage and missing parts NOTE Maintenance inspections must be performed at least once a week S...
Page 27: ...noticed Contact Martin Engineering or one of its representatives for support Do NOT start up the conveyor system until the cause of the problems has been recognised and eliminated CAUTION RISK OF DAM...
Page 28: ...ing parts or by the moving conveyor belt Do not touch or reach into the conveyor system or its accessories during operation CAUTION RISK OF DAMAGE Never operate the belt cleaner for longer than 15 min...
Page 29: ...ntenance 6 3 Replacing the blades 1 Slacken the Inline Reversing tensioners as specified in the corresponding installation instructions 2 Fold the cleaner down from the head pulley 3 Open the retainin...
Page 30: ...Maintenance 5 Remove the blade from the hollow clamping pin 1 Fig 10 6 Remove the blade from the mainframe 2 Fig 10 7 Place a new blade onto the mainframe 1 Fig 11 8 Slide the blade onto the hollow cl...
Page 31: ...gainst the head pulley 12 Tighten the cleaner 13 Remove all tools from the working area 14 Switch the conveyor back on 15 Observe the cleaner and check its cleaning performance See Section 7 Troublesh...
Page 32: ...sed on the conveyor belt Reduce the tension Tension values can be found in the tensioner s installation manual Cleaner installed in the material flow Install the cleaner in a different place Insuffici...
Page 33: ...f necessary Noises or vibrations Cleaner on the conveyor belt too loose of too tightly tensed Correct the tension if necessary The blade s urethane is possibly not suitable for the application Contact...
Page 34: ...ure where they are protected against direct sunlight The best storage conditions are at 0 C to 30 C and 60 relative humidity Martin Engineering guarantees that the stored products will remain fully fu...
Page 35: ...PIT VIPER Pre Cleaner PV1S aabbccddeef gg E a Belt width in inches b Blade design 11 solid 10 segmented c Cleaning width in inches d Urethane type OR Orange BR Brown chemical resistance CL clear dry...
Page 36: ...teel door dust proof 229 x 305 mm Part no CYA 0912 305 x 356 mm Part no CYA 1214 305 x 457 mm Part no CYA 1218 457 x 610 mm Part no CYA 1824 610 x 610 mm Part no CYA 2424 9 4 Installation manuals MART...
Page 37: ...ring GmbH 35 M3735UK 09 15 Part numbers 9 7 MARTIN PIT VIPER Pre Cleaner Fig 13 1 3 2 4 5 6 7 ML Mainframe Length Hauptachsenl nge Verst rkungsl nge RL Reinforcement Length CW Cleaning Width Reinigung...
Page 38: ...610 1524 32756 30 XX E PV 30XX24XX 1600 2200 715 PV1S 30XX28XXXX XX E 711 1524 32756 30 XX E PV 30XX28XX 1600 2200 715 PV1S 36XX30XXXX XX E 762 1676 32756 36 XX E PV 36XX30XX 1800 2400 870 PV1S 36XX34...
Page 39: ...ilenr Pos Blade color Blattfarbe Range of application Anwendungsbereich 2 PV1S XXXXXXORXX XX E PV XXXXXXOR Orange Used for 80 of all aplications Geeignet f r 80 aller Anwendungen PV1S XXXXXXBRXX XX E...
Page 40: ...not required meets the following requirements EC Machinery Directive 2006 42 EC DIN EN 618 Equipment and systems for bulk materials The following harmonised standards were particularly applied DIN EN...
Page 41: ...4 65396 Walluf Germany Tel 49 6123 97820 Fax 49 6123 75533 info martin eng de www martin eng de Turkey Martin Engineering Turkey Yukar Dudullu mes Sanayi Sitesi B Blok 205 Sokak No 6 34775 mraniye Ist...