background image


Before attempting to set the P7500 to a fold different than the factory setting, you 
must understand the different types of folds (see Figure 9 for examples of several 
common folds and their corresponding icons). A half fold requires only the first 
fold table to be set and used. All other folds require both fold tables. 


Letter Fold 


Half Fold 


Z-Fold 


Double Parallel 

Figure 9: Fold Types 

USING THE P7500 

Double Fold Operation 

All folding operations, apart from the half fold, require two folds be placed in the 
stock. This is the case in the typical letter fold or Z-fold. The second fold table 
must be in the double fold position (position it is factory preset to) in order to 
accomplish this. Use the following steps to create the different types of folds: 

1.


Loosen both locking knobs on both folding tables to loosen the paper stops. 

2.


Locate the icons on the fold table rulers that are the type of fold that the 
operator desires. 

3.


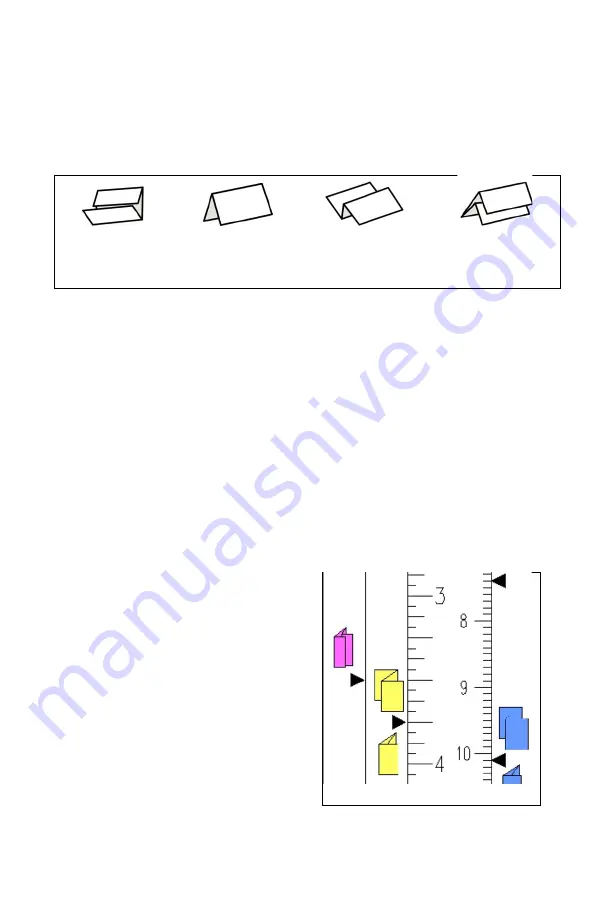
Move the Paper stops to the 
corresponding arrows next to the 
desired icons. 8.5” X 11” (yellow icons) 
and 8.5” x 14” (pink icons) paper use the 
inch scale on the left side of the rulers. 
A4 (blue icons) paper uses the metric 
scale on the right side of the rulers (see 
Figure 10). 

4.


Tighten the paper stop locking knobs 
down to lock the paper stops into 
position. 


Figure 10 

Summary of Contents for my OFFICE PRODUCTS P7500

Page 1: ...P7500 RAPIDFOLD PAPER FOLDER INSTRUCTION MANUAL Model P7500 110V Model P750022 220V Serial Number Date ...

Page 2: ......

Page 3: ...CONTENTS ABOUT 4 SPECIFICATIONS 4 COMPONENT IDENTIFICATION 4 SETTING UP 5 ASSEMBLY 5 ALIGNING THE PAPER GUIDES 6 FOLD TABLES 8 USING THE P7500 9 DOUBLE FOLD OPERATION 9 HALF FOLD OPERATION 10 TROUBLESHOOTING 13 ...

Page 4: ...00 sheets hr Accepts 18 24 lb bond paper 68 90 gsm Folds 1 sheet at a time automatically or up to 3 sheets at a time manually Component Identification A RapidFold Folding Machine B Paper Guides 2 C Front Fold Table D Back Fold Table E Metal Brackets 2 F Exit Tray Connector Set 3 3 top plastic pieces 3 bottom plastic pieces 6 connector screws A B C D E F ...

Page 5: ...he black plastic nuts and clear spacers from the Guides Once inserted install the clear spacers on the Paper Guides and screw the nuts back onto the Paper Guides and tighten The Paper Guides should now be attached to the machine as shown in Figure 2 Figure 1 Figure 2 ExitTrayAssembly To assemble the Exit Tray you will need a 2 Philips screwdriver the two Metal Brackets and the three Exit Tray Conn...

Page 6: ...her The other metal portion may then be installed to the plastic connector and screwed together completely PlugintheMachine Insert the plug into the back of the machine and then into an electrical outlet Aligning the Paper Guides Paper guide placement is a critical and often overlooked factor in machine set up Please follow the instructions below carefully to ensure trouble free paper feeding Figu...

Page 7: ...e 5 Paper guides aligned to LS marks 3 Slide a single piece of paper between the paper guides check for a Pinching the paper should slide freely between the paper guides with a small amount of clearance to feed freely Loosen thumbscrews and adjust paper guides if necessary to correct Setting the paper guides too tight will result in feed hesitation b Skewing the paper should be exactly square to t...

Page 8: ...ld go into the machine open end first exception When doing a half fold the Back Fold Table should go in closed end first See Half Fold section on the next page Hint Many users find it easier to install the fold tables while looking at them from the bottom as seen in Figure 6 Figure 7 Front Fold Table Figure 8 Back Fold Table AdjustingtheFoldTables Note The RapidFold 110v model comes factory preset...

Page 9: ...cal letter fold or Z fold The second fold table must be in the double fold position position it is factory preset to in order to accomplish this Use the following steps to create the different types of folds 1 Loosen both locking knobs on both folding tables to loosen the paper stops 2 Locate the icons on the fold table rulers that are the type of fold that the operator desires 3 Move the Paper st...

Page 10: ...s on a flat surface such as a table 2 Load squared stack of paper into the P7500 feed table the top sheet of paper should be in contact with the black feed tire NOTE In loading the paper the stack need only be pushed into the feed mechanism with a light touch Jamming the stack of paper into the folder with force will result in feeding problems See figures 12 and 13 Figure 12 Figure 11 1 Take out b...

Page 11: ...ing multiple sheet sets of paper 1 To prevent jams remove all paper from the Paper Tray before feeding sets by hand 2 For feeding sets of up to 3 sheets stapled or unstapled first square the paper against a tabletop 3 Place the paper into the manual feed slot on the top of the machine as shown in Figures 13 and 14 above Do not install multiple sheet sets in the Feed Table a jam will result Manual ...

Page 12: ...ving the first fold table stop out approximately 1 8 For example if the first fold table were set at 7 3 8 for a letter fold the user would reset it to 7 1 2 for the multiple sheet set PaperJams 1 Unplug the machine Check to see if you can clear the jam by removing one of the Fold Tables 2 If you cannot remove the jam use a flathead screwdriver to manually turn the folding rollers using the access...

Page 13: ...tatic Eliminator to remove static in paper PaperMisfeed 1 If the paper guides are too tight or not parallel to each other adjust the paper guides as described in Aligning the Paper Guides section of this instruction manual 2 If feeding by hand make sure the paper is properly aligned before placing it in the slot 3 If feeding by hand place the set in the slot before turning the machine on 4 Re alig...

Page 14: ......

Page 15: ......

Page 16: ...3 09 21 By Martin Yale Industries 251 Wedcor Ave Wabash IN 46992 my officeproducts com martinyale com info martinyale com 800 225 5644 For Product Registration and Warranty information visit martinyale com register ...

Reviews: