6
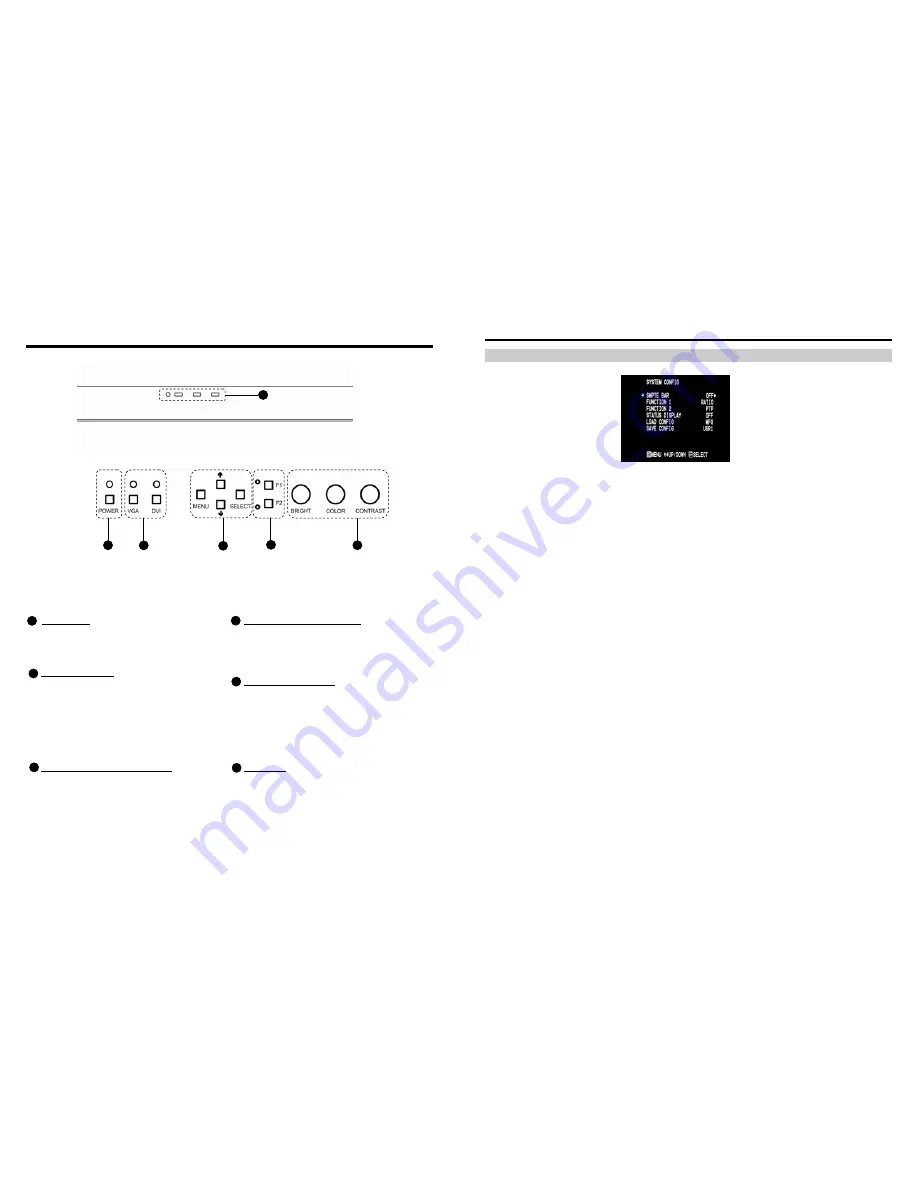
Front Panel Features
Power Button
Turn the monitor on by pressing the power button.
In the OFF state, the LED will shine red. The LED
will shine green when the monitor is turned on.
Input Select Buttons
Use the input select buttons to select the input to be
displayed:
•
VGA
•
DVI
Each input automatically detects the applicable
formats
(See Compatible Input Formats – Page 8)
.
On-Screen Menu Navigation Buttons
Use the
Menu
,
↑
,
↓
, and
Select
buttons to display
and navigate the on-screen menu
(See Main Menu
and Navigation – Page 9)
.
User-Definable Function Buttons
Two user-definable function buttons can be used for
direct access to various settings. Functions are
assigned using the on-screen menu
(See User-
Definable Function Buttons – Page 15)
.
Image Adjustment Knobs
Use the image adjustment knobs to adjust the
following settings. Pressing each knob will display
the current status of the corresponding control:
•
Brightness (0-64)
•
Color (0-64)
•
Contrast (0-64)
Tally Lights
Three tally LEDs (green, red, and yellow) are
provided as general purpose indicators. Each LED
can be individually controlled, providing multiple
indications. Tally LEDs are controlled via the HD-15
connector on the rear panel
(See Tally Interface –
Page 7)
1
2
3
4
5
6
1
2
3
4
5
Top Front Panel
6
Lower Front Panel
15
On-Screen Menu (continued)
SYSTEM CONFIGURATION SUBMENU
■
Internal SMPTE Color Bars
Use to display internally generated SMPTE split-field color bars.
■
User-Definable Function Buttons
Use the
FUNCTION 1
and
FUNCTION 2
menu items to define each function button on the front panel of the monitor.
The following options are available for each button:
• DELAY
Enable and rotate amongst delay modes.
• RATIO
Toggle between 4:3 and 16:9 aspect ratios.
• BACK
Rotate amongst marker backgrounds.
• CENTER
Enable/disable center marker.
• MARKER
Enable and rotate amongst marker settings (choices depend on aspect ratio setting).
• MONO
Enable/disable monochrome mode.
• CTEMP
Rotate amongst color temperature settings.
• PTP
Enable/disable Pixel-to-Pixel mode.
FUNCTION 1
is set to
RATIO
by default.
FUNCTION 2
is set to
PTP
by default.
■
Status Display
Use to enable on-screen display of input/format status in the upper-left corner of the screen.
■
Saving and Loading User Configuration Presets
Use the SAVE CONFIG and LOAD CONFIG menus to save current settings to one of 6 presets, or load a preset. All
monitor settings on the monitor are saved, including the image adjustment knob settings.
•
Use the LOAD CONFIG menu to load one of presets USR1 – USR6. Factory default settings can also be loaded
by selecting MFG. (Factory defaults cannot be overwritten.)
•
Use the SAVE CONFIG menu to save the current settings to a preset from USR1- USR6.
Video Configuration Submenu
Summary of Contents for V-R1042DP-DVI
Page 2: ...2 19...


