background image

11

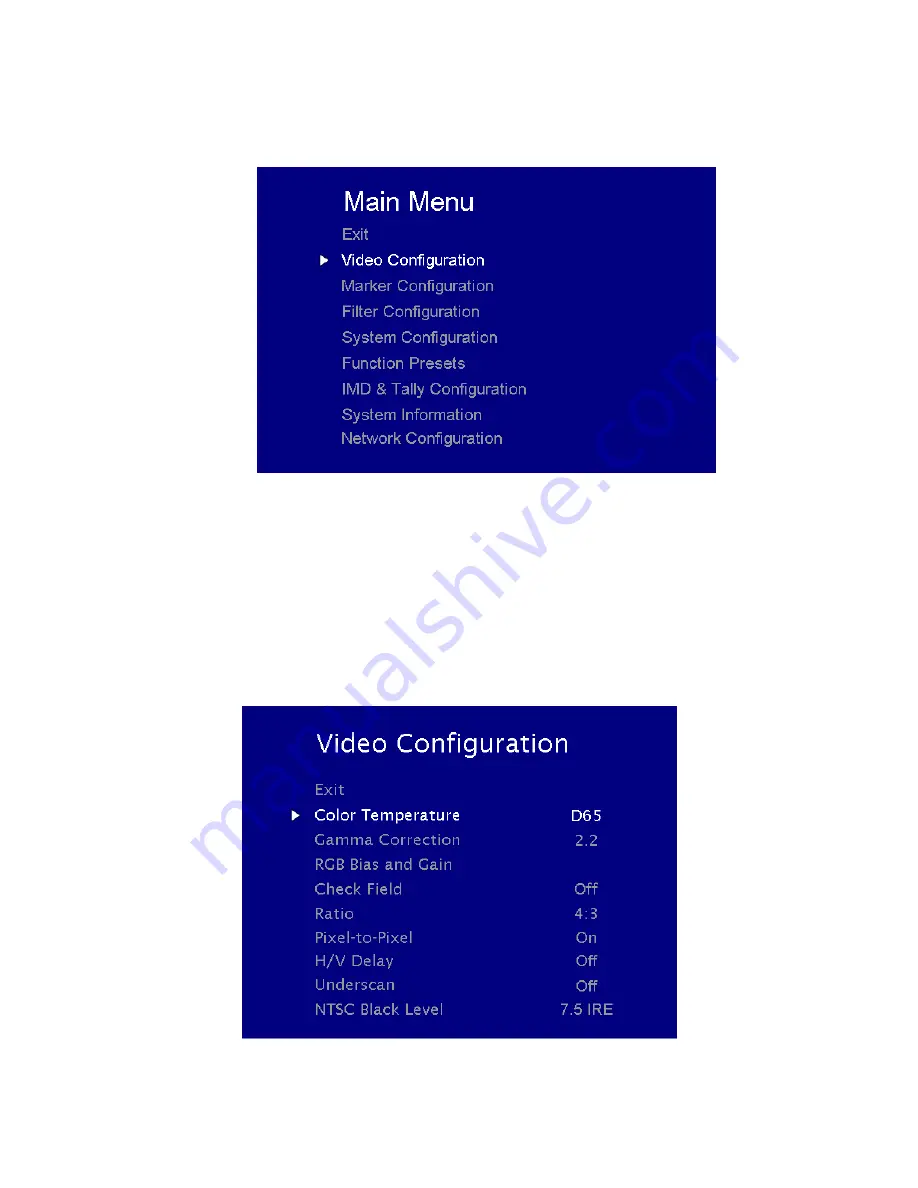
MAIN MENU AND NAVIGATION

Access the main menu by pushing and holding the

MENU

button on the front panel of the monitor.

•Step through menu items using the

and

buttons.

•Choose a submenu or select a menu item by pressing

SELECT

.

•Return to the previous menu by pressing

MENU

.

•Exit the main menu by pressing

MENU

. The menu will automatically time out after 15 seconds.

VIDEO CONFIGURATION SUBMENU

Summary of Contents for V-MD173

Page 1: ...Marshall Electronics Model No V MD173 Rack Mountable High Definition LCD Monitor Operating Instructions Edition 1 Revision 7W ...

Page 2: ...2 Page Intentionally Left Blank ...

Page 3: ... 14 FILTER CONFIGURATION SUBMENU 17 SYSTEM CONFIGURATION SUBMENU 19 FUNCTION PRESETS SUBMENU 20 IMD TALLY CONFIGURATION 20 SYSTEM INFORMATION SUBMENU 22 NETWORK CONFIGURATION SUBMENU 22 Network Control Page 24 Power Tab 24 Menu Tab 24 Function Presets 26 IMD Tally Config 26 Display Tab 27 Keypad Tab 27 Tally Tab 27 Network Tab 27 Network Configuration 27 Navigator 28 Info Tab 29 Global 30 Specific...

Page 4: ...4 Page Intentionally Left Blank ...

Page 5: ...sions section for more information A VESA standard 75mm hole pattern also allows custom mounting installations Alternately the V MD173 can be used in a desktop configuration with optional stand Please contact Marshall Electronics for more information Warning Please use only the square type VESA mount which fits inside the VESA Screw Length WARNING silkscreen with the 75mm hole pattern in order to ...

Page 6: ...les located in Slot 1 or Slot 2 User Definable Function Buttons Four user definable function buttons can be used for direct access to various settings Functions are assigned using the on screen menu Menu Navigation Buttons Use the Menu and Select buttons to display and navigate the on screen menu See Main Menu and Navigation Image Adjustment Knobs Use the image adjustment knobs to adjust color bri...

Page 7: ...D monitor Use a regular RJ45 Ethernet cable to connect the V MD monitor to your network Please see the Network Configuration Submenu section of this manual for further connection details Desktop Mounting Holes These holes are used when attaching the monitor to the optional desktop stand VESA 75mm Hole Pattern VESA standard 75 mm hole patterns is provided to accommodate a variety of custom mounting...

Page 8: ...59 94 60 3G Level A and Level B YCbCr YCbCr A RGB RGB A 1080p 60 59 94 50 1080p 30 29 97 25 24 23 98 30sF 29 97sF 25sF 24sF 23 98sF 1080i 60 59 94 50 MD HDSDIx2 Two channel HD SDI Input Module with switched output 525i 625i 50 720p 25 29 97 30 50 59 94 60 1080p 23 98 23 98sF 24 24sF 25 29 30 1080i 50 59 94 60 MD HDMIx2 Two channel HDMI Input Module 480p59 94 576p 50 720p 25 29 97 30 50 59 94 60 10...

Page 9: ...9 Page Intentionally Left Blank ...

Page 10: ...ch slot you intend to install module Slot 1 or Slot 2 Carefully align the module with the chosen slot The raised rails will fit inside the module Align the Module so that the three 3 mounting holes all line up with the threaded holes of the slot The connectors on both the module and the main board slot should now be in alignment Carefully PRESS the module into the slot Module will seat flush with ...

Page 11: ...e front panel of the monitor Step through menu items using the and buttons Choose a submenu or select a menu item by pressing SELECT Return to the previous menu by pressing MENU Exit the main menu by pressing MENU The menu will automatically time out after 15 seconds VIDEO CONFIGURATION SUBMENU ...

Page 12: ...ing of the screen The purpose is to allow color matching to other types of monitors and or displays Note The Color Temperature preset will automatically switch to USER when Color Bias settings are adjusted It is normal for color bias adjustments to be very subtle When selecting the RGB Bias and Gain submenu gain adjustment indicators will appear at the top of the screen and bias adjustment indicat...

Page 13: ...super black and black bars but the gray bar is still visible 5 Adjust the Contrast button until an even grayscale appears along the top bars 6 Disable Monochrome mode 7 Enable Blue Check Field mode and adjust the Color button so that the outermost bars white and blue appear to match in brightness 8 Composite NTSC only Adjust the Tint button until the third bar from the left cyan and the third bar ...

Page 14: ... For incoming formats smaller than the native resolution of the LCD panel the image will be displayed in the center of the screen using only the necessary LCD pixels For example NTSC images will occupy exactly 720 x 480 pixels The surrounding pixels will be black Note Pixel to Pixel mode disables aspect ratio control and H V Delay MARKER CONFIGURATION SUBMENU Use the Video Configuration submenu to...

Page 15: ... screen when in 16 9 mode 4 3 13 9 14 9 1 85 1 2 35 1 95 Safe 93 Safe 90 Safe 88 Safe 85 Safe 80 Safe 16 9 Marker Examples Full Screen Markers Use these settings to superimpose one of 6 markers on the screen when in Full Screen mode 95 Safe 93 Safe 90 Safe 88 Safe 85 Safe 80 Safe 4 3 Markers Use this setting to superimpose one of 5 markers on the screen when in 4 3 mode 95 Safe Area 93 Safe Area 9...

Page 16: ...is superimposed on the complete image 25 Image area beyond the marker is shown at 25 intensity 50 Image area beyond the marker is shown at 50 intensity 75 Image area beyond the marker is shown at 75 intensity 100 Image area beyond the marker is shown at 100 intensity black Example 80 Marker in 4 3 Mode OFF No Marker 90 Safe Area 0 Background 100 Background ...

Page 17: ... people it is common practice to set exposure of faces to the equivalent of approximately 56 IRE The false color filter will show this area as the color PINK on the monitor Therefore as you increase exposure open the IRIS your subject will change color as indicated on the chart PINK then GREY then a few shades of YELLOW Over exposed subjects above 101 IRE on the monitor will be shown as RED In add...

Page 18: ...18 False Color Key ...

Page 19: ... Input Format OSD Use this option to enable on screen display of input format status in the upper left corner of the screen Curtain Color Use this option to change the curtain color on the monitor This curtain color is what you see when there is no signal input to the monitor Splash Screen Use this option to enable or disable the Marshall Electronics Inc splash screen seen when the monitor is firs...

Page 20: ...one of the user configured presets Save Setup Select this menu item to save a current setup into one of 6 available user presets Power On Preset Select this menu item to reset all adjustments and menu settings to the factory default configuration whenever the unit is powered down FUNCTION PRESETS SUBMENU Function Presets Allows user to assign menu items to the front panel function buttons F1 F2 F3...

Page 21: ...field A value of 0 will cause the background to appear black A value of 100 will make the background invisible Text Alignment Use this field to change the alignment of the text string mentioned above Tally Source Use this setting to change the source of the LED tally lights Choosing the HD 15 Contact Closure option will render the LAN Tally interface disabled Choosing the LAN 100 option will also ...

Page 22: ...D Tally Configuration menu option SYSTEM INFORMATION SUBMENU System This shows the System firmware version of your monitor Power Module This shows the Power Module firmware version of your monitor Keypad This shows the Keypad firmware version of your monitor Slot 1 or 2 This shows your module type and the firmware version of your module If no module is present the word EMPTY will appear in parenth...

Page 23: ...cific Subnet Mask for your monitor When in DHCP Configuration Mode this field will automatically be filled by the Subnet Mask assigned by your network Default Gateway When using a Manual Configuration Mode use this field to assign a specific Default Gateway for your monitor When in DHCP Configuration Mode this field will automatically be filled by the Default Gateway assigned by your network Host ...

Page 24: ...nes the input format currently being displayed on a particular monitor screen A No Signal string indicates that there is no signal present Menu Tab Video Config Color Temperature Use this row to set the current Color Temperature preset being used on the screen Gamma Use this row to set the current Gamma preset being used on each screen RGB Bias and Gain Click the Adjust button in this row to move ...

Page 25: ...dual panel Filter Config False Colors Use this row to turn the False Color filter on an individual screen ON or OFF Mosquito Filter Use this row to turn the Mosquito Filter on an individual screen ON or OFF System Config Input Format OSD Use this row set the Input Format OSD timeout length Curtain Color Use this row to set the current Curtain Color state Splash Screen Use this row to set the splas...

Page 26: ...ettings to be loaded when power is applied to the monitor Function Presets Function on F Buttons Use these rows to select the functions set to be controlled by the F buttons on the physical unit or on the Network Control page IMD Tally Config Text Enable Use this row to turn the monitor s IMD text ON or OFF Text String Use the dialogue box in this row to enter a text string that will be displayed ...

Page 27: ... Bias for the Red Green and Blue components of the video signal To enter a value manually type in a number from 0 100 in the dialogue box and press Set Backlight Backlight Use this section to adjust the Backlight value for the monitor To enter a value manually type in a number from 0 100 in the dialogue box and press Set Keypad Tab Keypad Use the keypad portion of the Network Control page to acces...

Page 28: ...n mode for the IP configuration mode you will be able to enter Default Gateway address manually in this field If you have selected DHCP the box will have Default Gateway already entered This cannot be modified when in DHCP mode Host Name Use this field to enter a Host Name for the monitor You may choose up to 15 alphanumeric characters for the Host Name Web Authentication Fill in the Web Authentic...

Page 29: ...or to their installation The information field at the bottom will indicate the Host Name IP Address and model number of the origin of the Navigator pop up page It will also give a count of how many monitors have been found on the network Info Tab System This shows the System firmware version of your monitor Power Module This shows the Power Module firmware version of your monitor Keypad This shows...

Page 30: ... that you wish to control with the GLOBAL CONTROL settings 4 Click on the POWER MENU or DISPLAY buttons that you wish to control Scan Network Use the Scan Network button to scan for any other Marshall Electronics MD monitor connected on your network The results will show up in the SELECT MONITORS TO CONTROL box SELECT MONITORS TO CONTROL box This box will list any MD Series monitors found on your ...

Page 31: ...wap remove power from unit before Inserting or removing Modules Power Input 4 Pin XLR Connector Tally Hardware Interface HD 15 Female CN 1 Programming Port Factory Upgrade Use Only TALLY Hardware Interface HD 15 Activation requires contact closure of pin to ground on the HD 15 connector ELECTRICAL Power Consumption N A Voltage Requirement 12 VDC MECHANICAL Weight with rack ears 8 75 lbs Operating ...

Page 32: ...32 Dimensions ...

Page 33: ...33 ...

Page 34: ...34 ...

Page 35: ...tainer for a period of one year from the purchase date This warranty is extended to the first consumer only and proof of purchase is necessary to honor the warranty If there is no proof of purchase provided with a warranty claim Marshall Electronics reserves the right not to honor the warranty set forth above Therefore labor and parts may be charged to the consumer This warranty does not apply to ...

Page 36: ...36 Marshall Electronics Inc 1910 East Maple Ave El Segundo CA 90245 Tel 800 800 6608 310 333 0606 Fax 310 333 0688 www LCDRacks com sales lcdracks com ...

Reviews: