background image


Promote your assets 


20

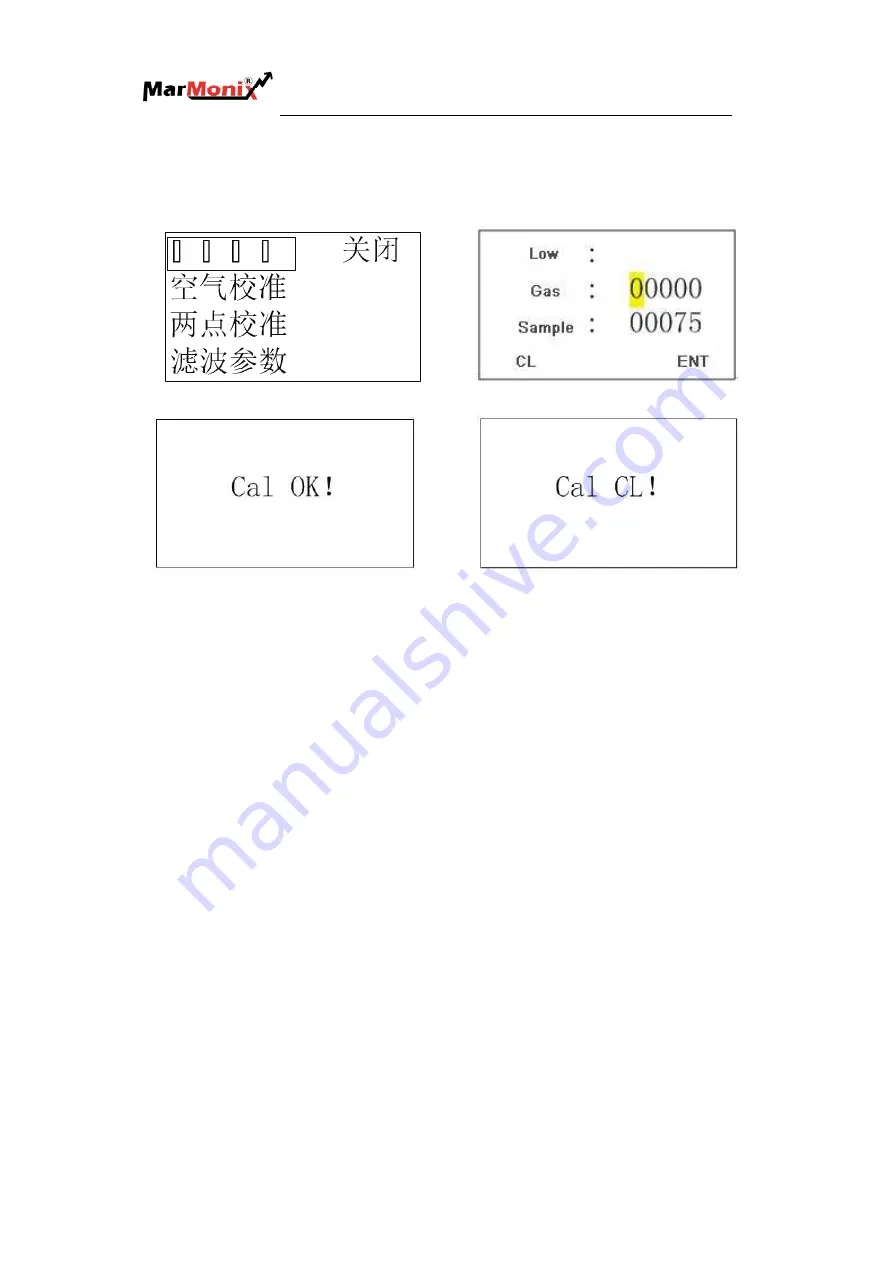
store  the  set  of  parameters  and  prompt  the  calibration  successful  (  Figure  3-36), 

otherwise  it  will  display  the  cancel  prompt  (  Figure  3-37).  Then  end  the  low  point 

calibration. 


Figure 3-34 Select the LOW_ CAL            Figure 3-35 Low point calibration sampling interface


Figure 3-36 Calibration is successful                          Figure 3-37 Calibration cancel   

(2)

High point calibration


The  method  of  high  point  calibration  is  same  to  the  low  point  calibration.  The 

standard gas adopts the measured gas according to the full scale of the instrument, e.g. 

the  range  of  instrument  is  0-50ppm,  select  the  50ppm  SF6  gas  as  the  standard  gas; 

0-1000ppm  range  shall  use  950  ppmSF6  gas  as  the  standard  gas.  Here  we  introduce 

the high point calibration of 0-50ppm range as the example. 

Select the 

HIGH_CAL

 in the main interface (as fig3-38) and press the confirm key 

to enter the operating interface as shown in Figure 3-39 after opening the calibration 

lock function. Open the gas pump and absorb the SF6 gas of 50ppm concentration, if 

the  sensor  works  normally,  the  sampling  value  will  become  stable  (or  the  value 

fluctuates in  a small  range) in short time. At this time, input 50 on the  right of  ""by   

using  the  up  key,  down  key  and  confirm  key,  if  the  instrument  works  normally,  the 

system  will  store  the  set  of  parameters  and  prompt  the  calibration  successful  (see 

Figure 3-36), otherwise it will display the cancel prompt (see Figure 3-37). Then end 

the high point calibration. 


Summary of Contents for MSF6-1000

Page 1: ...MSF6 1000 Portable Infrared Gas Detector Operation Manual V1 0 Please read Operating Specifications carefully prior to use MARMONIX Measuring devices...

Page 2: ...enter of MARMONIX Warning Potential danger Never use the instrument where explosion may happen or there is flammable vapors Please read Operation Specifications carefully prior to use Used batteries s...

Page 3: ...2 THE SYSTEM STATUS RELATED OPERATION 15 3 3 3 CALIBRATION OPERATION 17 3 3 4 OPERATING INSTRUCTIONS OF INSTRUMENT SETTING 21 CHAPTER 4 SOFTWARE OPERATING INSTRUCTIONS 25 4 1 SOFTWARE INSTALLATION 25...

Page 4: ...pact appearance design which facilitates carrying and detecting the SF6 gas leakage on site Lithium battery supply the power and users can recharge it by USB or exchange adapter 1 2 1 2 1 2 1 2 Main F...

Page 5: ...SF6 gas has extremely strong absorption capacity in the infrared wave band center wavelength 10 55 m SF6 infrared sensor is to realize quantitative detection of SF6 gas by detecting the absorption of...

Page 6: ...nmental temperature 20 60 humidity 0 95 RH no condensation Warning Due to the mirror inside the measurement sensitive components once the mirror is defiled the accuracy of measurement will be affected...

Page 7: ...tive type 0 50ppm Sensitivity Standard type 1ppm Highly sensitive type 0 01ppm Accuracy Standard type 1ppm Highly sensitive type 0 1ppm Sampling Mode Pump Operating Temperature 20 60 Power Supply 4 2V...

Page 8: ...2 1 MSF6 1000 Overall Unit 1 Power Indicator 2 Test status indicator light is green in normal status while the light gets red in alarming status 3 Probe 4 Dust proof cap 5 OLED screen can display cle...

Page 9: ...een clearly Figure 2 2 Figure 2 3 is partial enlarged detail of label 5 in figure 2 1 it introduces the meaning of various numerical label in the measurement interface Figure 2 3 SF6 11 9 2 9 03 0 0 p...

Page 10: ...return to the previous menu Up key Under the measuring interface press key to store data manually Under password input interface calibration interface or other interfaces press this key to increase th...

Page 11: ...loose the key until it displays warming up interface the warming up time is about 100s Figure 3 1 Enter into the main interface Figure 3 2 under the non working state after finishing the preheating p...

Page 12: ...s pump and end the measurement Long press it appears the countdown interface the system is power off after the screen shows the word close 3 3 3 3 3 3 3 3 Instrument menu operation Press the CL key af...

Page 13: ...1 Operation of data record menu Press the confirm key in the interface as shown in Figure 3 5 entering the interface as shown in Figure 3 7 users can operate to set the save mode review or delete data...

Page 14: ...interface of input data time Figure 3 9 The interface to display data record Press up or down key under the interface shown as in Figure 3 9 the instrument will display the data record which is nearer...

Page 15: ...t will record the valid value not zero automatically For zero it only records the first changed zero value can reduce invalid data storage Figure 3 14 Setting SAVEMODE MANUAL Figure 3 15 Setting SAVEM...

Page 16: ...attery status the calibration data of last time view the current using address of sensor manual testing whether the sensor has a problem and the program version The information facilitates the instrum...

Page 17: ...stem will fine tuning the measured value according to this value Figure 3 21 Select the PARA_CHK Figure 3 22 The calibration parameters of last time View the sensor information This function can autom...

Page 18: ...ibration submenu as shown in Figure 3 30 Set CAL_LOCK to open state before instrument calibration as shown in Figure 3 31 and then to operate the instrument calibration steps It includes the single po...

Page 19: ...NST_CAL Figure 3 30 the main menu of calibration Figure 3 31 Open calibration lock function Single point calibration When users start to operate the single point calibration the instrument shall compl...

Page 20: ...igure 3 34 after opening the calibration lock function The low point calibration and high point calibration will be introduced as following Figure 3 34Two point calibration 1 Low point calibration The...

Page 21: ...0 1000ppm range shall use 950 ppmSF6 gas as the standard gas Here we introduce the high point calibration of 0 50ppm range as the example Select the HIGH_CAL in the main interface as fig3 38 and pres...

Page 22: ...tore the factory settings adjust the time and other functions The specific operation is showing as below In the main menu interface please select INST_SET as Figure 3 40 entering the interface of inst...

Page 23: ...the instrument shall alarm if the gas concentration exceeds the 3ppm press up key down key and confirm keys to input new alarm value press the confirm button to save the alarm value setting Instrumen...

Page 24: ...volume level value 4 Language setting Select LANGUAGE item in the Parameter setting menu as Fig 3 49 press confirm key to switch the language as fig 3 50 Figure 3 49 Select language setting Figure 3...

Page 25: ...d as a stopwatch before inputting value in CLK_SET interface when you change any value clock stops and then go into the modified clock phase Figure 3 53 Select TIME_ SET Figure 3 54 Select CLK_SET Fig...

Page 26: ...tware Operating Instructions 4 1 4 1 4 1 4 1 Software Installation Please run installation package the install necessary software on the upper computer at first find it in the attached installation CD...

Page 27: ...igure 4 2 Software Installation 2 Suggest to select the installation path as the no operating system disk partition such as D Globe Instrument MSF6 1000 in case the measurement data is lost Figure 4 3...

Page 28: ...the interface display as shown in figure 4 6 and the software installation is completed You can conveniently open the software through the start menu of Windows and desktop shortcut 4 2 4 2 4 2 4 2 PC...

Page 29: ...Promote your assets 28 Figure 4 5 Click on the scan device if successful that the interface will display as shown in Figure 4 6...

Page 30: ...Promote your assets 29 Figure 4 6 3 Click to open the device if successful that the interface will be as shown in Figure 4 7...

Page 31: ...Promote your assets 30 Figure 4 7 4 Click to read data if successful that the interface will be as shown in Figure 4 8...

Page 32: ...can use the mouse wheel to zoom in or out To view the data corresponding to the date please move your mouse to data points stay there for a short time in the scaling status please ensure that the pal...

Page 33: ...Promote your assets 32 Figure 4 9 6 If you want to export the current data into EXCEL format please click export data button...

Page 34: ...Promote your assets 33 Figure 4 10 Figure 4 11...

Page 35: ...e measured value will be inaccurate When outdoor measurement is carried out guarantee that the weather is dry and without wind If you need measured six sulfur hexafluoride leakage situation under the...

Page 36: ...if you forget the instrument code If the user forgets their password you can at state of Figure 3 2 or 3 3 and press the CL key enter the password interface enter the password of the factory settings...

Page 37: ...ings Notes A If the failure cannot be remedied by users the instruments can be sent to the nearest service station or our Company for repair We will remedy and return them back to users as soon as pos...

Page 38: ...f purchasing the products to all users who buy our products Due to the following conditions or problems do not enjoy the warranty of free service I Accident disaster and not proper use and installatio...

Page 39: ...hall be accepted in time after arrival and equipment parts and documents shall be checked according to packing lists If any dispute it should be submitted within 3 working days 7 4 7 4 7 4 7 4 Environ...

Page 40: ...and improving it may lead the contents of the instructions may have discrepancies with the actual product Please forgive us that these changes may not inform you If you search the latest version pleas...

Reviews: