background image

38

ENGLISH

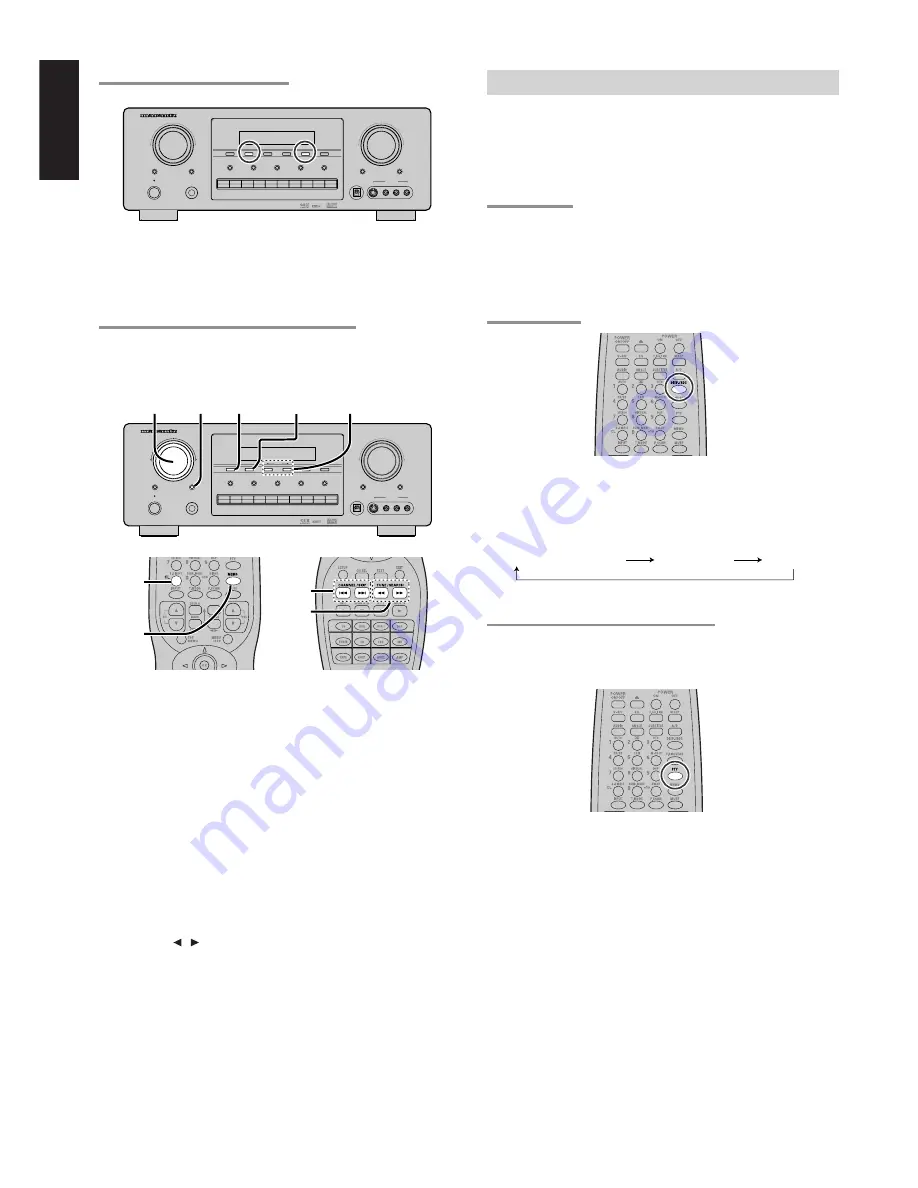
SORTING PRESET STATIONS

Stored preset stations number can be kept line.
To sort the numbers, press and hold the 

MEMORY

 and the 

F/P

 buttons.

PRESET SORT

” will appear on the display and sorting will be done.

NAME INPUT OF THE PRESET STATION.

This function allows the name of each preset channel to be entered
using alphanumeric characters.
Before name inputting, need to store preset stations with the preset
memory operation.

1.

Recall the preset number to be inputted name with the method
described in “Recalling” a preset station.

2.

Press the 

MEMORY 

button on the front panel or press 

MEMO

button on the remote for more than 3 seconds.

3.

The left most column of the station name indicator flashes,
indicating the character entry ready status.

4.

When the 

SELECT 

knob is turned or press 

5

5

5

5

5

 / 

6

6

6

6

6

 button on the

remote alphabetic and numeric characters will be displayed in the
following order:

 B 

 C ... Z 

 1 

 2 

 3 ..... 0 

 –  

 + 

 / 

 (Blank) 

 A

 UP 


 DOWN

5.

After selecting the first character to be entered, press the

MEMORY 

or 

ENTER 

buttons, press 

MEMO 

button on the remote.

The entry in this column is fixed and the next column starts to
flash. Fill the next column same as.
To move back and forth between the characters, press the

TUNING   /   

button or press 

4

 or 

¢

 buttons on the remote.

Note:

• Unused columns should be filled by entering blanks.

6.

To save name, press the 

MEMORY 

or 

ENTER 

button, press

MEMO 

button on the remote for more than 2 seconds.

AV SURROUND RECEIVER SR7300

UP

SURROUND

VOLUME

DOWN

MEMORY

TUNING

MODE

F/P

CLEAR

S-DIRECT

MULTIROOM

MUTE

A/D

7.1CH INPUT

SPEAKRS A/B

POWER ON/STANDBY

PHONES

ENTER

STANDBY

AUX1 INPUT

S-VIDEO

DIGITAL

VIDEO

L

AUDIO

R

DSS/VCR2

AUX1

AUX2

VCR1

DVD

TV

CD

CD-R

TAPE

TUNER

ATT

SELECT

5.

2.


5.


6.

5.


6. 4.

4.

4.

5.

4.

2.

5.

6.

RDS OPERATION

Now in use in many countries, RDS (Radio Data System) is a
description of the station’s programming hidden space in the FM signal.
Your new receiver is equipped with RDS to assist in the selection of
FM stations using station and network names, rather than broadcast
frequencies.  Additional RDS functions include the ability to search for
programme types.

RADIO TEXT

Some RDS stations broadcast RADIO TEXT, which is additional
information on the station and programme being broadcast.
RADIO TEXT information appears as ‘running’ text in the display.
RADIO TEXT is transmitted character-by- character by the radio
station.  As a result of that it may take some time until the entire text
has been completely received.

RDS DISPLAY

When a receiver is tuned to an FM station that is transmitting RDS
data, the Front Panel Information Display will automatically show the
station name or RDS TEXT in place of the typical display of the
station’s broadcast frequency.
To change the display, press the 

DISP./RDS 

button on the remote

controller.

PROGRAMME TYPE (PTY) DISPLAY

The RDS system categorizes programmes according to their genre
into different programme type (PTY) groups.  To display the
programme type information of the current station, press the 

PTY

button in the TUNER MODE on the remote controller.

RT (RADIO TEXT)

PS (Program Service Name)

Frequency

Summary of Contents for SR7300

Page 1: ...Model SR7300 SR7300 OSE User Guide AV Surround Receiver R...

Page 2: ...tenga que hacer uso del seguro o se ponga en contacto con Marantz IMPORTANTE Cuando solicite el servicio otorgado por la garantia el usuario tiene la responsabilidad de demonstrar cu do efectu la comp...

Page 3: ...de la unidad Italiano Perch l unit possa essere sempre ben ventilata non installarla in scaffali o librerie e tenere presente quanto segue Non toccare la parte superiore del rivestimento durante il fu...

Page 4: ...6 8 7 1 CH INPUT LEVEL 27 9 DC TRIGGER SETUP 27 BASIC OPERATION PLAY BACK 28 SELECTING AN INPUT SOURCE 28 SELECTING THE SURROUND MODE 28 ADJUSTING THE MAIN VOLUME 28 ADJUSTING THE TONE BASS TREBLE CON...

Page 5: ...t be exposed to direct sunlight it will not be exposed to electrostatic discharges Never place heavy objects on the equipment If a foreign body or water does enter the equipment contact your nearest d...

Page 6: ...and in a way which follows naturally from the original presentation Neo 6 offers a music mode to expand stereo nonmatrix recordings into the five or six channel layout in a way which does not diminish...

Page 7: ...performances and dramatically improves both hi fi audio conventional surround encoded video material CS II provides composite stereo rear channels to greatly improve separation and image positioning...

Page 8: ...SR7300 is designed and engineered with extensive feedback from custom installation experts dealers and consumers It features multi room multisource 2 assignable DC triggers a RS232C communication por...

Page 9: ...emorized for each input function AV SURROUND RECEIVER SR7300 UP SELECTOR VOLUME DOWN MEMORY TUNING MODE F P CLEAR S DIRECT MULTIROOM MUTE A D 7 1CH INPUT SPEAKERS A B POWER ON OFF PHONES ENTER STANDBY...

Page 10: ...puts Note This button is not used for an input source that is not set to a digital input in the system setup menu 8 S Source DIRECT button When this button is pressed the tone control circuitry is byp...

Page 11: ...s operation 8 DIRECT Source direct indicator This indicator lights when the SR7300 is in the SOURCE DIRECT mode 9 HDCD indicator OSE version only When HDCD signal is decoded this indicator will light...

Page 12: ...terminal 75 ohms Connect an external FM antenna with a coaxial cable or a cable network FM source AM antenna and ground terminals Connect the supplied AM loop antenna Use the terminals marked AM and G...

Page 13: ...o and video output jacks for the Multi zone Multi room Connect these jacks to the optional audio power amplifiers or video display devices to listen and view to the source selected by the multiroom sy...

Page 14: ...select monitor input Note This button is unavailable for SR7300 1 T MODE button when TUNER mode is selected Used to select the auto stereo mode or mono mode when the FM band is selected The AUTO indi...

Page 15: ...ayer to Play 0 EXIT button when AMP mode is selected Used to exit setup menu 1 TEST button when AMP mode is selected Used to enter the test tone menu 2 MENU OSD button when AMP mode is selected When t...

Page 16: ...until it clicks Note The supplied batteries are shipped to confirm the initial operation Therefore the supplied batteries will be consumed quickly Remote control unit RC7300SR 60 SR7300 Approx 5 m LC...

Page 17: ...equency sound VOL 34 Adjusts the over all sound level MENU OSD Displays the current setting on the monitor Cursor Moves the cursor for setting in On screen display mode OK Enter the On screen display...

Page 18: ...a subwoofer with proper setting of the switches in the menu system Front left and right speakers We recommend to set the front L and R speakers with 45 60 degrees from the listening position Center sp...

Page 19: ...YSTEM MINIMUM 4 OHMS CONNECTING SPEAKERS CONNECTING SPEAKER WIRE 1 Strip away approx 3 8 inch 10 mm of wire insulation 2 Twist the bared wire ends tight to prevent short circuits 3 Loosen the knob by...

Page 20: ...white connectors are for the L left channel Be sure to connect input and output properly Refer to the instructions for each component that is connected with this unit Do not bind audio video connectio...

Page 21: ...ideo signal for the VIDEO jacks is the conventional composite video signal S VIDEO jack The video signal is separated into luminance Y and color C signals for the S VIDEO jack The S VIDEO signals enab...

Page 22: ...AUDIO COMPONENT VIDEO DIGITAL OUT DIGITAL IN SBL OUT SL TV SW VCR1 DVD SBL C SR MULTI SR L C R SW SBR DSS VCR2 OUT IN CDR MD IN OUT TAPE IN OUT CD IN OUT SBR TV DVD OPT DSS VCR2 TV DVD COAX MULTI MON...

Page 23: ...FM OUTDOOR ANTENNA Notes Keep the antenna away from noise sources neon signs busy roads etc Do not put the antenna close to power lines Keep it well away from power lines transformers etc To avoid the...

Page 24: ...SURROUND MULTI RC OUT L R L R L R SBL SL SW SBL C SR MULTI L C SBR SL R L PRE OUT FRONT A SURROUND BACK FRONT B CENTER SURROUND L R L R L R 6 5 Y CB PB CB PB CB PB CR PR Y CR PR Y CR PR AUX2 SPEAKER...

Page 25: ...ENCE S TANDBY MODE ECONOMY T V AUTO D I SABL E OSD I N FO ENABL E MA I N EX I T 4 SURROUND S URR MODE AUTO H T EQ OF F L F E L E VE L 0 dB C ENT ER 0 dB S URR L 0 dB S URR R 0 dB S URR BACK 0 dB S UB...

Page 26: ...K button to go to next page SUBWOOFER YES Select when a subwoofer is connected NONE Select when a subwoofer is not connected FRONT L R LARGE Select if the front speakers are large sized SMALL Select i...

Page 27: ...W Set the distance from the subwoofer to your normal listening position between 1 and 30 feet in 1 0 foot intervals 0 3 to 9 meters in 0 3 meter intervals SURR BACK Set the distance from a surround ba...

Page 28: ...large movie theater environments Activating the HT EQ feature when watching a film made for movie theaters corrects this and restores the correct tonal balance The HT EQ feature can be activated only...

Page 29: ...the actual physical capabilities of the speakers adding exciting deeper bass effects SRS DIALOG Set the SRS DIALOG level between 0 and 6 level in 1 level interval with or cursor button This can be pop...

Page 30: ...ROOM MULTI ROOM or DISABLE by pressing or cursor buttons 3 To Select desired input source press or cursor button 4 To set ON or OFF press or cursor button 5 If you finish the setup to DC 1 trigger mo...

Page 31: ...VOL button on the remote to decrease the volume turn to the counterclockwise or press VOL button on the remote Notes The volume can be adjusted within the range of to 18 dB in steps of 1 dB However w...

Page 32: ...ont panel and it will count down until the time has elapsed When the programmed sleep time has elapsed the unit will automatically turn off Note that the SLEEP indicator on the display will light up w...

Page 33: ...DTS ES encoded source material such as DVD This mode cannot be used when an analog input has been selected Dolby Digital EX In a movie theater film soundtracks that have been encoded with Dolby Digita...

Page 34: ...output You may not be able to play some DTS source signals from certain CD players and LD players even if you connect the player to the SR7300 digitally This is because the digital signal has been pr...

Page 35: ...II O O O 2 DIGITAL 2 SURROUND L R S PCM Audio Pro Logic II O O O PCM L R Analog Pro Logic II O O O ANALOG DTS DTS ES DTS 5 1 O O O O dts ES L C R SL SR S LFE Neo 6 Cinema DTS 96 24 DTS 96 24 O O O O...

Page 36: ...elect this mode press the DISP on the remote control unit When this button is pressed the display mode is switched in the following sequence Surround Mode Auto display Off Display Off Input Function S...

Page 37: ...utputs There is no conversion from digital to analog When connecting CD players and other digital components do not connect only the digital terminals but the analog ones as well HT EQ Press the EQ bu...

Page 38: ...at the listening position For the front left front right center surround left surround right surround back left and surround back right speakers the output levels can be adjusted between 10 to 10 dB...

Page 39: ...n in the auto stereo mode AUTO indicator keeps to light on the display The ST indicator lights on when a stereo broadcast is tuned in At open frequencies the noise is muted and the TUNED and ST indica...

Page 40: ...station by pressing the TUNING or button on the front panel Using the remote control unit 1 Press the 4 or button to select the desired preset station or input your desired preset channel with numeric...

Page 41: ...ONES ENTER STANDBY AUX1 INPUT S VIDEO DIGITAL VIDEO L AUDIO R DSS VCR2 AUX1 AUX2 VCR1 DVD TV CD CD R TAPE TUNER ATT SELECT AV SURROUND RECEIVER SR7300 UP SURROUND VOLUME DOWN MEMORY TUNING MODE F P CL...

Page 42: ...rt and the tuner will pause at each station broadcasting RDS PTY information corresponding to the selected choice 4 To advance to the next RDS station with the desired PTY press the PTY button again w...

Page 43: ...MULTI VOL VOLUME xx dB for approx 5 seconds 3 During this time you can set the volume level in the multi room as desired This will only set the volume in the second room OPERATION TO MULTI ROOM OUTPU...

Page 44: ...track 5 6 Searches forward or backward Pause 9 Stop 2 Play POWER ON OFF Turns the VCR on and off Ejects the tape AUDIO Selects the audio language 0 9 Inputs the numeric CL Clears the inputting MENU OS...

Page 45: ...ENU OSD Switches the display information 4 Skips forward or previous track 5 6 Searches forward or backward 0 Record Pause 9 Stop 2 Play POWER ON OFF Turns the tape deck on and off POWER ON Turns the...

Page 46: ...ve finished programming the remote controller press and hold down the OK button until USE is displayed in the display Note When NG is displayed in step 5 again the transmitting code is unavailable for...

Page 47: ...a macro are set initially to be sent one after another in 1 second intervals however these intervals may be shortened to as little as 0 5 seconds or lengthened to as much as 5 seconds using the Setup...

Page 48: ...layed in the display EDITING MACROS Macros may be edited using following procedure 1 Press and hold the T MODE and MENU button until the MACRO is displayed on the LCD LEARN and MACRO is displayed blin...

Page 49: ...ut source to DVD Set the Surround mode to VIRTUAL Set the DVD player to PLAY 1 Press and hold the T MODE and MENU button until the MACRO is displayed on the LCD LEARN and MACRO is displayed blinking 2...

Page 50: ...do not press OK button and simply touch any other button 4 To return the USE mode press and hold down the OK button until USE is displayed in the display 0 5 seconds 5 seconds 1 5 seconds 1 second AD...

Page 51: ...the function selector Sound from the wrong channel is output from the speaker No sound is output from the center speaker No sound is output from the surround speakers No sound is output from the surr...

Page 52: ...s and hold the SELECT and ATT buttons simultaneously for 3 seconds or more Remember that the procedure will reset the settings of the function selector Surround mode delay time TUNER PRESET etc to the...

Page 53: ...W Ch Surround L R 8 ohms 105 W Ch Surround Back 8 ohms 105 W Ch Front L R 6 ohms 130 W Ch Center 6 ohms 130 W Ch Surround L R 6 ohms 130 W Ch Surround Back 6 ohms 130 W Ch Power Output 20 Hz 20 kHz T...

Page 54: ...our nearest Marantz sales company or distributor from this address JAPAN Marantz Japan Inc 35 1 Sagami Ohno 7 Chome Sagamihara shi Kanagawa 228 8505 Japan U S A Marantz America Inc 1100 Maplewood Driv...

Reviews: