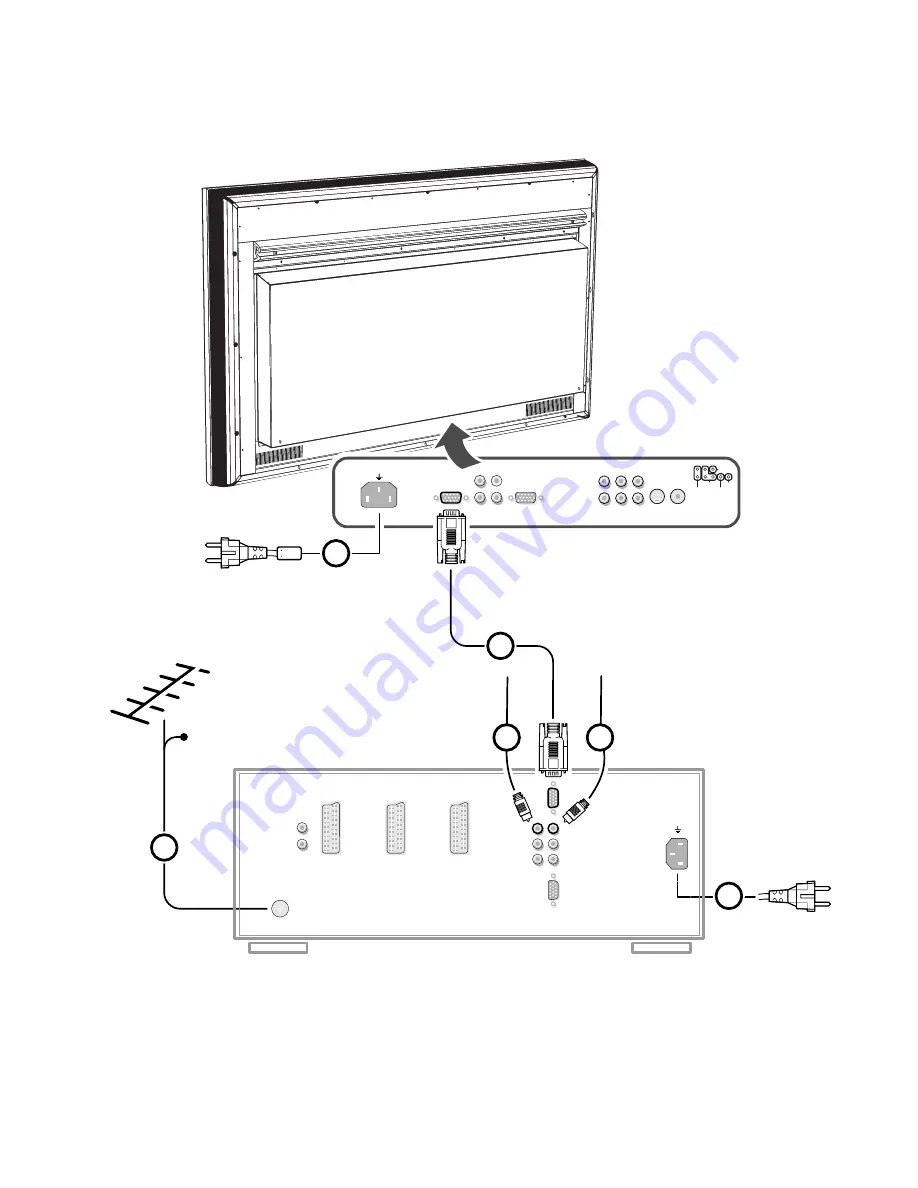
background image

AV3

AV2

AV1

AV4

AUDIO

AUDIO IN

L

R

Y

U

CVBS

Y/C

S-VHS

CVBS

V

MAINS INLET

VGA IN

AUDIO IN

L

R

AUDIO OUT

VGA OUT

5

CABLE

1

4

EXTERNAL 3

EXTERNAL 2

IN

IN / OUT

IN / OUT

ANTENNA

EXTERNAL 1

NO FUNCTION

NO FUNCTION

R

L

OUT

NO FUNCTION

IN

SURROUND SOUND CENTER IN

AUDIO IN

VGA MONITOR

MAINS INLET

L

R

L

R

VGA MONITOR

2

CONSTANT LEVEL OUT

3

3

Summary of Contents for MAR0076

Page 1: ...NS INLET VGA IN AUDIO IN L R AUDIO OUT VGA OUT 5 CABLE 1 4 EXTERNAL 3 EXTERNAL 2 IN IN OUT IN OUT ANTENNA EXTERNAL 1 NO FUNCTION NO FUNCTION R L OUT NO FUNCTION IN SURROUND SOUND CENTER IN AUDIO IN VGA MONITOR MAINS INLET L R L R VGA MONITOR 2 CONSTANT LEVEL OUT 3 3 ...

Page 2: ...hat a sequence of actions are executed at the same time in both the television and the video cassette recorder provided both are fitted with the EasyLink function and connected with the eurocable supplied with your video recorder Installation Operation Use of the remote control 1 9 1 11 Use of the menus 1 12 Picture menu 1 12 Sound menu 1 12 1 13 Features menu 1 14 The keys on the front of the rec...

Page 3: ... control panels Direct access buttons Sound mute Channel up down Volume up down Scroll buttons to display previous and next control panel Mode menu Customize the remote control Left and right buttons Activate the commands shown immediately above the buttons Learning eye for learning commands from other remote controls Serial port to link the remote to a computer Modes Normal use controlling compon...

Page 4: ...cord 5 at the back of the receiver Put both in the wall sockets Please only use the mains cord 4 with filter supplied with the monitor for the monitor and the mains cord 5 supplied with the receiver only for the receiver Remote control a Slide the battery door off the back of the Remote Control b Remove the plastic AA battery tray from the battery compartment c Insert the battery pack included wit...

Page 5: ...our choice and press the OK key Select the menu language and country Touch the control menu on the remote TV mode é Select settings and press the installation key Installation Select the INSTALLATION menu Touch the control menu and select cursor é Use the cursor in the up down left right directions to select a menu item Press the OK key to activate Press one of the colour menu keys of the remote c...

Page 6: ...arching All TV channels are searched for and stored automatically Wait until the message Ready is displayed at the bottom of the screen If a cable system or a TV channel which broadcasts ACI Automatic Channel Installation or a TV channel transmitting a teletext page with the frequencies and programme names of all the TV channels which can be received is detected the search is stopped and the progr...

Page 7: ... the operation until all TV channels are allocated as you like Press one of the colour menu keys R G Y or B to return to the INSTALLATION menu Reshuffle the programme list After leaving the installation you can browse through the TV channels and externals by pressing the channel keys Only those TV channels and externals which are in the favourite list will be displayed Non favourite TV channels an...

Page 8: ...r decoder with the digit keys Select Decoder Status with the cursor up down Press the cursor left right to select the input used to connect your decoder TV EXT1 or EXT2 Select TV if you do not want the selected programme number being activated as a decoder programme number Use the menu key R red to return or switch menu off If the TV is connected to a video recorder with the EasyLink function the ...

Page 9: ...V channel or the programme name or another message which appears briefly in the information line at the bottom of the screen When selected Off the information line will only appear after pressing the i key and not after the selection of a TV channel Picture Mute Press the cursor left right to select a Blue or Black screen when there is no picture or information In VGA mode always black mute is use...

Page 10: ...el Permanent program number screen information Press for 3 seconds to activate de activate the continuos display of the program number Press briefly to display the information about the selected channel or external it s name the sound mode picture format setting the selected DNR setting and remaining time set with the sleeptimer MUTE CHANNEL VOLUME TV Go back Sub Sub 1 2 3 VGA Front Scan MUTE CHAN...

Page 11: ...ined picture setting and you modify a setting in the picture menu all values of the menu will overwrite the previously made personal setting Multi screen A menu line Mosaic appears Select the desired function with the cursor left or right keys and press the OK key Scan The TV channel played in the favourite list appear subsequently Press the channel up key to select a next series of 12 channels Af...

Page 12: ...ges scrolling When a selected TV Text page consists of different subpages select with the left or right button the next Sub of previous Sub subpage 0 9 digit keys To select a TV Text page number Previous page Select the previously selected txt page Panel Down To go to the second TV Text control panel Panel up To go the first TV Text control panel Continuous subtitles TV channels with TV text often...

Page 13: ...ter picture areas more noticeable it is preferred to select Med or Max In certain circumstances it may be preferred to select Min or Off Natural Motion Natural Motion On reproduces smooth movement which makes it more natural After selecting a new TV channel or external Natural Motion will automatically be set to On Sound menu Store the modified adjustments for the headphone Volume and Balance for ...

Page 14: ...ou are watching on the screen Note in the Dual Screen picture you will hear the sound of the left picture through your headphone except if a picture from a connected peripheral has been selected in the right picture Then you will hear the sound from the right picture Select TV when you want to listen to the sound of a TV channel In all other cases select the source where you connected your equipme...

Page 15: ... lock must be switched off before you can use the PROGRAM and keys and the VOLUME or keys on the receiver Headphone PP store The Volume and Balance in the headphone menu can be stored in memory for all TV channels Message With this function you can enter a personal message on 2 lines which will be displayed automatically when the set is switched on For example I ll be late this evening Don t wait ...

Page 16: ...tual time with arbitrary numbers then start again Use 24 hour or military time Programme Enter with the digit keys the programme number of the TV channel you want your TV to switch over to Use 24 hour or military time Start time Enter with the digit keys the start time of the selected TV programme number you want your TV to switch over to Cancel timer Select Cancel Timer and press OK to reset the ...

Page 17: ... e g videorecorder can be heard via the headphone VGA can not be displayed in Dual screen mode On screen sound information of the left main picture appears in the right upper corner Switch screens Press the c key to swap the right and left picture The sound is swapped as well Select still picture Press the S key to freeze the programmes on the left and the right picture Press the S key again to de...

Page 18: ...red to in the displayed page the precapturing of all the subpages Switch Teletext on and off Press b to switch the teletext on or off The main index page appears on the screen Note Dual Screen is disabled in Teletext mode Select a Teletext page With the digit keys Enter the desired page number with the digit keys The page counter seeks the page or the page appears immediately when the page number ...

Page 19: ... page is on screen Select with the cursor up down the previous or the following subpage With the left and the right buttons Select with the left button on the remote control for the following page and press the right button for the previous page By adding a subcode Press U Enter the desired subpage with the digit keys e g 3 for the third page of seven subpages The TV searches for the selected subp...

Page 20: ...f the video recorder Unplug the aerial cable 1 from the aerial socket x of your video recorder é Switch on your TV and put the video recorder on the test signal See the handbook for your video recorder Search for the test signal of your video recorder in the same way as you searched for and stored the TV signals See Installation Searching for and storing TV channels Manual Installation p 6 Store t...

Page 21: ...select the audio source for your headphone sound See p 14 Headphone S VH S VID EO A U D IO L R 1 2 3 n Video recorder and other peripherals EXTERNAL 2 1 VCR 1 CABLE 1 5 2 4 3 Connect the aerial cables 1 2 and 3 as shown opposite Better picture quality can be obtained if you also connect eurocable 5 to EXTERNAL 2 and a eurocable 4 to EXTERNAL 1 or 3 é Look for the test signal of your peripheral in ...

Page 22: ...or cable Contact your dealer Connect a switchable adaptor for Apple video connectors to one end of a VGA cable é Put the DIP switches on the adaptor in the following positions 1 2 3 4 off off on on Connect the end of the VGA cable with the adaptor to the video card of the computer and the other end to the VGA MONITOR IN connector on the back of the receiver box or at the VGA IN connector on the ba...

Page 23: ...0x480 31 468 kHz 60 Hz VGA 640x400 31 468 kHz 70 Hz VGA 640x350 31 468 kHz 70 Hz VGA 856x480 31 468 kHz 60 Hz VGA 800x450 31 490 kHz 65 Hz MAC II 640x480 35 000 kHz 67 Hz SVGA 800x600 35 156 kHz 56 Hz SVGA 800x600 37 880 kHz 60 Hz XGA 1024x768 45 000 kHz 56 Hz XGA 1024x768 48 360 kHz 60 Hz When a VGA computer is connected the selection is made automatically A message is displayed when the monitor ...

Page 24: ... If you want to change to TV channels Enter the programme number of the TV channel which you want to watch with the digit keys To select connected equipment Press the w key in the keypad control panel and select VGA é Select in the control menu cursor Press the red picture menu green sound menu or yellow features menu key on the door of the remote control to switch on the VGA menu or press the MEN...

Page 25: ...le panel on the remote control repeatedly to switch the menu off Record a TV programme Select the programme number on your video recorder é Set your video recorder to record See the handbook for your video recorder Switching programme numbers on your TV does not disturb recording Record a programme on your video recorder connected to EXTERNAL 2 from Audio Video equipment connected to EXTERNAL 1 EX...

Page 26: ...ected the correct VGA mode in your PC 640x480 640x400 640x350 856x480 800x450 MAC II SVGA XGA If your problem is not solved Switch both your monitor and your receiver off and then on again Never attempt to repair a defective monitor or receiver yourself Check with your dealer or call a TV technician End of life directives We are paying a lot of attention to using environmentally friendly productio...

Page 27: ...ic Noise Reduction By encoding signals digitally in 100 Hz sets with Digital Scan it is possible to clean up picture noise This is especially beneficial in poor signal areas and when viewing poor quality video tapes Easy Link Digital intelligent ESI bus system between audio components in HiFi systems and between TV and VCR Scart connection required Turns source selection and control into a one but...

Page 28: ...English ...

Reviews: