background image

1

Before You Start

7

English

What’s in the box

Thank you for buying this MARANTZ prod-
uct. Please confirm that the following
accessories are in the box when you open it.

• Remote control

• AA/R6P dry cell batteries x2

• Audio/Video cable (yellow/red/white)

• System control cable

• Power cable

• User Guide (this manual)

• Warranty card

Putting the batteries in the
remote control

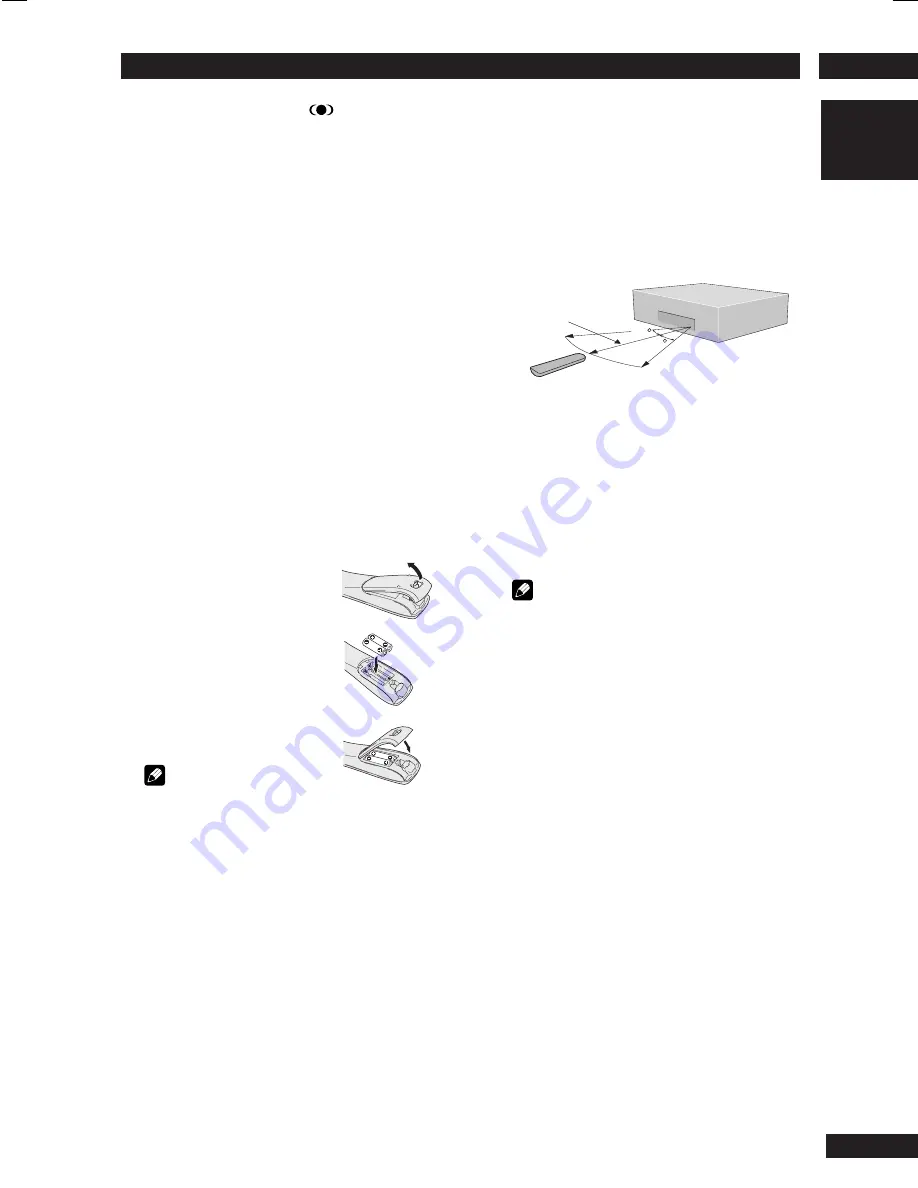
1 Open the battery com-

partment cover on the
back of the remote
control.

2 Insert two AA/R6P

batteries into the battery
compartment following
the indications (

ª

·

)

inside the compartment.

3 Close the cover.

 Note

Incorrect use of batteries can
result in hazards such as leakage and bursting.
Please observe the following:

• Don’t mix new and old batteries together.

• Don’t use different kinds of battery together—

although they may look similar, different
batteries may have different voltages.

• Make sure that the plus and minus ends of each

battery match the indications in the battery
compartment.

• Remove batteries from equipment that isn’t

going to be used for a month or more.

When disposing of used batteries, please comply
with governmental regulations or environmental
bylaws that apply in your country or area.

Using the remote control

Keep in mind the following when using the
remote control:

• Make sure that there are no obstacles between

the remote control and the remote sensor on
the unit.

• Use within the operating range and angle, as

shown.

• Remote operation may become unreliable if

strong sunlight or fluorescent light is shining on
the unit’s remote sensor.

• Remote controllers for different devices can

interfere with each other. Avoid using remotes
for other equipment located close to this unit.

• Replace the batteries when you notice a fall off

in the operating range of the remote control.

30

30

5m

 Note

When using this player independently, set a

REMOTE CONTROL

 switch on the rear panel to

INT. (INTERNAL) 

(see 

page 10

).

*

5

TruSurround, SRS and the 

®

 symbol are

trademarks of SRS Labs, Inc. TruSurround
technology is incorporated under license from
SRS Labs, Inc.

Summary of Contents for DV9500

Page 1: ...Model DV9500 User Guide Super Audio CD DVD Player CLASS 1 LASER PRODUCT LUOKAN 1 LASERLAITE KLASS 1 LASERAPPARAT ...

Page 2: ...te of purchase Your purchase receipt or invoice is adequate for such proof FOR U K ONLY This undertaking is in addition to a consumer s statutory rights and does not affect those rights in any way LASER SAFETY This unit employs a laser Only a qualified service person should remove the cover or attempt to service this device due to possible eye injury USE OF CONTROLS OR ADJUSTMENTS OR PERFORMANCE O...

Page 3: ...ed with the letter N or coloured BLACK 2 The BROWN wire must be connected to the terminal which is marked with the letter L or coloured RED 3 Do not connect either wires to the earth terminal in the plug which is marked by the letter E or by the safety earth symbol or coloured green or green and yellow Before replacing the plug cover make certain that the cord grip is clamped over the sheath of th...

Page 4: ...4 ...

Page 5: ...age 27 Using the Zoom Function 27 MP3 JPEG Play 28 Video Adjust 30 6 DVD Setup Menu Using the FL menu 32 Using the Setup Menu 33 Setting up the Language Setup 35 Setting up the Audio Setup 1 37 Setting up the Audio Setup 2 42 Setting up the Video Setup 45 Setting up the Parental Setup 49 Setting up the Others Setup 50 Resetting the Player 54 7 Additional Information Handling discs 55 Storing discs...

Page 6: ...connected to a plasma display or projector it corrects the time lag between the video and audio created by the video circuit processing time in units of 10msec up to a maximum of 200msec It precisely synchronizes the actors voices and the movements of their mouths see page 31 Equipped with a Super Audio CD Distance compensation function It can perform Distance adjustment of Super Audio CD that was...

Page 7: ... the indications in the battery compartment Remove batteries from equipment that isn t going to be used for a month or more When disposing of used batteries please comply with governmental regulations or environmental bylaws that apply in your country or area Using the remote control Keep in mind the following when using the remote control Make sure that there are no obstacles between the remote c...

Page 8: ... DVD Video format DVD RW compatibility This unit can play DVD RW discs Please note the following points when using these discs Logo This unit can play DVD RW discs recorded as DVD Video format DVD RW discs that were recorded with copy once only permission cannot be played Audio CD compatibility Logos 12cm 5in or 8cm 3in discs Linear PCM digital audio Audio CD CD R and CD RW formats CDs are divided...

Page 9: ...o handle image data recorded in JPEG format no assurances are given that the player will be able to display image data recorded in all JPEG formats Display is limited to the display of files up to 30MB in size This player cannot display progressive JPEG images When writing JPEG files to CD R RW discs always be sure to set the writing format to ISO 9660 Level 1 Always be sure to specify a file exte...

Page 10: ...omponents are switched off and unplugged from the wall outlet Note When connecting to a standard TV select 4 3 L Box or 4 3 Pan Scan in the TV Aspect setting see page 45 Connect the video output of the player directly to your TV Because the player is designed to support an Analog Protection System copy card there are cases when proper playback will be not be possible if the player is connected to ...

Page 11: ...t becomes possible to provide the very finest in image quality see pages 32 52 Note The HDMI output of this unit can be connected to a DVI jack on a TV or other device using a conversion adapter In this case it is necessary to use a TV or display with an HDCP compat ible DVI input see page 52 There may be no image output if connected to a TV or display that is not compatible with the above format ...

Page 12: ...onnecting coaxial cables Use an interconnect with a pin type also called RCA or phono plug on each end to connect up digital coaxial type jacks Make sure that the plug is pushed fully home Note If you listen to multichannel DVD Audio through one of the digital outputs it will be downmixed to stereo Also high sampling rate DVD Audio 192kHz or 176 4kHz will be downsampled to 96kHz 88 2kHz 48kHz or 4...

Page 13: ...le the light flashes green When it is DVI compatible the light flashes red 10 0 OPEN CLOSE Press to open and close the disc tray 1 1 Head Phone Jack Connect the head phone 12 4 1 Press to skip reverse title group chapter or track You can also press and hold this button to scan the above 13 Head Phone Level Adjust the output of the head phone When using the Head Phone Analog audio output and HDMI a...

Page 14: ...CD is loaded CD Lights when a Audio CD is loaded 19 MP3 Lights when replaying MP3 audio 20 N Lights when NTSC has been selected as the TV system 21 P Lights when PAL has been selected as the TV system 22 M Lights when Multi has been selected as the TV system 23 V OFF Indicates that video output is turned off 24 D OFF Lights when the unit is set to Digital Out off 25 Character display 26 TITLE Indi...

Page 15: ... displayed in the display window on the main unit Also set the REMOT CODE on the FL menu to the same setting as the remote control This setting is set to DVD1 when the unit is shipped from the factory see page 32 Audio is not output from HDMI output when Video out is set to Off with VIDEO ON OFF button on the remote control 1 OPEN CLOSE Disc tray open close page 16 2 VIDEO ON OFF press to turn vid...

Page 16: ...e at the point where the layers change This is not a malfunction Basic playback controls Button What it does 3 Starts playback DVD and Video CD if the display shows RESUME playback starts from the resume point 8 Pauses a disc that s playing 7 Stops playback DVD and Video CD Display shows RESUME Press 7 STOP again to cancel the resume function 1 1 Press for fast reverse scanning during play 2 Press...

Page 17: ...e SET UP button on the remote control 2 Select Title Menu Title Menu Title Menu Title Menu Title Menu using the cursor buttons 5 then press the cursor button 3 or ENTER button And also select Title Menu Title Menu Title Menu Title Menu Title Menu using the TOP MENU button on the remote control Title Menu 1 Title 1 2 Title 2 3 Title 3 Note Depending on the disc the Title and Disc Menus may not work...

Page 18: ...the cursor buttons 5 to highlight Function Function Function Function Function then press the cursor button 3 or ENTER button 3 The Function selection screen appears showing Info Info Info Info Information rmation rmation rmation rmation Zoom Zoom Zoom Zoom Zoom Bookmark Bookmark Bookmark Bookmark Bookmark and Repeat Repeat Repeat Repeat Repeat Information see page 19 Zoom see page 27 Bookmark see...

Page 19: ...n the remote control 2 Use the cursor buttons 5 to select the desired item 3 Use the cursor buttons 2 3 to make the desired setup then press ENTER You may use the number buttons of the remote control to directly access a title chapter or to start the playback from the desired time 4 Pressing the DISPLAY button again will change the displayed disc time information DVD Video Title time Chapter time ...

Page 20: ... slow playback the speed of playback can be adjusted from 1 8 normal playback speed to 1 2 normal playback speed in 4 steps using 1 REW To return to normal playback When the picture is paused or during slow playback pressing 3 PLAY restores normal playback operation Step Motion playback Viewing one frame at a time With this function DVDs and Video CDs can only be moved in the forward direction Pre...

Page 21: ...ever you load that disc The player can store settings for 20 discs after this memorizing another replaces the oldest one stored Condition Memory does not work with DVD Audio and DVD RW discs The settings memorized are Audio Language page 27 Subtitle Language page 26 Camera Angle page 26 On Screen Display page 50 To memorize settings for the current disc press CONDITION during playback To recall me...

Page 22: ...wish to play using the Number buttons Pressing the 3 PLAY button will start random play within the designated group Tip During random play the 4 PREV and NEXT buttons function a little differently to normal 4 PREV returns to the beginning of the current track chapter You can t go back further than this NEXT selects another track chapter at random from those remaining You can t use random play toge...

Page 23: ...o DVD Video Video CD CD Super Audio CD 2 Select Track Track Track Track Track Group Group Group Group Group A B A B A B A B A B Chapter Chapter Chapter Chapter Chapter Title Title Title Title Title A B A B A B A B A B Track Track Track Track Track All All All All All A A A A A B B B B B using the cursor buttons 2 3 3 Press ENTER 4 To return to normal play press REPEAT again then press the cursor b...

Page 24: ...will change to a number 1 2 or 3 4 Press the MARKER button to turn off the display Recalling a Marked Scene 1 During play press the MARKER button on the remote control 2 Use the cursor buttons 2 3 to select a marked scene 3 Press 3 PLAY buttons to skip to the marked scene Clearing a Bookmark 1 During play press the MARKER button on the remote control 2 Use the cursor buttons 2 3 to select the book...

Page 25: ...ers as well Note however that bonus tracks may not be specified in programmed playback A program list can contain up to 20 steps 3 Press 3 PLAY button The disc will be played in programmed order 1 Return to normal playback To return to normal playback press the CLEAR button while playback is in progress 2 Delete programs from list one at a time Press 7 STOP button to stop program playback and then...

Page 26: ...e the TV angle indicator choose Angle Mark Off from the Others menu see page 50 Note Depending on the disc this feature may not work Switching Subtitle Language Many DVD Video discs have subtitles in one or more lan guages the disc box will usually tell you which subtitle lan guages are available You can switch subtitle language anytime during playback To display the subtitle language press SUBTIT...

Page 27: ...itching audio channel DVD Audio Depending on the disc you may be able to switch channels when playing DVD Audio discs see the disc box for details To switch the audio channel use the cursor buttons 2 3 Switching audio channel Video CD On Video CDs you can switch between stereo just the left channel or just the right channel To switch the audio channel use the cursor buttons 2 3 Using the Zoom Func...

Page 28: ...o 6 song files can be displayed at a time If you have more than 6 files on a disc press the cursor buttons 2 3 to bring them up on the screen 2 Use the cursor buttons 5 to select the desired song file then press ENTER to begin playback of the song file 3 Press the RETURN button and the music folder menu will appear on the right side of the screen Use the cursor buttons 5 to select the desired musi...

Page 29: ... instruction When you wish to import an image press ENTER on the remote control is displayed on the screen so push the ENTER button 3 The image begins to enter 4 Push the CLEAR button on your remote control to stop entry Note 1 The user can only store 1 screen 2 When a new image has been entered the old screen is erased 3 If entry fails the data that was already recorded may also be lost 4 When th...

Page 30: ...g Auto 2 Setting for moving images Auto 3 Setting for still images Video 1 Standard setting Video 2 Setting for moving images Video 3 Setting for still images DNR Adjusts the amount of noise reduction NR applied to the Y brightness component CNR Adjusts the amount of noise reduction NR applied to the C color component Video Adjust You can set the picture settings you desire and store them in the p...

Page 31: ...r components Gamma Adjusts the brightness of the darker images in the picture Black Setup Corrects floating black color Lip Sync Adjusts the time lag between the audio signal and the video signal from 0 to 200 msec in 10 msec steps Initialize Returns to the default values 5 Press ENTER to save your changes Note Pressing DISPLAY while the VIDEO ADJUST MENT screen is displayed shows one adjust ment ...

Page 32: ...DMI RESET Select HDMI RESET then press ENTER SURE is displayed in the FL menu Press ENTER if you want to RESET The menu selection is set Note If images are not displayed properly on the TV or projector after making HDMI setting on the Setup menu reset the set see page 54 This will return the HDMI setting to the state before the setting was made HDMI ON OFF setting Select HDMI ON OFF then press ENT...

Page 33: ... or region 1 Press the SET UP button on the remote control Select Setup Setup Setup Setup Setup using the cursor buttons 5 then press the cursor 3 or ENTER button Language Setup Setup of the Language page 35 Ÿ Audio Setup 1 and 2 Setup of the Audio Options pages 37 42 Video Setup Setup of the Display Options page 45 Use to select which type of screen you want to watch and several display options P...

Page 34: ...tereo Multi ch CD Player Mode page 42 DVD Audio DVD Video CD Play Back page 43 CD DTS CD DTS Down Mix page 43 Stereo Lt Rt Audio DRC page 44 On Off TruSurround page 44 On Off Super Audio CD Play page 44 DSD PCM Video Setup page 45 TV Aspect page 45 4 3 L Box 4 3 Pan Scan 16 9 Wide 16 9 Squeeze Components Out page 47 Progressive Interlace Pause Mode page 47 Field Frame Auto Back Ground page 48 Logo...

Page 35: ... button 2 Select Setup Setup Setup Setup Setup using the cursor buttons 5 then press the cursor 3 or ENTER button 3 Select Language Setup Language Setup Language Setup Language Setup Language Setup using the cursor buttons 5 then press the cursor 3 or ENTER button 4 Select DVD DVD DVD DVD DVD Menu Menu Menu Menu Menu Language Language Language Language Language using the cursor buttons 5 then pres...

Page 36: ...ess the cursor 3 or ENTER button 4 Select Subtitle Subtitle Subtitle Subtitle Subtitle Language Language Language Language Language using the cursor buttons 5 then press the cursor 3 or ENTER button 5 Use the cursor buttons 5 to select English English English English English Select Auto if you want the subtitle language to be the same as the language selected as the audio preference Select Others ...

Page 37: ...wise leave it On Note that you can t switch on off the optical and coaxial outputs individually Note Super Audio CD will not output digital sound Dolby Digital Out Default setting Bit Stream If your AV amplifier or other connected compo nent is Dolby Digital compatible set to Bit Stream otherwise set to PCM DTS Out Default setting Bit Stream If your AV amplifier or other connected compo nent has a...

Page 38: ...e digital audio output terminal see page 37 PCM Down Sample ON 48kHz 16 bit PCM 48kHz 16 bit PCM 44 1kHz 16 bit PCM 48kHz 16 bit PCM 44 1kHz 16 bit PCM 48kHz 16 bit PCM 44 1kHz 16 bit PCM 48kHz 16 bit PCM 44 1kHz 16 bit PCM 44 1kHz 16 bit PCM 44 1 48kHz 16 bit PCM No output produced 3 DVD Video DVD Audio Video CD Audio CD MP3 CD Super Audio CD Audio recording format PCM 48kHz 16 24 bit 96kHz 16 24...

Page 39: ...Rch DTS 2 3 1 Center Surround LS RS LFE LFE MUTE Lch Rch MUTE MUTE Dolby Digital Lch Rch Lch Rch MUTE MUTE 5 1 CH 2 CH DVD RW Lch Rch Dolby Digital MPEG or PCM Lch Rch MUTE 2 ch DOWNMIX Lch Rch 5 1 CH 2 CH Front Lch Rch Center Surround LS RS LFE MUTE 5 1 CH 2 CH 2 ch DOWNMIX Lch Rch Front Lch Rch Center Surround LS RS LFE MUTE Lch Rch Lch Rch 5 1 CH 2 CH 2 ch DOWNMIX Lch Rch MPEG MPEG MUTE Note Ev...

Page 40: ...e C LS or RS speakers is set to Off the audio is automatically down mixed to stereo Distance Default setting Unit Meter Distance 3m Set the distance from your main listening position to each speaker in the Distance screen The distance setting for any speaker that was set to Off in the Speaker Size screen will be disappeared For the other speakers enter the distance to the nearest 0 3m 1 feet You c...

Page 41: ... Change at manual test tone Cursor buttons 5 Output Level Change To help you gauge the correct gain levels set the Test Tone to Manual test tone from just that speaker or Auto test tone from each speaker in turn then adjust the gain so that all speakers appear to be the same volume from your listening position Follow the on screen displays to select speakers and set the Output Levels Many AV ampli...

Page 42: ...D audio The Super Audio CD Play setting enables you to select which area of the disc you want to play with the cursor buttons 2 3 Note If you select an area that isn t on the disc loaded a different area of the disc will play For example if you choose standard CD audio but the disc loaded is not a hybrid Super Audio CD the stereo Super Audio CD audio will play You can also select it using the S MO...

Page 43: ...en DTS Digital Out has been set to PCM all digital output will be automatically set to stereo output no matter what DTS Down Mix setting has been specified When 2 Channel is selected by Audio Out the DTS multi channel s down mix method can be selected CD Play Back Default setting CD Replay DTS CD CD replay settings Use the cursor buttons 2 3 to select either CD or DTS CD CD Should be selected when...

Page 44: ...Audio Out to 2 Channel page 39 you can simulate surround sound by setting TruSurround to On Note Works with DVD Video and VCD only The digital audio output is processed by TruSurround when playing 2 channel Dolby Digital DVDs or Video CDs with TruSurround On It is recommended that TruSurround be turned Off when connecting the player to your amp using a coaxial or optical connection How good the su...

Page 45: ...n Letter Box mode widescreen software is shown with black bars at the top and bottom of the screen Pan Scan chops the sides off widescreen material to make it fit the 4 3 screen so even though the picture looks larger on the screen you re actually seeing less of the movie Press ENTER Note Some discs will not allow you to change the aspect ratio Setting up the Video Setup 1 Press the SET UP button ...

Page 46: ...TV or monitor 16 9 Wide The picture is presented in widescreen 16 9 Wide 16 9 The picture is presented with black bars either side Screen format of disc TV Setting Appearance 4 3 16 9 Wide Player Setting Full Normal Full Normal 4 3 16 9 Squeeze This setting only has any effect with progressive output Full The picture is squashed Set to either Pan Scan or Letter Box The picture is squashed Set your...

Page 47: ...ange the TV setting to Normal If your TV doesn t have settings to change the aspect ratio of the picture set this player to 16 9 Squeeze Note If you connect a TV that is not compatible with a progressive scan signal and choose one of the progressive scan settings you will not be able to see any picture at all With your TV con nected using either the composite or S Video terminals choose the Interl...

Page 48: ...rol you may not be able to view NTSC discs because the picture may roll If the TV has a V Hold control adjust it until the picture stops rolling On some TVs the picture may shrink vertically leaving black bands at the top and bottom of the screen This is not a malfunction it is caused by the NTSC to PAL conversion Note When the selected format is changed to a different format from the TV format in...

Page 49: ...ppears Rating Level The Rating Level will work only when Use Password is set to Yes Use the cursor button 3 or ENTER to select Rating Level Use the cursor buttons 5 to select a level e g Level 6 and press ENTER Discs that contain Level 7 will now not play To cancel the rating level use the cursor button 3 or ENTER to set Use Password to No Change Password Use the cursor buttons 5 to select Change ...

Page 50: ...press the RETURN or cursor button 2 On Screen Display Default setting On If you prefer not to have the operation displays shown on screen change the setting to Off Angle Mark Default setting On If you prefer not to see the camera icon on screen during camera angle scenes on DVD discs change this setting to Off Bonus Group Some DVD Audio discs have an extra bonus group that requires a 4 digit key n...

Page 51: ... Off If you play a CD or Super Audio CD while Pure Mode Mode1 or Mode2 is selected then Display Video Out and Digital Out shut off automatically And if you push the FL OFF button on the front panel or DIM MER button on the remote control during the Pure Mode ON for three seconds only Display is displayed Display and Video Out are on and Digital Out is off during Stop Depending on the disc it may n...

Page 52: ...tton for two seconds to bring up the FL menu Then set HDMI RESET to reset page 32 VGA can be outputed only when TV System is set to NTSC When the resolution changes the image may be corrupted or the output may take longer than normal 2 Select Format Format Format Format Format RGB Normal RGB Expand YCbCr 1 4 4 4 YCbCr 2 4 2 2 Select one of the above with the cursor buttons 5 and then press the ENT...

Page 53: ...utput as linear PCM PCM Audio is converted to linear PCM Select one of the above with the cursor buttons 2 3 Resolution HDMI Setting 480p 576p 525p 625p 720p 1080i 750p 1 125i Playback Disc Disc Recorded in Squeeze Ratio Disc Recorded in 4 3 Ratio Aspect HDMI Setting Monitor Settings Aspect HDMI Setting Monitor Settings Full Squeeze 4 3 Standard 16 9 Wide 16 9 Wide Normal 16 9 Squeeze Normal Throu...

Page 54: ... Right Left Right 2 Channel DOWNMIX Left Right 2 2 Channel DOWNMIX 3 HDMI Setting Audio DVD Resetting the Player Resetting the player returns all menu picture and password settings to their factory defaults To reset the player press and hold 7 STOP on the front panel when press ing Power switch to turn the power on FL OFF HDMI DVI STANDBY POWER PAUSE PLAY OPEN CLOSE STOP ON OFF LEVEL PHONES Note S...

Page 55: ...ively cold humid or hot environments including under direct sun light Don t glue paper or put stickers onto the disc or use a pencil ball point pen or other sharp tipped writing instrument These could all damage the disc For more detailed care information see the instructions that come with discs Do not load more than one disc into the player Discs to avoid Discs spin at high speed inside the play...

Page 56: ...r carpet or cover with cloth this may prevent proper cooling of the unit Place on an unstable surface or one that is not large enough to support all four of the unit s feet Moving the player If you need to move the player first press POWER ON OFF button on the front panel to turn the player off then unplug the power cord Never lift or move the unit during playback discs rotate at a high speed and ...

Page 57: ...s unit can convert MPEG audio to PCM format for wider compatibility with digital recorders and AV amplifiers See also PCM Glossary Analog audio An electrical signal that directly represents sound Compare this to digital audio which can be an electrical signal but is an indirect representation of sound See also Digital audio Aspect ratio The width of a TV screen relative to its height Conventional ...

Page 58: ...MPEG video The video format used for Video CDs and DVDs Video CDs uses the older MPEG 1 standard while DVD uses the newer and much better quality MPEG 2 standard Multi session A CD R RW that contains two or more sessions Each session is a complete recording process so each session is read as a complete disc This player can only read the first session on a disc Optical digital output A jack that ou...

Page 59: ...o the appropriate input Now choose the Interlace setting in the Components Out menu then switch the TV input back to the component input page 47 Check the VIDEO ON OFF button on the remote control page 15 Screen is stretched or aspect does not change The TV Screen setting in the Setup menu is incorrect Set the TV Screen option to match the TV monitor you re using page 45 Troubleshooting Incorrect ...

Page 60: ...set to PCM Down Sample On Set to Off As a copy protection measure some DVDs do not output 96kHz audio In this case even if Off is selected the player automatically outputs the audio at 48kHz This is not a malfunction No audio or audio is distorted Some DVD discs do not output digital audio Switch your amplifier to the player s analog outputs Dirt dust etc on the disc Clean the disc page 55 Interco...

Page 61: ... setting is set to On page 37 Some DVD Audio discs prohibit digital audio output No digital audio is output when playing Super Audio CDs Cannot output 192kHz or 176 4kHz digital audio The player does not output digital audio at these sampling rates Cannot output 96kHz or 88 2kHz digital audio Check that the PCM Down Sample setting is not set to On page 38 Some discs are digital copy protected and ...

Page 62: ...output Output level During audio output 2 Vrms 1kHz 0 dB Number of channels 2 Jacks RCA jack Audio output multi channel L R C SW LS RS Output level During audio output 2 Vrms 1kHz 0 dB Number of channels 6 Jacks RCA jack Audio characteristics Frequency response 4Hz to 44kHz DVD fs 96kHz 4Hz to 88kHz DVD Audio fs 192kHz S N ratio 130 dB Dynamic range 1 10 dB Total harmonic distortion 0 0008 Wow and...

Page 63: ...find your nearest authorized distributor or dealer on our website JAPAN Marantz Japan Inc 35 1 Sagami Ohno 7 Chome Sagamihara shi Kanagawa 228 8505 Japan U S A Marantz America Inc 1100 Maplewood Drive Itasca IL 60143 U S A EUROPE Marantz Europe B V P O Box 8744 5605 LS Eindhoven The Netherlands ...

Reviews: