background image

Connecting Up

2

10

Easy setup

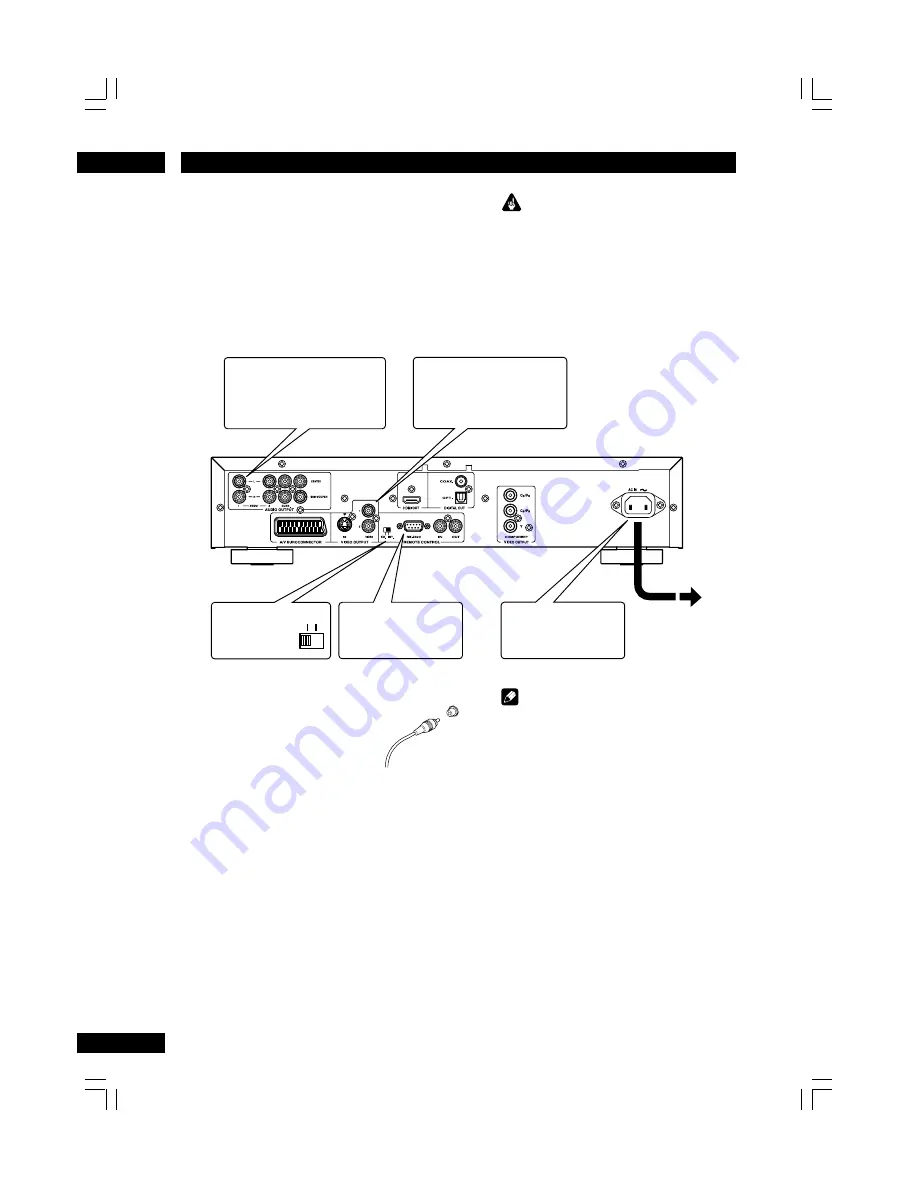
This easy setup is the minimum set of
connections you need to start watching
DVD-Video discs. Both sound and picture
are fed directly to your TV using the sup-
plied Audio/Video cables. For other possible
connections, see 

pages 11-12

.

Connecting audio/video
cables

Be sure to insert each plug fully
for the best connection. The
plugs and jacks are color-coded
to make connection easier.

Connecting system control cables

By connecting this DVD player to another
Marantz audio component using a supplied
System control cable, you can remotely
operate the components as a single system.

• When connecting to component with a remote

sensor, be sure to connect the 

REMOTE

CONTROL IN

 jack of this DVD player to the

REMOTE CONTROL OUT

 jack of the compo-

nent with the remote sensor.

• When connecting to component which is not

equipped with a remote sensor, be sure to
connect the component to the 

REMOTE

CONTROL OUT

 jack of this DVD player.

 Important

• Before making or changing any rear panel

connections, make sure that all components are
switched off and unplugged from the wall
outlet.

• When connecting the component is turned on,

do not unplug the power cord of this DVD
player from the wall outlet. The speaker may be
damaged.

 Note

• When connecting to a standard TV, select

4:3 L - Box

 or 

4:3 Pan Scan

 in the TV Aspect

setting (see 

page 33

).

• Connect the video output of the player directly

to your TV.  Because the player is designed to
support an Analog Protection System copy
card, there are cases when proper playback will
be not be possible if the player is connected to
the TV through a VCR and images are recorded
and played on the VCR.

• The player’s video output and S2 output will

not be progressive.

Remote switch

When using this DVD player independently, set
this switch to 

INT. (INTERNAL)

. When using

this DVD player in a system with a Marantz
receiver equipped with a remote sensor, set the
switch to 

EXT. (EXTERNAL)

.

2

1

3

INT.

EXT.

Connect to a composite video
input on your TV using the
supplied Audio/Video cable.

Plug into a standard
AC wall outlet.

Connect to a pair of stereo
audio inputs on your TV using
the supplied Audio/Video cable.

RS-232C terminal

Control terminal for use
by custom installers.

See Note:

Remote Switch

Summary of Contents for DV7600

Page 1: ...Model DV7600 User Guide Super Audio CD DVD Player CLASS 1 LASER PRODUCT LUOKAN 1 LASERLAITE KLASS 1 LASERAPPARAT ...

Page 2: ... INVISIBLE LASER RADIATION WHEN OPEN AVOID EXPOSURE TO BEAM WARNING LOCATION INSIDE ON LASER COVERSHIELD CAUTION TO REDUCE THE RISK OF ELECTRIC SHOCK DO NOT REMOVE COVER OR BACK NO USER SERVICEABLE PARTS INSIDE REFER SERVICING TO QUALIFIED SERVICE PERSONNEL The lightning flash with arrowhead symbol within an equilateral triangle is intended to alert the user to the presence of uninsulated dangerou...

Page 3: ...7 Power Lines An outside antenna system should not be located in the vicinity of overhead power lines or other electric light or power circuits or where it can fall into such power lines or circuits When installing an outside antenna system extreme care should be taken to keep from touching such power lines or circuits as contact with them might be fatal 18 Overloading Do not overload wall outlets...

Page 4: ...lic instruc tion s rules that apply in your country or area Do not place anything about 0 1 meter above the top panel Make a space of about 0 1 meter around the unit No objects filled with liquids such as vases shall be placed on the apparatus When the switch is in the OFF position the equipment is not completely switched off from MAINS FCC NOTE for U S A only This equipment has been tested and fo...

Page 5: ...ow Play Frame Advance Playback 20 Using the Page 21 Using the Random Play 21 Using the Repeat Play 22 Switching Super Audio CD Mode 23 Switching Camera Angles 23 Switching Subtitle Language 23 Switching Audio Language 24 Using the Zoom Function 24 Making a program list 26 Video Adjust 28 6 DVD Setup Menu Using the FL menu 30 Using the Setup Menu 31 Setting up the Video Setup 33 Setting up the HDMI...

Page 6: ...ound from CDs and DVDs Superlative audio performance with Super Audio CD DVD Audio Dolby 3 Digital and DTS 4 software Logos R The DV7600 delivers breathtaking sound quality with Super Audio CD DVD Audio Dolby Digital and DTS discs SRS TruSurround 5 Logo When used with stereo sources SRS TruSurround creates a realistic surround sound effect using just two speakers see page 41 MP3 compatibility This...

Page 7: ...tages Make sure that the plus and minus ends of each battery match the indications in the battery compartment Remove batteries from equipment that isn t going to be used for a month or more When disposing of used batteries please comply with governmental regulations or environmental bylaws that apply in your country or area Using the remote control Keep in mind the following when using the remote ...

Page 8: ... can play DVD R discs recorded as DVD Video format DVD RW compatibility This unit can play DVD RW discs Please note the following points when using these discs Logo This unit can play DVD RW discs recorded as DVD Video format DVD RW discs that were recorded with copy once only permission cannot be played Audio CD compatibility Logos 12cm 5in or 8cm 3in discs Linear PCM digital audio Audio CD CD R ...

Page 9: ...given that the player will be able to display image data recorded in all JPEG formats This player cannot display progressive JPEG images When writing JPEG files to CD R RW discs always be sure to set the writing format to ISO 9660 Level 1 Always be sure to specify a file extension of JPG or JPE for JPEG files The file will not be able to be displayed if a file extension other than JPG or JPE is sp...

Page 10: ...s make sure that all components are switched off and unplugged from the wall outlet When connecting the component is turned on do not unplug the power cord of this DVD player from the wall outlet The speaker may be damaged Note When connecting to a standard TV select 4 3 L Box or 4 3 Pan Scan in the TV Aspect setting see page 33 Connect the video output of the player directly to your TV Because th...

Page 11: ...t can be connected to a DVI jack on a TV or other device using a conversion adapter In this case it is necessary to use a TV or display with an HDCP compat ible DVI input see page 37 There may be no image output if connected to a TV or display that is not compatible with the above format Refer to the instruction manual of the TV or display to be connected to this unit for detailed information rega...

Page 12: ...nplugged from the wall outlet When connecting the component is turned on do not unplug the power cord of this DVD player from the wall outlet The speaker may be damaged Connecting coaxial cables Use an interconnect with a pin type also called RCA or phono plug on each end to connect up digital coaxial type jacks Make sure that the plug is pushed fully home Note If you listen to multichannel DVD Au...

Page 13: ...cted device is HDMI compat ible the light flashes green When it is DVI compatible the light flashes red 8 Display page 14 Operation indications are displayed here 9 FL OFF Lights when the display is switched off using the FL OFF button and DIMMER button on the remote control 10 0 OPEN CLOSE Press to open and close the disc tray 1 1 4 1 Press to skip reverse title group chapter or track You can als...

Page 14: ...18 N Lights when NTSC has been selected as the TV system 19 P Lights when PAL has been selected as the TV system 20 M Lights when Multi has been selected as the TV system 21 V OFF Indicates that video output is turned off 22 D OFF Lights when the unit is set to Digital Out off 23 Character display 24 TITLE Indicates that the number below in the character display is a DVD Video title number 25 PROG...

Page 15: ... CODE on the FL menu to the same setting as the remote control This setting is set to DVD1 when the unit is shipped from the factory see page 30 1 OPEN CLOSE Disc tray open close page 16 2 VIDEO ON OFF press to turn video output off and on HDMI video output cannot be switched off 3 DISPLAY page 25 4 ZOOM page 24 5 VIDEO ADJ Video adjust pages 28 29 6 Number buttons 7 CLEAR page 26 8 ANGLE page 23 ...

Page 16: ...back DVD and Video CD if the display shows RESUME playback starts from the resume point 8 Pauses a disc that s playing 7 Stops playback DVD Display shows RESUME Press 7 STOP again to cancel the resume function 1 1 Press for fast reverse scanning during play 2 Press again to increase the scan speed Super Audio CD Video CD and CD have 3 scan speeds DVD have 4 Press 3 PLAY to resume normal playback 1...

Page 17: ...top menu RETURN Returns to the previously displayed menu screen Coursor Moves the cursor around the screen 2 3 5 ENTER Selects the current menu option Numbers Selects a numbered menu option some discs only Navigating Video CD PBC menus Some Video CDs have menus from which you can choose what you want to watch These are called PBC Playback control menus Press the TOP MENU to turn the PBC function o...

Page 18: ...nction off Finding what you want on a disc You can directly access any point on a disc using one of the search modes Use these search modes while a disc is playing Playback jumps to the point specified 1 Press the SEARCH button during playback mode current title number current chapter number elapsed time of the current title total number of titles on the disc total number of chapters in the curren...

Page 19: ... 1 and 2 To select a part 1 minute 10 seconds from the beginning of the selected track press 1 1 0 4 Press 3 PLAY button or the ENTER button Note Some discs don t allow the Search mode If you select numbers which don t exist on the disc PROHIBITED icon will be displayed In the STOP mode of DVD Pressing the SEARCH button sets the title select mode on and the GUI display should look like this total ...

Page 20: ... playback speed in 3 steps using 1 REV To return to normal playback When the picture is paused or during slow playback pressing 3 PLAY restores normal playback operation Step Motion playback Viewing one frame at a time With this function DVDs can only be moved in the forward direction Press 8 PAUSE Each time the button is pressed a new frame will appear To return to normal playback When viewing St...

Page 21: ...ring random play the 4 PREV and NEXT buttons function a little differently to normal 4 PREV returns to the beginning of the current track chapter You can t go back further than this NEXT selects another track chapter at random from those remaining You can t use random play together with program or repeat play Using the Page Press the PAGE button on the remote control during playback You may select...

Page 22: ... SINGLE REPEAT FOLDER REPEAT DISC REPEAT Note Folder The current folder will be played once Disc The disc will be played once 2 To return to normal play press REPEAT again then select off Looping a section of a disc 1 Press A B once at the start of the section you want to repeat then again at the end Playback immediately jumps back to the start point and plays the loop round and round On a DVD dis...

Page 23: ...UBTITLE repeatedly The current subtitle language is shown on screen To set subtitle preferences see page 44 Note It may take a few seconds till a selected subtitle appears on the screen In some cases a subtitle can not be turned off even if you select OFF Some discs allow you to change subtitles only via the disc menu In that case press the MENU button and change the settings Picture distortion ma...

Page 24: ... Language is audible Video distortion may occur when changing the Audio Language Switching audio channel Depending on the disc this feature may not work Depending on the disc you may be able to switch channels when playing DVD Audio discs see the disc box for details To switch the audio channel press AUDIO repeatedly On Video CDs you can switch between stereo just the left channel or just the righ...

Page 25: ... number time elapsed time of current track OFF Note The above information is not displayed with a Video CD playing in PBC mode The display on the front panel change as follows TITLE ELAPSED CHAPTER ELAPSED TITLE ELAPSED current title number current chapter number elapsed time of current title CHAPTER ELAPSED elapsed time of current chapter current chapter number SINGLE ELAPSED GROUP ELAPSED GROUP ...

Page 26: ...eatedly until is displayed Select a track number using the number buttons and then press the ENTER button The track is added to the end of the program To resume normal playback In the stop mode press the PROGRAM button to resume normal playback The PROG indicator will go off and the pro gram mode will be cancelled However the programmed content isn t lost You can return to the programmed playback ...

Page 27: ... name B file name C file number D play mode See page 22 2 Select a directory by pressing the 5 2 3 buttons and press the 3 PLAY button or ENTER button 3 Track numbers and titles file names will appear on the screen Select the desired file by pressing the 5 or number buttons of the remote control and press the 3 PLAY button Playback will start from the selected track Note During playback elapsed ti...

Page 28: ...the cursor button 2 to rotate the image counter clockwise 90 degrees Press the cursor buttons 5 to flip the image from top to bottom by 180 degrees Press the cursor button to flip the image from right to left by 180 degrees 4 Zoom playback To zoom press the ZOOM button during playback Each time the FF button the magnifica tion level changes Each time the 1 REV button the reduction level changes No...

Page 29: ...mages Auto 3 Setting for still images Video 1 Standard setting Video 2 Setting for moving images Video 3 Setting for still images DNR Adjusts the amount of noise reduction NR applied to the Y brightness component CNR Adjusts the amount of noise reduction NR applied to the C color component Sharpness High Adjusts the sharpness of the high frequency finely detailed elements in the picture Sharpness ...

Page 30: ...ction set the HDMI in the SETUP menu page 37 HDMI RESET Select HDMI RESET then press ENTER SURE is displayed in the FL menu Press ENTER if you want to RESET The menu selection is set Note If images are not displayed properly on the TV or projector after making HDMI setting on the Setup menu reset the set see page 47 This will return the HDMI setting to the state before the setting was made HDMI ON...

Page 31: ...rk Video Setup of the Display Options page 33 Use to select which type of screen you want to watch and several display options Ÿ HDMI Setup of the HDMI page 37 Audio Setup of the Audio Options page 39 Speaker Setup of the Speaker size and Distance page 43 SP Level Setup of the Speaker Level page 44 DISC Setup of the Language and several other options page 44 System Setup of the Parental Level and ...

Page 32: ... Sub Woofer page 43 On None Front L R Distance page 43 10 ft 3 0m Center Distance page 43 10 ft 3 0m Rear LS RS Distance page 43 10 ft 3 0m LFE Sub Woofer Distance page 43 10 ft 3 0m SP Level page 44 Test Tone Auto Off Manual Front L Level Center Level Front R Level Rear RS Level Rear LS Level LFE Sub Woofer Level DISC page 44 Audio Language page 44 English French Spanish Japanese German Italian N...

Page 33: ... the material is presented see the manual that came with your TV for details on what options are available If your TV does not have settings for how 4 3 sources look choose the 16 9 Squeeze setting The picture you see on your TV will be determined by the disc See page 34 for more information If you have a conventional TV choose either 4 3 L Box or 4 3 Pan Scan In Letter Box mode widescreen softwar...

Page 34: ...TV or monitor 16 9 Wide The picture is presented in widescreen 16 9 Wide 16 9 The picture is presented with black bars either side Screen format of disc TV Setting Appearance 4 3 16 9 Wide Player Setting Full Normal Full Normal 4 3 16 9 Squeeze This setting only has any effect with progressive output Full The picture is squashed Set to either Pan Scan or Letter Box The picture is squashed Set your...

Page 35: ...may become jerky and the upper and lower parts of the screen may disappear The above setting should be specified to match the format of your own TV Slide show Mode Default setting Random When a JPEG file is played you can enjoy twelve slideshow effects Press the ENTER button to select the desired mode from the following TYPE 1 1 1 TYPE 1 wipes from top to bottom TYPE 2 wipes from bottom to top TYP...

Page 36: ...l and choose one of the progressive scan settings you will not be able to see any picture at all With your TV con nected using either the composite or S Video terminals choose the Interlace setting in the Component Video menu Compatibility of this unit with progressive scan TVs Note that not all high definition television sets are fully compatible with this unit and may cause artifacts to be displ...

Page 37: ...80P 576P 720P 1080i Format RGB Normal RGB Expand YCbCr 1 4 4 4 YCbCr 2 4 2 2 Select one of the above with the ENTER button Note Image data values in RGB Normal format range between 16 black and 235 white Image data values in RGB Expand format range between 0 black and 246 white The formats available for HDMI outputs depend on the connected TV or projector For details see the user s manual of your ...

Page 38: ...s with CPPM protection Audio is not output when the player is con nected to a device with an HDCP compatible DVI jack All of PCM signal from digital out page 12 is converted to 44 1kHz 48kHz Turn the power on the front panel OFF during play or pause Noise from a television etc may come out When HDMI Audio is set to Auto or PCM the Digital Out page 12 setting is as per HDMI Audio 1 The player autom...

Page 39: ...ream otherwise set to PCM Check the manual that came with the other component if you re unsure whether it is Dolby Digital and DTS compatible If at any time you need to switch off the digital audio output set this to Off Note that you can t switch on off the optical and coaxial outputs individually Note Super Audio CD will not output digital sound If you set to Bitstream with a non DTS compat ible...

Page 40: ...uced from 44 1kHz 16 bit source 3 Output will consist of 44 1kHz linear PCM output when replaying CD layer When digital output is turned off no digital audio data will be output from the digital audio output terminal see page 39 PCM Down Sample ON 48kHz 48kHz 44 1kHz 48kHz 44 1kHz 48kHz 44 1kHz 48kHz 44 1kHz 44 1kHz 44 1 48kHz No output produced 3 DVD Video DVD Audio Video CD Audio CD MP3 CD Super...

Page 41: ...d the surround effect is varies with the disc When TruSurround is selected the audio can be output only for the L R channels on the Front SRS TruSurround SRS TruSurround uses technology that simulates multichannel surround sound using only two speakers Note Even if you set Audio Out to 5 1 Channel you ll only get sound from all speakers when playing a multi channel DVD Audio disc multi channel Sup...

Page 42: ...Lch Rch AUDIO OUT 5 1 CH Lch Rch Front Lch Rch L R Front L R Center Surround L R Sub Woofer 2 1 Center Surround LS RS LFE LFE MUTE MUTE MUTE Lch Rch MUTE MUTE 5 1 CH Other DVD RW Lch Rch MUTE 5 1 CH Other Front Lch Rch Center Surround LS RS LFE MUTE 5 1 CH Front Lch Rch Center Surround LS RS LFE 2 ch DOWNMIX Lch Rch 3 5 1 CH Other 2 ch DOWNMIX Lch Rch Front Lch Rch Center Surround LS RS LFE MUTE O...

Page 43: ...ffect digital audio output Follow the on screen displays to describe which speakers are in your system and their sizes and positions Set the size of your speakers in the Speaker Size screen The front left right L R center C and rear left right LS RS speakers can each be set to Large Small or Off Set a speaker to Large if the main speaker cone is 12cm or more set to Small if it s less than 12cm The...

Page 44: ... once again press the ENTER button to change the level Note Test tone cannot be used if a disc is loaded press open close to open the disc tray and remove a disc Be sure to press the open close to close the disc tray Change can be made only in the stop mode When RESUME is indicated on the display put the player in the STOP mode by pressing 7 STOP button This setting can be set only Audio Out is se...

Page 45: ...alian Hebrew Japanese Yiddish Javanese Georgian Kazakh Greenlandic Cambodian Kannada Korean Kashmiri Kurdish Kirghiz Latin Code 7678 7679 7684 7686 7771 7773 7775 7776 7778 7779 7782 7783 7784 7789 7865 7869 7876 7879 7982 8065 8076 8083 8084 8185 8277 8279 8285 8365 8368 8372 8373 Language Lingala Laothian Lithuanian Latvian Lettish Malagasy Maori Macedonish Malayalam Mongolian Moldavian Marathi ...

Page 46: ...he ENTER button The Change Password screen appears 2 Enter your old password 3 Enter your new password Re enter the new password again 4 Press the ENTER button Note If you have forgotten your password press 2580 Defaults You can re initialize the setting back to the factory defaults in the setup menu 1 Select DEFAULTS and press the ENTER button 2 Enter your password using the numeric buttons 3 Pre...

Page 47: ...electricity or other external influences may cause malfunctioning of this unit In this case unplug the power cord and then plug back in This will usually reset the unit for proper operation If this does not correct the problem please consult your nearest MARANTZ service center If this operation is performed all memories in which the Program Memory page 26 and Video Adjust s Memory page 28 have bee...

Page 48: ...y cold humid or hot environments including under direct sun light Don t glue paper or put stickers onto the disc or use a pencil ball point pen or other sharp tipped writing instrument These could all damage the disc For more detailed care information see the instructions that come with discs Do not load more than one disc into the player Discs to avoid Discs spin at high speed inside the player I...

Page 49: ... or carpet or cover with cloth this may prevent proper cooling of the unit Place on an unstable surface or one that is not large enough to support all four of the unit s feet Moving the player If you need to move the player first press POWER ON STANDBY button on the front panel to turn the player off then unplug the power cord Never lift or move the unit during playback discs rotate at a high spee...

Page 50: ...it can convert MPEG audio to PCM format for wider compatibility with digital recorders and AV amplifiers See also PCM Glossary Analog audio An electrical signal that directly represents sound Compare this to digital audio which can be an electrical signal but is an indirect representation of sound See also Digital audio Aspect ratio The width of a TV screen relative to its height Conventional TVs ...

Page 51: ...oup MPEG video The video format used for Video CDs and DVDs Video CDs uses the older MPEG 1 standard while DVD uses the newer and much better quality MPEG 2 standard Multi session A CD R RW that contains two or more sessions Each session is a complete recording process so each session is read as a complete disc This player can only read the first session on a disc Optical digital output A jack tha...

Page 52: ...e the Interlace setting in the Components Out menu then switch the TV input back to the component input page 36 Check the VIDEO ON OFF button on the remote control page 15 Screen is stretched or aspect does not change The TV Aspect setting in the Setup menu is incorrect Set the TV Aspect option to match the TV monitor you re using page 33 Troubleshooting Incorrect operation is often mistaken for t...

Page 53: ...ate audio through the digital output Linear PCM Out is set to PCM Down Sample On Set to Off As a copy protection measure some DVDs do not output 96kHz audio In this case even if Off is selected the player automatically outputs the audio at 48kHz This is not a malfunction No audio or audio is distorted Some DVD discs do not output digital audio Switch your amplifier to the player s analog outputs D...

Page 54: ...n playing Super Audio CDs Cannot output 192kHz or 176 4kHz digital audio The player does not output digital audio at these sampling rates Only 48 44 1 kHz output is available when HDMI is connected Cannot output 96kHz or 88 2kHz digital audio Check that the PCM Down Sample setting is not set to On page 40 Some discs are digital copy protected and do not output high sampling rate digital audio Only...

Page 55: ...r mm inch 440 17 3 13 5 0 5 82 8 3 3 96 3 3 8 2 5 0 1 297 6 11 7 305 5 12 0 5 4 0 2 PIN no 1 Audio 2 R out 1 1 G out 3 Audio 1 L out 15 R or C out 4 GND 17 GND 7 B out 19 Video out or Y out 8 Status 21 GND 20 18 16 14 12 10 8 6 4 2 21 19 17 15 13 11 9 7 5 3 1 Audio output Output level During audio output 2 Vrms 1kHz 0 dB Number of channels 2 Jacks RCA jack Audio output multi channel L R C SW LS RS...

Page 56: ...rk www marantz com You can find your nearest authorized distributor or dealer on our website U S A Marantz America Inc 1100 Maplewood Drive Itasca IL 60143 U S A EUROPE Marantz Europe B V P O Box 8744 5605 LS Eindhoven The Netherlands Printed in China ...

Reviews: