


12
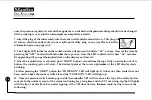
glow and read as “00” as time. This has 2 modes:
i.
If the ‘SET’ button is momentarily pr
essed once
and released the display will indicate 04 minutes with
a short beep and wait for the ST
ART command.
ii. If the “START” button is pressed, the cooker will
automatically go into BROWN mode and the LED will
show “
”. After browning press CLR/OFF to
programme cooking.
iii. If the SET button is kept pr
essed continuously the
display will keep jumping with 1 minute incr
ements ,
with a short beep for each increment. Stop when the
display shows the required time. In case you have
overshot the required time (for example: 30 minutes
instead of 25 minutes) all you need to do is to pr
ess the
CLR/OFF button (third from the top) once. This will
cancel the setting and restore the display to “00”. Now
repeat the operation to get the required time. Now the
cooker is programmed for the required cooking time.
Now press the START button (second from the top)
once. The heater is now put on power and the cooking
starts. The decimal point LED indicator will start
blinking at 1 second intervals showing, the timing is
in progress. The “POWER ON” LED will be ON.
Simultaneously the digital display also starts counting
down . At the end of the set time, the display will r
ead
"00", the beeper will sound, then the display will show
“
” and “POWER ON” indicator will blink, ie, 3
seconds ON and 30 seconds OFF. The heater will be
now in the KEEP WARM mode with only 10% power
applied . The cooker will remain in this state till the
the CLR/OFF button is pressed or the cord
disconnected from the wall outlet. When the CLR/
OFF button is pressed the indicator LED goes off, to
show that the WARM MODE also is now of
f and the
display returns to "00".
NOTE: Do not immerse the plastic base in water
. In
case it becomes soiled or requires cleaning, first press


