DVD-060
DVD WIFI CENTER
27
Set the support software CD-Rom in the CD-ROM Dri-
ver. Double click the icon of “Medialink” to starting install
the application software.
Choose the language for the software, follow the on-
screen instructions and click “NEXT” to continue the in-
stallation.
Click the finish button.
NOTE
: Under WinXP® SP2, your Firewall may ask you
to “UNBLOCK” Medialink application :
Checking the IP address in the Computer
Automatic assign IP address
The Network DVD Player needs to have his own IP Ad-
dress for communication with other computer devices.
If your computer has DHCP server enabled, the IP ad-
dress of your player will automatically be assigned by the
computer
Manually assign IP address
If the DHCP server is not enabled, you must manually
set the IP address of the Network DVD Player in the se-
tup menu.
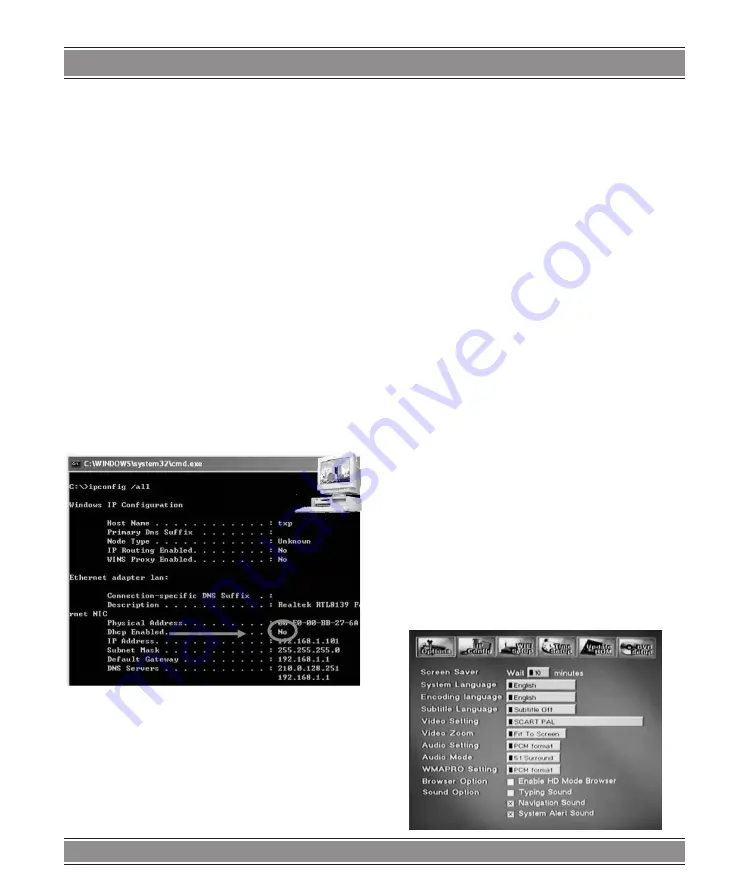
First, check to see if the DHCP server is or is not ena-
bled as follow:
(WinXP/2000/Me/98/SE only)
1. Turn on your computer
2. Click “Run” in the start menu.
3. Input “cmd” in the text box and press enter to open
the MS-DOS invite screen.
4. Input “ipconfig/all” in the MS-DOS window and press
“Enter”.
5. The following screen will appear.
6. It shows the computer IP and LAN settings.
Check the status of “DHCP Enabled” on the screen.
Setting the Network DVD Player for first time
You should have done the above section: “Checking
the IP Address of the computer” and have the IP settings
you wrote down available.
After making the video and audio cable connections:
Turn on the power to the Network DVD Player and your
TV or monitor. You should see the Logo name of the Ne-
twork DVD player. If not, then recheck the cables, or press
TV MODE on the remote several times until you get an
image on the screen.
It will take several seconds for the Network DVD Play-
er to display.
For the problems in making the video and audio cable
connection, Please read [3] Connecting to Network DVD
player.
Press the SETUP button on the remote controller.
The option-setting screen is displayed.
Press “Right” 2 times to “WIFI Setup” and Press “En-
ter”
DNX-8620 connected directly to PC using
crossover cable connection without Hub or
Router
Note:
Most PCs only have one LAN Port, your broadband in-
ternet modem connection may have to be disconnected
or plugged through PC USB mode.
Please follow these instructions:
1. Connect the Network DVD player to the PC using
‘cross-over’ RJ45 cable, then turn on the network
DVD player.
2. Using the remote control, press Setup to get the fol-
lowing screen:
3. Select the connection type used on your Network
“infrastructure” or “Ad-hoc”. (Ad-hoc for PC direct
connection)
Summary of Contents for DVD-060
Page 33: ...DVD 060 DVD WIFI CENTER 33 Note ...


