background image

54

Playing Back Images

This section explains the various methods of viewing images on the LCD monitor
of this unit.

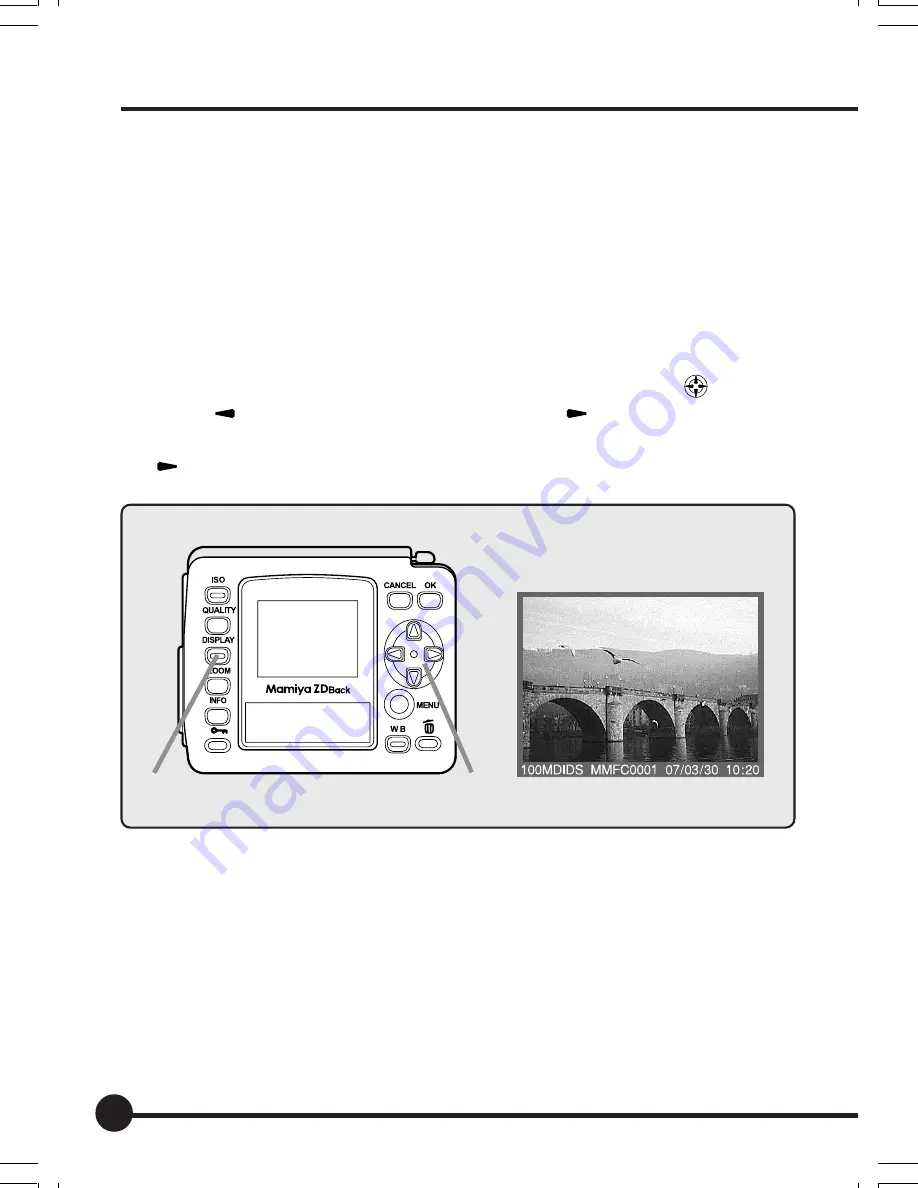
Playing Back Frames

Displays the images frame by frame on the LCD monitor.

1. Press the Display button.

The most recently recorded image will be displayed on the LCD monitor.

2. Select the image you wish to display with the toggle key

.

Press [

] to display the previous image, and [

] to display the next im-

age. When the most recently taken photograph is displayed, pressing the
[

] key on the toggle key will display the first photograph taken.

LCD monitor display

1

2

 04_ZD back_E_p053-060

07/3/9, 20:40

54

Summary of Contents for ZD Back

Page 1: ...Digital Back User s Manual English DCUG1205N01 Printed in Japan 00 1_ZD back_E _hyou1 4 07 3 9 20 35 1...

Page 2: ...f the subject that is copyright protected using this product is prohibited There are also times when use of professional and personal photographic devices is restricted in some per formances shows and...

Page 3: ...direct sunlight in sun heated vehicles or near stoves Do not attempt to weld deform modify or disassemble the battery or camera The terminals may be damaged or the contents scatter Loss of sight can...

Page 4: ...disconnect the AC adapter with wet hands Make sure that the strap is not caught on anything when carrying the camera Care should be taken in order to avoid catching the strap on other objects when ca...

Page 5: ...an result in condensation buildup within this product To avoid condensation buildup within this product it is suggested that this product be placed inside a plastic bag and sealed Remove this product...

Page 6: ...have not been verified for compatibility Safe operation of Memory cards Memory cards are precision instruments Do not drop or allow them to be exposed to strong vibrations This can corrupt data that i...

Page 7: ...used to delete any remaining data completely before disposing of giving away the memory card The customer must assume the responsibility for data stored within the memory card About this User s manual...

Page 8: ...Mamiya ZD Back for the 645AFDII 20 Removing the Mamiya ZD Back for the RZ67PRO IID 20 Preparing the Lithium Ion Battery PB401 for Mamiya ZD Back 21 Removing the Battery 24 Date Settings and Preparing...

Page 9: ...mages 58 Erasing1 Frame 58 Erasing All Images Entire Folder 59 Protecting Images 60 Protecting Images 60 Menus Menu Screen Operations 62 Recording Menu 63 Recording Menu 63 Playback Menu 67 Playback M...

Page 10: ...10 Appendix Digital Terminology 96 Index 101 Specifications 104...

Page 11: ...Before Taking Pictures This chapter describes what you need to do before you start us ing this unit for the first time...

Page 12: ...FD II Shutter speed and aperture setting Shutter release Settings about digital images Following settings can be adjusted when connecting the camera to a PC and opening a capture screen with Mamiya Di...

Page 13: ...re BS301 MEMO A memory card for recording images must be purchased separately The low pass filter YC401 for Mamiya ZD Back must be purchased separately Protective Cover KE403 for Mamiya ZD Back viewfi...

Page 14: ...Cover KE403 for Mamiya ZD Back LCD monitor P 54 ISO button P 43 Digital LCD panel P 16 White balance button P 38 OK button P 27 Cancel button P 27 Toggle key P 16 MENU button P 27 Delete button P 58...

Page 15: ...15 Left View Bottom View Memory card slot cover P 26 Memory card access lamp P 36 Terminal cover P 84 Video terminal cover P 88 Battery cover lock P 22 Battery cover P 22...

Page 16: ...an be set by various combinations of the toggle keys and buttons Indicator Toggle key ISO button ISO Sets the ISO sensitivity Quality button Quality icon Selects the image quality Display button Image...

Page 17: ...ess the lever into the unit while si multaneously pulling it out The cap can then be detached 3 Align the fitting groove on the bottom of the Mamiya ZD Back with the holder attachment fitting on the b...

Page 18: ...he Mamiya ZD Back q Pull the detachment lever w Press the lever into the unit while si multaneously pulling it out The cap can then be removed 3 Align the orange circle on the Digital Back Adapter HX7...

Page 19: ...f the Mamiya ZD Back with the attachment fitting on the bot tom of the adapter 6 Press the Mamiya ZD Back onto the camera and then insert the attach ment fitting groove at the top into the attachment...

Page 20: ...Pull the detachment lever w Press the lever into the unit while si multaneously pulling it out The Mamiya ZD Back can then be de tached from the adapter 2 Remove the Digital Back Adapter HX701 q Push...

Page 21: ...arge the battery Insert the Lithium ion battery PB401 supplied with the camera into the bat tery charger PC401 as illustrated The charging lamp lights and charging starts automatically When the chargi...

Page 22: ...Load the battery into this unit 1 Push down the battery cover lock to open the cover 2 Load the charged battery into the camera and close the battery cover Caution Be sure to turn this unit off before...

Page 23: ...charged There is little power remaining Have a charged battery ready The camera will still op erate There is very little power remaining Replace the battery with a charged battery When the battery is...

Page 24: ...g the Mamiya ZD Back Removing the Battery 1 Press the battery cover lock to open the battery cover 2 Press the and remove the battery Caution Be sure to turn this unit off before loading or unloading...

Page 25: ...toggle key to select 9 Date Time and press the OK button 3 The current date and time is displayed Press the OK button 4 The year entry field is selected Press on the toggle key to set the year 5 After...

Page 26: ...Insert the memory card as far as it will go making sure it is oriented as illustrated 3 Close the memory card slot cover MEMO This camera uses an SD card or CF card SD memory cards with a capacity of...

Page 27: ...en inserted in and press the OK button 4 The confirmation dialog is displayed Press the OK button to format MEMO To cancel formatting press the Cancel button The display returns to Step 2 Important Al...

Page 28: ...button shown in the illustration to make the button pop out Press the button to eject the memory card and pull it slowly out of the slot 2 To remove an SD card press the card in lightly to eject it an...

Page 29: ...1 does not reduce false colors moir and other phenomena that are unique to digital images Low Pass Filter YC401 The low pass filterYC401 reduces false colors moir and other phenomena that are produced...

Page 30: ...t Filter YB401 for Mamiya ZD Back 1 Invert the filter so that the side en graved IR CUT FILTER is facing back 2 Align the notch on the filter attach ment with the protruding part of the filter and pre...

Page 31: ...Basic Setup The functions available with the Mamiya ZD Back can be set up to match the style of photography required This chapter contains explanations on the basic settings for photographic styles...

Page 32: ...you can choose from 3 images sizes L M S and 3 compression rates FINE NORMAL BASIC RAW Data RAW data is image data that has not undergone any processing in this unit and has the extension MEF To view...

Page 33: ...08 2256 pixels Approx 218 3 163 7mm NORMAL Approx 1 5MB 6 800 000 pixels BASIC Approx 0 8MB The image file size varies depending on the subject and shooting environment The print size is the approxima...

Page 34: ...ect the quality 3 If you selected JPEG format press on the toggle key to select L M or S 4 Press the QUALITY button to set JPEG JPEG JPEG JPEG JPEG JPEG JPEG JPEG JPEG JPEG JPEG JPEG JPEG JPEG JPEG JP...

Page 35: ...NORMAL 24 frames 50 frames 101 frames BASIC 25 frames 52 frames 105 frames FINE 24 frames 50 frames 100 frames S NORMAL 25 frames 53 frames 106 frames BASIC 26 frames 54 frames 108 frames FINE 94 fra...

Page 36: ...have a spare battery ready and keep it warm in your pocket When taking a lot of pictures be sure to have a spare battery at hand The shape of plugs and power outlets varies from country to country Wh...

Page 37: ...pecified when developing images using Mamiya Digital PhotoStudio Setting Description sRGB Sets the color space to sRGB Suitable for general image use Sets the color space to Adobe RGB With a broader c...

Page 38: ...For taking pictures under incandescent light Fluorescent Approx 4200K For taking pictures under white fluorescent light light Flash Approx 5500K For taking pictures using the flash Customized Approx...

Page 39: ...e minor adjustments to the white balance settings for auto day light cloudy shade electric light fluorescent light and flash in the range of 3 decamired steps Adjusting in the plus direction produces...

Page 40: ...in value you want to set Press and hold down the toggle key to change the color temperature continu ously 4 Press the WB button Trial Shot Check that the color temperature you have set is the correct...

Page 41: ...OK button 3 Select customized white balance 1 or 2 in the customize window and press the OK but ton Customized white balance 1 is used in this ex planation The Customize White Balance window appears 4...

Page 42: ...zing the white balance As photocopying paper and other OA paper contains a fluorescent coating the correct custom ized white balance may not be obtained If the captured white or gray object is smaller...

Page 43: ...se only when you require a fast shutter speed in low light conditions 1 Press the ISO button The ISO icon and film speed appear on the digital LCD panel 2 Press the toggle keys to select the film spee...

Page 44: ...able for most pictures Portrait Emphasizes skin tones Suitable for portrait pictures Landscape Emphasizes bright greenery and blue skies Suitable for landscape pictures Products Emphasizes primary col...

Page 45: ...desired sharpness 3 Press the OK button to set Tone You can adjust the tone of images Select Low to reduce the contrast and High to increase the contrast The default setting is Normal 1 Press the MENU...

Page 46: ...t 4 Saturation in the recording menu and press the OK button 2 Press on the toggle key to select the desired saturation 3 Press the OK button to set Important Any changes you make to the sharpness ton...

Page 47: ...rd 1 Press the MENU button Press the toggle keys to select 7 Storage in the recording menu and press the OK button 2 Press on the toggle key to select a card slot 3 Press the OK button to set Subseque...

Page 48: ...er number The folder number can be set up number 100 to 999 5 Press the OK button to set The selected folder number appears in the cur rent folder field and subsequently captured images are saved to t...

Page 49: ...older A folder is automatically created when the memory card is formatted or a card containing no folders is inserted A new folder is created when the number of files saved to the folder exceeds 9999...

Page 50: ...er when the selected folder or memory card already contains images numbering starts from the next file number after the highest existing file number in the folder When the memory card is full FOLDER N...

Page 51: ...vity and picture count to the folder number and file number While the ISO sensitivity and picture count are displayed on the monitor press the ISO button while holding down the INFO button The ISO sen...

Page 52: ......

Page 53: ...Back Images This section explains how to playback and delete photographs with this unit attached to the camera Refer to the instruction manual for the software in use when play ing back images on a c...

Page 54: ...onitor 1 Press the Display button The most recently recorded image will be displayed on the LCD monitor 2 Select the image you wish to display with the toggle key Press to display the previous image a...

Page 55: ...ton move the frame to the area you wish to zoom in on with the toggle key 5 Release the ZOOM button A zoom in image of the area selected with the frame will be displayed Use the toggle key to scroll a...

Page 56: ...between different display formats 1 Press the Display button to display the frame 2 Keep your finger pressed down on the Info button and then select the required LCD monitor with the and toggle keys...

Page 57: ...mber Time Preview screen Date 1 Shutter speed 2 Aperture 3 Metered mode 4 Exposure mode 5 ISO sensitivity 6 Exposure compensation 7 White balance 8 Image Quality mode Only RAW will be displayed if rec...

Page 58: ...3 Press the Delete button A message confirming that the image is to be deleted will be displayed 4 Select 1 Frame with the and toggle keys and then press the OK button The frame being displayed will...

Page 59: ...gle key and then press the OK button A message confirming that all images in the folder are to be deleted will be displayed 4 Select OK with the and toggle keys and then press the OK button All of the...

Page 60: ...d image will be displayed on the LCD monitor 2 Select the image you wish to protect with the toggle key Press to display the previous image and to display the next im age 3 Press the Protect button Th...

Page 61: ...Menus This chapter explains the functions that can be selected from this unit s menu screen There are three types of menu mode available Recording Menu Playback Menu and Setup Menu...

Page 62: ...etup Menu The Setup Menu includes all of the basis settings relating to this unit such as memory card formatting date setup and other settings To set up each parameter select the required parameter sy...

Page 63: ...eters 1 Shooting Mode 2 Sharpness 3 Tone 4 Saturation 5 Folder Setting 6 Customize White Balance 7 Storage 8 Auto Rotation The name of the menu currently selected and the current parameter setting wil...

Page 64: ...Sharpness The sharpness strength of the outlines for images is set up on this menu The default setting is None See Basic Setup Setting the Sharpness Tone and Saturation page 46 for further details 3 T...

Page 65: ...ils 5 Folder Setting The folder in which recorded images are to be stored is set up on this menu See Basic Setup Creating a Folder page 49 for further details 6 Custom White Balance The customized whi...

Page 66: ...age 48 for further details on se lecting the storage medium 8 Auto Rotation This menu sets up whether to rotate images or not When set at OFF horizontal and vertical images are stored in the horizonta...

Page 67: ...enu contains the following parameters 1 Erase Image 2 Playback Folder 3 Slide Show 4 LCD Brightness 5 Protect Unprotect 6 Highlight Shadow Alerts 7 Set Magnification 8 Highlight Alert Level 1 9 Shadow...

Page 68: ...ages at a Time When the 2 All folders has been select and all images are erased at a time note that all images in the folder currently being played back will be erased together will all images in ever...

Page 69: ...ss the Cancel button to end the slide show 4 LCD Brightness This adjusts the brightness of the LCD monitor The brightness can be ad justed to six different stages to match the environment in which ima...

Page 70: ...to be activated or deactivated for the images stored on the memory card individually or in bulk for all images in the folder Parameter Details Protect capture folder Activates the protection function...

Page 71: ...Setup Menu These alerts can be selected for highlights only shadows only or both high lights and shadows White blurs and black smudges will flash when this has been activated provid ing an indication...

Page 72: ...on 3 Select the required parameter with the toggle keys 4 Press the OK button 8 Highlight Alert Level This sets the level of the highlight for which an alert is to be displayed when the highlight and...

Page 73: ...Select the required shadow alert level with the toggle keys 4 Press the OK button 10 Select File Type to Erase This sets the method in which RAW images and JPEG images stored simulta neously on the m...

Page 74: ...se Image on the playback menu When both RAW and JPEG images are stored simultaneously and one of them is deleted the remaining image will be displayed Images that have been protected and display the m...

Page 75: ...eft indicates the Setup Menu Use the toggle key to select the Setup menu when the menu symbol has been selected Setup Menu The Setup Menu contains the following parameters 1 Color Space JPEG 2 Shutter...

Page 76: ...ls 2 Shutter Release w o Card Sets whether the shutter release is to be deactivated or not when no memory card has been inserted into the camera The default setting is Not allowed 1 Press the MENU but...

Page 77: ...activates the low power consumption mode to restrain battery con sumption The default setting is ON Parameter Details ON Activates the low power consumption mode but it slows down the activation of th...

Page 78: ...e RAW format with Mamiya Digital PhotoStudio Refer to ISO Sensitivity Setup page 56 when setting up this parameter 6 Image Review This function sets up the display format and display time of images th...

Page 79: ...deo output when the camera is connected to a television or other monitor is to be NTSC or PAL The default setting is NTSC 1 Press the MENU button and then select 7 Video Output on the Setup Menu with...

Page 80: ...Setup Menu with the toggle key 2 Press the OK button 3 Select the required display time with the toggle key 4 Press the OK button When 4 OFF has been selected the display will con tinue until the powe...

Page 81: ...required language with the toggle keys 4 Press the OK button 11 Format Memory cards must be formatted before they can be used The formatting procedure is performed from this menu 1 Press the MENU but...

Page 82: ...city of up to 2 GB will be formatted in the FAT16 format and memory cards with a capacity that exceeds 2 GB will be formatted in the FAT32 format Important Precautions When Memory Cards are to be Disp...

Page 83: ...cting to the PC This section explains how to connect a camera fitted with the Mamiya ZD Back to a personal computer or television Refer to the software instruction manual for detailed operation proced...

Page 84: ...this unit to a personal computer on which Mamiya Digital PhotoStudio is installed with the use of an IEEE1394 cable sold separately it is possible to transfer images to the computer and operate the c...

Page 85: ...on manual provided with the Mamiya Digital PhotoStudio for further details Transferring Image Data There are two methods available for transferring image data to the PC using a card reader sold separa...

Page 86: ...e click on Mamiya Folder DCIM to display the folders containing im ages 4 Open My Documents My Pictures and create a New Folder 5 Drag and drop the folder containing the images to New Folder Transfer...

Page 87: ...een appears 2 Select a folder in the camera memory card from the Origin tree 3 Select a drive in the computer from the Destination list A folder tree of the selected drive ap pears below the list 4 Se...

Page 88: ...nit and the TV with a video cable sold separately as shown in the diagram 3 Turn on the TV and select video input as the input source 4 Press DISPLAY to play back an image The same image appears on th...

Page 89: ...Maintenance This chapter explains the daily maintenance procedures for this unit...

Page 90: ...ve the lithium ion battery and store it in a well ventilated place when this unit is not going to be used for an extended period Never try to dismantle or modify the camera in any way The connections...

Page 91: ...Troubleshooting This chapter contains information that should be read thoroughly before problems occur with this unit...

Page 92: ...nit The battery runs out quickly Are you sure you have fully charged the lithium ion battery Make sure it has been fully charged Has the lithium ion battery reached the end of its life span Purchase a...

Page 93: ...Has the LCD reached the end of its life span Contact our Customer Service Center I can t erase images Are the images protected Cancel the protect function Is the SD card protected Unprotect the SD ca...

Page 94: ...nt memory card The card is not formatted Format the memory card FOLDER No FULL Cannot create folder Format the memory card CARD FULL Cannot create folder The card is full up Erase all unwanted images...

Page 95: ...Appendix This chapter provides information on digital terminology an in dex and the camera specifications...

Page 96: ...to the three primary colors in order to facilitate clean printing of the color black CMY are complimentary colors to RGB and CMY is known as a subtractive color mixture method as opposed to RGB which...

Page 97: ...tputted rather than the whole file Crop is also used to denote the se lected range FireWire This is the nick name of the IEEE1394 standard which is a transmission mode protocol that connects a compute...

Page 98: ...Liquid Crystal Display A display device that uses liquid crystal LCD is thinner and lighter than other display devices and consumes com paratively less power It is often used in digital equipment Mir...

Page 99: ...output from the CCDs image capture element is stored in non com pressed 12 bit format These images can only be opened with this software and if the image is to be used in another application it is ne...

Page 100: ...quality loss systems irreversible compression such as LZW or pack bit can be selected Thumbnail An image that has been compressed in order to display a number of such images together in a list format...

Page 101: ...Custom White Balance 65 D Delete 1 frame 58 Delete button 14 Digital LCD panel 14 DISPLAY button 14 E Erase Image 68 F File Numbering 77 File Type to Erase 73 Folder number icon 16 Folder Setting 65 F...

Page 102: ...LCD Brightness 69 LCD monitor 14 Lithium ion battery 13 M Magnification 72 Mamiya Digital PhotoStudio 13 Memory card slot cover 15 MENU button 14 N Noise Reduction 77 O OK button 14 P Playback 1 frame...

Page 103: ...uration 63 Set Date Time 80 Set up menu 75 Shadow Alert 73 Sharpness 64 Shooting Mode 64 Shutter Release w o Card 76 Slide Show 69 Storage 66 T Toggle key 14 16 Tone 46 V Video Output 134 W White Bala...

Page 104: ...proximately 1 5MB JPEG S Fine approximately 3MB S Normal approximately 1 5MB S Basic approximately 0 8MB File sizes may differ depending on ISO sensitivity and subject Shooting speed 1 2 frames second...

Page 105: ...mensions 106 mm W x 90 mm H x 62 mm Weight 450g camera only Battery 100g Working environment Working temperature 0 deg C to 40 deg C Working humidity 75 or less These specifications are subject to cha...

Page 106: ...106...

Reviews: