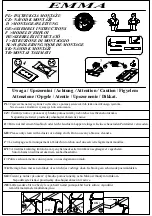
background image

Step 5

Attach the two middle guides
(F7), (these have a hole going
through them) to the middle
hole in each cot ends by
pushing two short assembly
screws (F2) through the
holes, then screw them into
the guides using the allen key
(F10).
The holes through the guides
must face upwards (see
diagram).

FITTINGS

Step 6

Please note:

Fit the drop-

side with the plastic teething
rail at the top.
Align the holes in the ends of
the top and bottom rail on
the drop- side (C5) with the
holes in the guides. 
Slide the drop-side rods (C6)
through the holes in the rails
and middle guides. 
The ends of the rods rest in
the recess in the top of the
bottom guides.

FITTINGS

F7 / Middle
guides x 2

F2

N O

N E

C5

C6

F7

F2 / 
Short assembly screws x 2

– 6 –

F10


Summary of Contents for Amelia

Page 1: ...instructions amelia cot IMPORTANT Please read instructions carefully and keep for future reference...

Page 2: ...ts 4 Item Description Qty F5 Base bracket nuts 4 Item Description Qty F6 Bottom guides 2 Item Description Qty F7 Middle guides 2 Item Description Qty F9 Top guides 2 Item Description Qty F8 Drop side...

Page 3: ...OR FITTING THE COT ENDS Mattress height mark base fitting holes Fixed side or drop side Base fitting holes The three holes for the height positions of the base are closer to one side of the legs edge...

Page 4: ...f the cot ends Slot the screws into the holes in the ends of the sides rails and tighten them into the barrel nuts F3 using the allen key F10 FITTINGS C2 C1 Step 2 Please note The base brackets F4 com...

Page 5: ...nds of the base brackets using the allen key F10 FITTINGS C4 F6 Bottom guides x 2 Step 4 Please note The guides must always be fitted on the inside face of both cot ends see diagram Attach the two bot...

Page 6: ...must face upwards see diagram FITTINGS Step 6 Please note Fit the drop side with the plastic teething rail at the top Align the holes in the ends of the top and bottom rail on the drop side C5 with th...

Page 7: ...h marked Right goes on the right side Step 7c Slot two short assembly screws F2 through the top holes in the cot ends Tighten the screws into the threaded holes in the thinner ends of the top guides I...

Page 8: ...ome worn or damaged then do not use the cot seek advice by calling our Customer Care Helpline on 01484 438222 6 Do not use replacement parts that are not recommended or supplied by Mamas Papas Non app...

Reviews: