background image

Unpacking instructions

 Appendix C

Mastersizer 2000

Page C-3

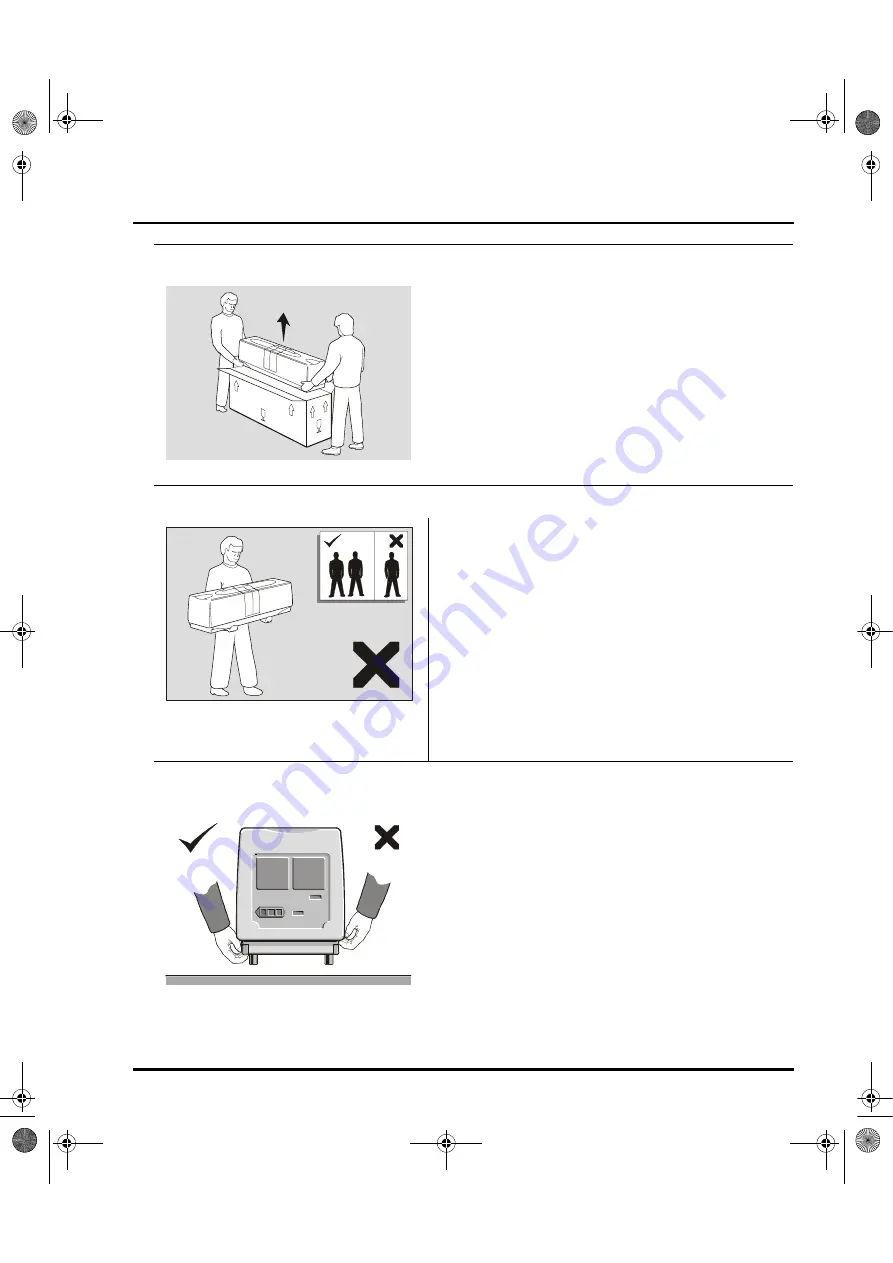
5.

ill 4925

Lift the instrument out of the carton and place on the 
workbench.

Soulevez l’instrument pour le sortir du carton, et posez-le 
sur le banc.

Das Gerät aus dem Karton heben und auf der Werkbank 
aufstellen.

Levantar el aparato, sacarlo de la caja, y colocarlo sobre 
el banco de trabajo.

Tire o instrumento da caixa e coloque-o na bancada.

6.

ill 4926

Never try to lift the instrument without the help of 
others.

Ne tentez jamais de soulever l’instrument tout(e) seul(e).

Bitte versuchen Sie niemals, das Gerät ohne Hilfe einer 
zweiten Person zu heben. Stets die korrekte Hubart 
verwenden, um eine Rückenverletzung zu vermeiden

No se debe intentar nunca levantar el aparato sin ayuda 
de otras personas.

Aplicar siempre las técnicas de elevación adecuadas 
para evitar daños en la espalda.

Não tente nunca levantar o instrumento da caixa sem o 
auxílio de outros - use sempre técnicas de levantamento 
adequadas, para evitar lesões nas costas.

7.

ill 4927

Never lift the instrument by its covers.

Pour soulever l'instrument, ne le tenez jamais par ses 
couvercles.

Niemals das Gerät an den Abdeckungen anheben.

No levantar nunca el aparato por sus cubiertas.

Nunca levante o instrumento pegando pelas suas 
tampas.

MAN0384-1.0 Mastersizer 2000.book  Page 3  Tuesday, March 20, 2007  8:56 AM

Summary of Contents for Mastersizer 2000

Page 1: ...ngland MRK0864 01 Malvern Instruments Limited Enigma Business Park Grovewood Road Malvern Worcs WR14 1XZ U K Tel 44 0 1684 892456 Fax 44 0 1684 892789 www malvern com user manual user manual Mastersizer Mastersizer Mastersizer 2000 2000 ...

Page 2: ......

Page 3: ...Mastersizer 2000 User Manual MAN0384 Issue 1 0 March 2007 MAN0384 1 0 Mastersizer 2000 book Page i Tuesday March 20 2007 8 56 AM ...

Page 4: ...y changes errors or omissions after the date of publication No reproduction or transmission of any part of this publication is allowed without the express written permission of Malvern Instruments Ltd Head office Malvern Instruments Ltd Enigma Business Park Grovewood Road Malvern Worcestershire WR14 1XZ United Kingdom Tel 44 0 1684 892456 Fax 44 0 1684 892789 Windows 2000 and XP are registered tra...

Page 5: ... The following information adds to the Light Sources information given on page A 1 Red light CDRH and CE compliant Class llla laser product CDRH Class 3R laser product IEC60825 1 1993 A1 1997 A2 2001 Type HeNe gas laser Max output power 4mW Beam diameter 0 63mm 1 e Beam divergence 1 5mrad Beam wavelength 633nm Blue Light For the Mastersizer 2000 and Mastersizer 2000LF this is Beam wavelength 466nm...

Page 6: ...Page 2 Addendum 0070 2 0 Addendum 0070 2 0 fm Page 2 Wednesday March 10 2010 11 58 AM ...

Page 7: ...4 Viewing the results 2 5 Saving the results 2 6 Identifying the features Introduction 3 1 Typical systems 3 2 Optical bench components 3 4 Software 3 8 Making measurements a tutorial Introduction 4 1 General measurement advice 4 2 The basics of making a measurement 4 3 Measurements on a Mastersizer 2000 4 4 Measurements on a Mastersizer 2000E 4 10 Measuring new samples 4 16 Measurement options 4 ...

Page 8: ...al concepts 6 7 Optical models 6 14 Handling measurement files Introduction 7 1 Records and files 7 2 Searching and sorting records 7 3 Exporting results 7 6 Extracting an SOP 7 8 Sample preparation Introduction 8 1 Sample preparation flow chart 8 2 Representative sampling 8 3 Considerations for dry samples 8 4 Considerations for wet samples 8 5 Symptoms of poor sample preparation 8 10 MAN0384 1 0...

Page 9: ...tion 9 1 Obscuration settings 9 2 Advanced result processing 9 5 Editing results 9 8 Defining user size bands 9 9 Alarms 9 11 Averaging records 9 13 Importing results from older instruments 9 14 Result emulation 9 15 MAN0384 1 0 Mastersizer 2000 book Page iii Tuesday March 20 2007 8 56 AM ...

Page 10: ...upervisor s Guide Security Introduction 10 1 Security principles 10 2 Setting up the Administrator 10 3 Security guidelines 10 4 Setting up user groups 10 5 Setting up individual users 10 6 MAN0384 1 0 Mastersizer 2000 book Page iv Tuesday March 20 2007 8 56 AM ...

Page 11: ...ility Introduction B 1 Unpacking instructions Regulatory statements CE Declaration of Conformity APA2000 D 2 CE Declaration of Conformity EPA2000 D 3 FCC Notice US only D 4 Canadian Regulatory Information Canada Only D 5 VCCI acceptance Japan only D 5 Index MAN0384 1 0 Mastersizer 2000 book Page v Tuesday March 20 2007 8 56 AM ...

Page 12: ...Table of Contents Mastersizer 2000 Page vi MAN 0384 MAN0384 1 0 Mastersizer 2000 book Page vi Tuesday March 20 2007 8 56 AM ...

Page 13: ...Part 1 Operator s Guide MAN0384 1 0 Mastersizer 2000 book Page 1 Tuesday March 20 2007 8 56 AM ...

Page 14: ...MAN0384 1 0 Mastersizer 2000 book Page 2 Tuesday March 20 2007 8 56 AM ...

Page 15: ...stand the basic measurement technique and be able to perform a simple measurement analyse the data and iden tify the main features of the system For users who have never operated a Malvern particle analyser before we recom mend reading this manual fully before starting the first measurement Users who are more familiar with particle size analysers may wish to proceed straight to Chapter 4 which giv...

Page 16: ... covers Supervisor The supervisor is the person responsible for the management safety of the instru ment and of its operation The supervisor is responsible for the training of the operators The supervisor can perform all user maintenance routines identified in the Essentials Manual including changing the fuses Warning Under no circumstances must the supervisor or operator remove the covers of the ...

Page 17: ...For simplicity in general text the term Mastersizer 2000 refers to both the Mastersizer 2000 and 2000E Where the Mastersizer 2000E is different this is always explained The sample dispersion units are referred to in full the Hydro 2000G or the Hydro 2000MU or as the dispersion unit The combination of the optical bench one or more dispersion units and the computer is referred to as the system Menu ...

Page 18: ...The system must be initially commissioned by a Malvern trained repre sentative Health and Safety this must be read by all users of the system It details all safety issues for the optical bench and all dispersion units Maintenance for both the optical bench and dispersion units Installation this gives enough information to allow the user for example to move the system from one laboratory to another...

Page 19: ...t s Serial number of the optical bench and dispersion unit s Version of the Malvern software this can be found by starting the software and selecting Help About The serial number of the optical bench can be found inside the sample area remove the cell first The serial number of a dispersion unit is found on its rear panel Contact the United Kingdom help desk if the local Malvern representative is ...

Page 20: ...e range of material charac terisation resources for use by customers 24 hours a day seven days a week Resources include Frequently Asked Questions a knowledge base and application notes plus information on other material characterisation solutions that Malvern can provide MAN0384 1 0 Mastersizer 2000 book Page 6 Tuesday March 20 2007 8 56 AM ...

Page 21: ...manual What the Mastersizer 2000 does Take a look around At the paint on the walls the chocolate on a biscuit the cement foundations of a building The stability chemical reactivity opacity and material strength of these and many other materials are affected by the size and characteristics of the particles within them The Mastersizer has been designed to measure the size of these particles or more ...

Page 22: ...ay it will scatter light can be predicted accu rately Each size of particle will have its own characteristic scattering pattern like a fingerprint that is unlike any other size of particle So how does the Mastersizer measure the size of particles It works backward from the above theories by using the optical bench to capture the actual scattering pattern from a field of particles Then using the th...

Page 23: ...re made for each measurement with each snap taking 1ms 3 Once the measurement is complete the raw data from it is analysed by the Malvern software using one of the theories mentioned above Once the data has been analysed the information can be displayed in various ways Note the following points regarding the measured data and the analysis Analysing the measurement data does not permanently alter t...

Page 24: ...ing an SOP is very easy The operator selects Configure New SOP and the software runs the SOP Wizard This wizard asks a series of questions such as what are the optical properties of the sample what is it suspended in how fast should the stirrer be how much ultrasonic dispersion is required should any additives be added to the sample to aid dispersion how is the result to be calculated and displaye...

Page 25: ... and selecting a record A typical measurement file is shown below The Records tab is shown initially Selecting this tab shows all the records within the opened measurement file One or more records must be selected before a report can be opened The series of tabs at the top of the window shows the reports that are available To change between reports simply select another report tab If the standard ...

Page 26: ...ent the user can save the result in a measurement file by selecting File Save or Save as an SOP can be configured to automatically save the results to a measurement file A measurement file has the extension mea MAN0384 1 0 Mastersizer 2000 book Page 6 Tuesday March 20 2007 8 56 AM ...

Page 27: ...ecific dispersion units or applications This chapter covers Typical systems identifies the main modules of typical systems Optical bench components examines the features of the optical bench in more detail Software identifies the main features of the Malvern software Detailed information on the dispersion units can be found in their own manuals MAN0384 1 0 Mastersizer 2000 book Page 1 Tuesday Marc...

Page 28: ...e 3 2 MAN 0384 3 Typical systems These diagrams show typical systems with their key modules Mastersizer 2000 ill 7917 Mastersizer 2000E ill 7918 1 3 2 1 3 2 1 3 2 1 3 2 MAN0384 1 0 Mastersizer 2000 book Page 2 Tuesday March 20 2007 8 56 AM ...

Page 29: ...ample dispersion units depending on their particular requirements In the diagrams above The Mastersizer 2000 is shown with two dispersion units a Hydro 2000G on the left and a Hydro 2000 S on the right The Mastersizer 2000E is shown with a Hydro 2000MU The individual dispersion unit manuals identify the dispersion units features Computer system The computer system is a stand alone computer that ru...

Page 30: ...n rather than a sliding action Protection window The protection window stops dust and dirt entering and damaging the internal detectors Clean this window periodically see the Essentials Manual Drain The drain allows any spillages within the cell area to exit onto the bench Cell The cell is the interface between the sample dispersion unit and the optical bench The sample measured is passed between ...

Page 31: ...cal bench It is detailed below Cell holder The cell holder is a parking area for the cell when it is not in use This is supplied when more than one dispersion unit is used on the system It allows the cell to be removed and stored without the need to disconnect it from the dispersion unit Window tool The window tool is used to remove the windows from the cell if they need clean ing or replacing see...

Page 32: ... is plugged in here Data from the optical bench and control commands from the computer are transmitted down it ACCESSORY connector Dispersion unit communications connector The first sample dispersion unit is connected here It allows the dispersion unit to be controlled by the software This connector is not used if only manually controlled dispersion units Hydro 2000MU and Scirocco 2000M are used A...

Page 33: ...see the Essentials Manual Cell in and Cell out connectors The sample is recirculated through the cell and back to the dispersion unit These connectors attach the cell to the dispersion unit The tubing must be connected correctly The tube from the dispersion unit to the cell must be connected to the Cell in connector This allows any trapped air bubbles to rise through the cell The connectors are co...

Page 34: ...esigner allows the user to create custom reports to display the results The Report Designer is detailed in Chapter 5 Features of the window The features of the window are detailed below ill 7752 Menu bar The menu bar contains the main menu headings for all software functions There are several ways to select an item from the menu bar Using the mouse to select an item from the menu bar click the lef...

Page 35: ...s an equivalent menu command For example using the button is equivalent to using the File Open command To help users identify a button a short tooltip description of its action is displayed in the status bar when the cursor is moved over it As with the menu bar if a button is not available it is shown greyed out Measurement window The Measurement window displays all the information for a measureme...

Page 36: ...Chapter 3 Identifying the features Page 3 10 MAN 0384 MAN0384 1 0 Mastersizer 2000 book Page 10 Tuesday March 20 2007 8 56 AM ...

Page 37: ...2000E Measuring new samples what to do for a new material Measurement options describes the series of dialogues which comprise the SOP Wizard The best way to learn how to use the system is to make a measurement To get the most benefit from this chapter we advise reading it once then reading it a second time while following the instructions to make a measurement To do this obtain a suitable sample ...

Page 38: ...prepare the sample to ensure a perfect measurement Details on sample preparation are given in Chapter 8 Note Over half of the problems encountered in measuring a sample are caused by bad sample preparation If the user prepares badly for the measurement no amount of subsequent analysis will give a good result Adding the sample The software reports exactly what level of signal the sample generates a...

Page 39: ...tandard Operating Procedure SOP SOPs are user defined procedures that are easily programmed into the software to allow the same type of sample to be measured in a consistent way with all the difficult decisions on measurement strategy already having been made When the SOP is run it automatically runs through the defined measurement procedure prompting the operator to perform tasks such as adding t...

Page 40: ...t the correct cell is connected informing the user if it is not To power up the system 1 Switch on the dispersion unit s 2 Switch on the optical bench 3 Switch on the computer and start the software by double clicking on the Mas tersizer 2000 icon Making a basic SOP measurement Start an SOP by selecting Measure Start SOP In the dialogue which appears select an SOP The Measurement Display dialogue ...

Page 41: ...to a measurement file All the user has to do is wait for a prompt from the SOP to perform the actions detailed above Try making an SOP measurement using single dairy cream Make sure that the sys tem is connected and powered up then 1 Select Measure Start SOP and browse for the SOP file 2 Select Dairy cream using Hydro 2000G SOP or Dairy cream using Hydro 2000S SOP if using the Hydro 2000S from the...

Page 42: ...ntaminated by background electrical noise and also by scattering data from dust on the optics and contaminants floating in the clean disper sant The Measure Background facility automatically makes a measure ment of the system containing only clean dispersant when a manual measurement is started as well as a measurement of the electrical back ground This background information is subtracted from th...

Page 43: ... ple the user can specify what sample and dispersant to measure how the size distribution is to be calculated and where to save the results Document pressing this button displays a dialogue where the user can document the measurement i e make notes on the pre dispersion tech niques sample quantity etc This allows the measurement to be repeated at a later date Start starts a measurement process For...

Page 44: ...n to open the Measurement Options dialogue Select the Material tab to specify the materials measured Select Dairy cream from the Sample material name box When measuring their own samples the user would specify a new material by pressing the Materials button 3 This sample is an aqueous emulsion so it should be dispersed in water Select Water in the Dispersant name box 4 Select the Measurement tab s...

Page 45: ...mple has been added press the Start button The sample is measured and the result size distribution calculated The measure ment record is automatically saved to the records buffer 7 At the end of the measurement a dialogue appears asking if the user wants to make another measurement Select Finished measuring The Measurement Display disappears and the software returns to the main window 8 The measur...

Page 46: ...h on the computer and start the software by double clicking on the Mas tersizer 2000E icon Making a basic SOP measurement Start an SOP by selecting Measure Start SOP In the dialogue which appears select an SOP The Measurement Display dialogue will appear ill 7753 The status area at the bottom left of the dialogue always says what is going on in the measurement The information in the dialogue will ...

Page 47: ...marise an SOP measurement generally follows the steps indicated below Make sure that the system is connected and powered up before starting 1 Select Measure Start SOP 2 A browse dialogue appears select an appropriate SOP file from this directory C Program files Malvern Instruments Mastersizer 2000E SOP 3 Select OK 4 The SOP measurement asks the user to clean the cell and then pump in fresh dispers...

Page 48: ...ntified ill 7754 Its main features are The status area at the bottom left of the dialogue reports what is going on The information in the dialogue changes as the measurement progresses The tabbed displays show information on the four stages of making a measure ment Measuring a background the measurement data from a particle field is contaminated by background electrical noise and also by scatterin...

Page 49: ...mation during the actual measurement Result this tab is displayed when the software is calculating the size dis tribution The measurement control buttons allow the measurement process to be con trolled and allow the user to document the measurement control the disper sion unit and set up all the measurement parameters The buttons are outlined below Options this button gives access to the measureme...

Page 50: ...m 1 Make sure the system optical bench and Hydro 2000MU is connected and powered up 2 Fill the sample beaker with clean dispersant and using the dispersion unit con trols pump the dispersant through the cell 3 Select Measure Manual The software will automatically make an electrical and optical background measurement as well as aligning the optics 4 Press the Options button to open the Measurement ...

Page 51: ...e Add one drop of the cream to the tank and wait for it to diffuse through the system Add enough drops to make the Laser Obscuration bar move into the green area try and achieve a mid value 10 Once satisfied that enough sample has been added press the Start button The sample is measured and the result size distribution calculated The measure ment record is automatically saved to the records buffer...

Page 52: ...te If a material is created or modified the computer calculates a new scatter ing model This usually takes one to 10 minutes depending on the compu ter The Measurement tab allows the user to set up measurement times and set measurement alarms etc Press the Document button in the Measurement Display and use the Docu ment dialogue to add relevant details that will allow users to repeat the measure m...

Page 53: ...r Editing an SOP An existing SOP can be easily edited either to correct that SOP or to create a new SOP based on it To edit an SOP 1 Select Configure Existing SOP 2 A tabbed dialogue appears each tab corresponding to a SOP Wizard dialogue 3 Select a tab and change any of the entries as required 4 Select OK the changes will be saved To create a new SOP based on an existing one the user must first m...

Page 54: ...ialogue A series of dialogues listed below is displayed in the SOP Wizard Identical tab versions of these dialogues are displayed during a manual measurement Sampler Selection dialogue Use this dialogue to select a sample dispersion unit Up to two samplers designated A and B of each type can be selected allowing for two different configurations This may be appropriate for example if a specific sam...

Page 55: ...al properties of the material measured The sys tem has a large database of commonly used materials from which a Frequently Used list may be created The material and dispersant to be used in a measurement are selected from the frequently used sample dispersant list boxes The Refractive Index and Absorption of each item listed is displayed next to the list box Changes to the frequently used lists ca...

Page 56: ...elec tion of one of three models General purpose default Multiple narrow modes or Single mode Clicking on the Advanced button allows the selection of reduced ranges or spe cific result transformations Click on the relevant Advice button for advice Note Mastersizer 2000 only The Mastersizer 2000 uses red and blue light to measure samples For cer tain materials most notably certain inks and pigments...

Page 57: ...ce This allows the sample to be traced in the future This dialogue also allows messages to be displayed for the operator before and or after a measurement For example it may be necessary to give details on how to prepare the sample before a measurement starts or how to dispose of it after the measurement MAN0384 1 0 Mastersizer 2000 book Page 21 Tuesday March 20 2007 8 56 AM ...

Page 58: ... been made Use the Reports page list box to select the report to use If distributing the SOP to other users ensure that they have the requested report installed This dialogue also allows results to be exported to a spreadsheet or other external application See Exporting results in Chapter 7 for more details MAN0384 1 0 Mastersizer 2000 book Page 22 Tuesday March 20 2007 8 56 AM ...

Page 59: ... of the sample its particle size distribution and the dispersion unit used If a material is monomodal its essential particle size characteristics can be captured in fewer snaps than a material with a broad particle size distribution which will need to be measured for longer to ensure that the coarser particles have had time to flow through the measurement beam This dialogue also gives access to so...

Page 60: ...tents of this dialogue depend on which dispersion unit was selected in the Sampler Selection dialogue Use the dialogue to set all dispersion unit control settings See the appropriate dispersion unit manual for more details MAN0384 1 0 Mastersizer 2000 book Page 24 Tuesday March 20 2007 8 56 AM ...

Page 61: ...to be performed If the sample dispersant used is not normally removed with a single flush enter a number in the Flush cycles box to run the flush sequence that number of times The user can set the Clean mode to either Automatic or Manual Manual ena bles the user to clean the system easily using a beaker and a bottle of clean solvent A series of prompts guides the user through the cleaning cycle Di...

Page 62: ...ements a tutorial Page 4 26 MAN 0384 Quantities dialogue Use this dialogue to define the quantities of sample additives to be added during a measurement MAN0384 1 0 Mastersizer 2000 book Page 26 Tuesday March 20 2007 8 56 AM ...

Page 63: ...t formats Malvern provides several default reports identified by the M in their name that will be sufficient for most users The user can also create their own custom reports as required Generally a computer monitor displays information in a landscape format while a printer prints in a portrait format Therefore each report is split into two formats one for displaying the report on the screen and an...

Page 64: ...port tab Some reports allow the user to compare or display more than one record For example if the user selects more than one record in the Records tab and then selects the Sample data report tab a graph will show the sample data for all selected records over plotted on a single graph The format of the information in a report can often be changed by selecting an item and right clicking the mouse F...

Page 65: ...the basic measurement data It shows the background signal measured and the actual measurement data This report can be used to identify problems with measurement data For example dirty optics will result in a poor background signal i e one with high values Result Difference report This report compares two records and displays the difference The first record must be set as the reference by selecting...

Page 66: ...list header The dialogue is split into two sides The list box on the left shows all fields available that can be added to the records tab The Show these fields in this order list shows all the fields that are currently displayed in the Records tab The order in which they are listed is the order in which they appear in that tab To add a field to the Records tab select a field from the Available fie...

Page 67: ...rder of records in the Records tab There are two ways to rearrange the records in the Records tab Using the Show Fields dialogue select the field to move in the right hand list then use the Move Up and Move Down buttons to change its order Directly from within the Records tab by selecting the header of the field and dragging it to a new position A red arrow will show the insertion point Be careful...

Page 68: ...e objects such as company logos to printed reports while not showing them on the screen display To add items to a report use this Tools box or Control Palette Use the following buttons on the palette to add the listed elements to a report Button Use this to add Text Picture bitmaps GIFs JPEGs metafiles and icons Parameter any parameter used by the Mastersizer system Conditional expression can be u...

Page 69: ...ey can be manoeuvred by selecting and dragging They can also be reduced or expanded in size using the cursor and tag boxes on the selected object The Report Designer has many size and alignment tools available from the tool bar or using the Layout option on the menu The following functions operate on two or more selected objects The last object selected becomes the reference object Align left Alig...

Page 70: ...t first be selected Result graph shows the particle size result of the measurement It can be displayed in different ways using its properties box Statistics graph shows statistics of the result The parameters available are mean standard deviation maximum and minimum Trend graph allow the measurement data from multiple records to be com pared to investigate any trends in the information Grade effic...

Page 71: ...er scattering model selected for that material The closeness of the fit is an indicator of the correctness of the light scattering data used and the quality of the measurement cleanliness of the system etc Result shows the raw result data Statistics shows the mean standard deviation maximum and minimum of a group of selected measurement records The statistic shown on the table can be altered using...

Page 72: ...Chapter 5 Viewing the results Page 5 10 MAN 0384 MAN0384 1 0 Mastersizer 2000 book Page 10 Tuesday March 20 2007 8 56 AM ...

Page 73: ... reports show Fundamental concepts explains some important concepts the user should understand before proceeding These include How the concentration Cv is calculated Use of volume based results How the result is expressed in terms of equivalent spheres How the distribution parameters are derived Optical models contrasts the Fraunhofer approximation used in some instru ments with the Mie theory whi...

Page 74: ...ticles 52 59 microns for example and the height of the bar represents the percentage of the sample that is within that band Read the percentage from the left hand axis Unless the size bands are changed see Chapter 9 the initial analysis uses the size bands that are set by the physical design of the detector Result under plot also known as cumulative undersize or result less than displays the resul...

Page 75: ...l for dis playing the results to show the modes or peaks in the graph The peak of the frequency curve gives the modal diameter the most com monly occurring particle diameter Note that the frequency curve is scaled to be approximately the same height as the analysis size band histogram Several peaks in the graph indicate that there are distinct sizes of particles within the sample This at a glance ...

Page 76: ...al of under 1 A residual of over 1 may indicate use of incorrect refractive index and absorption values for the sample and dispersant The statistics of the distribution are calculated from the results using the derived diameters D m n an internationally agreed method of defining the mean and other moments of particle size See British standard BS2955 1993 for more details 1 2 3 4 5 6 7 8 9 10 D m n...

Page 77: ...t of the width of the distribution The narrower the distribution the smaller the span becomes The span is calculated as The x is replaced by any of the letters v s l or n that define the distribution type Concentration the volume concentration This is calculated using Beer Lambert s law For full details see the following section Obscuration this helps the user to set the concentration of the sampl...

Page 78: ...m the median Here d x 0 5 is the median size of the distribution where x is replaced by v s l or n and di and xi are respectively the mean diameter of and result in size class i Specific Surface Area SSA the total area of the particles divided by the total weight where Vi is the relative volume in class i with mean class diameter of di and p is the particle density If the SSA is used it is importa...

Page 79: ... is the intensity of the light beam as it enters the particle field I I0 is the relative transmission T of the beam measured directly by the instrument I0 is the intensity of the laser beam measured at the receiver when no sample is present and I is the intensity with sample in the beam Expressing the Beer Lambert law in terms of relative transmission and re arranging to solve for absorbance gives...

Page 80: ...ured in µm and b in mm and v is the relative concentration of the size distribution such that then This equation provides the concentration in parts per million ppm To calculate the value as a percentage volume concentration the final value is divided by 10 000 In the above equation The Transmission T is a value between 0 and 1 and is measured directly by the instrument The particle size distribut...

Page 81: ...ding to the presentation being used It will be clear that there is a size dependence an obscuration of 30 means a widely varying volume concentration dependent on size Concentration at different obscurations Calculated for glass beads in water n 1 54 i0 in water In the more realistic situation of a polydisperse or multimodal sample it is not possible to provide simple graphical correlations of vol...

Page 82: ...icles It is useful to consider a numerical example to illustrate this point Suppose for simplicity that a sample consists of only two sizes of particle 50 by number hav ing a diameter of 1 micron and 50 by number a diameter of 10 microns Assum ing that the particles are spherical the volume of each of the larger particles is 1000 times the volume of one of the smaller ones Thus as a volume distrib...

Page 83: ...l One way to get a single unique number to describe an irregular shaped particle is to compare some feature of the actual particle to an imaginary spherical particle Some typical methods of doing this are Equivalent surface area calculating the diameter of a theoretical sphere that has the same surface area of the original particle Equivalent maximum length this is where the diameter of a theoreti...

Page 84: ...chniques Sieving would pass the par ticles through a 20mm aperture and classify them as 20mm Sedimentation would give a result related to the total surface area in this case reporting a diameter of around 40mm If there s a need to correlate laser diffraction results with values from some other technique consider applying a shape correction using the Result Modification procedure built into the Mal...

Page 85: ...ometric mean of the size band limits This number will be slightly different to the arithmetic mean For example the size band 404 21 492 47 microns has a geometric mean of 446 16 microns and an arithmetic mean of 448 34 microns In most cases the difference is small but the geometric mean is chosen in these calculations as more appropriate to the logarithmic spacing of the fundamental size classes T...

Page 86: ...ation used in some instruments with the Mie theory which underpins Mastersizer 2000 operation Fraunhofer approximation Older instruments and some existing instruments rely on the Fraunhofer approxi mation only This assumes that The particle is much larger than the wavelength of light employed ISO 13320 defines this as being greater than 40x wavelength 25µm when a He Ne laser is used All sizes of p...

Page 87: ...hese values either will be known or can be measured A standard set of particles is available for selection in the SOP presented in the first Analysis dialogue More can be defined by a user but the following parameters must be specified accurately Refractive Index Real describes the amount of scattering that takes place as a result of light interacting with the particle Refractive Index Imaginary t...

Page 88: ...Chapter 6 Understanding the views Page 6 16 MAN 0384 MAN0384 1 0 Mastersizer 2000 book Page 16 Tuesday March 20 2007 8 56 AM ...

Page 89: ...ter outlines the storage sorting and exporting of measurement data It covers Records and files Searching and sorting records Exporting results how to export information to other applications Extracting an SOP MAN0384 1 0 Mastersizer 2000 book Page 1 Tuesday March 20 2007 8 56 AM ...

Page 90: ...rement file Once all measurements are completed the user will have a measurement file with the following structure Cement Mea Hour 1 Hour 2 Hour 3 Hour 4 Hour 5 Alternatively they could have created five measurement files that each contain one record A record can be deleted but it can never be altered However a record can be re analysed and the resultant record saved under a new record name For ex...

Page 91: ...t contain a D v 0 5 value of more that 50 microns To search measurement files 1 Select Tools Find measurements to open this dialogue 2 Use the Files tab to specify which measurement files to search Use the Browse button to select a directory which contains the measurement files enabling the Search subfolders check box extends the search to all sub directories of this directory In the Named box spe...

Page 92: ...set the conditions of the search Select OK to add the search criterion to the list box in the previous dialogue A single search criterion can be altered or deleted by selecting the Edit and Delete buttons in the Find Measurements dialogue 5 Start the search by pressing the Find button Once the search is completed all records found will be displayed in a window similar to the normal Records tab exc...

Page 93: ...ned by these search buttons New search clears all criteria currently set Open search opens a previously saved search Save search saves the current search criteria to a new file Sorting records Records in a measurement file can be sorted into alphanumeric order From a measurement file window select the Records tab Selecting any of the field headers will rearrange all records into alpha numeric orde...

Page 94: ...able or Edit Copy Graph The item can then be pasted into another application Any of the parameters from one or more records can be exported as a text file This file can then be loaded into a word processor or spreadsheet A template is used to specify which parameters are exported Use the Configure Data export templates command to create and modify templates A measurement file can be attached to an...

Page 95: ...ay to export data is to select one or more records and simply drag the records to another application and then drop them onto a page This method uses the template specified in the Default Template list box in the Data Export Templates dialogue This dialogue can be accessed by selecting Configure Data export templates Creating an export template New export templates can be created or existing ones ...

Page 96: ... Down buttons as appropriate A standard template Result Analysis M is supplied that exports all fields of the standard report page Result Analysis M Extracting an SOP The SOP settings used to produce a measurement can be extracted for reuse To extract an SOP 1 Select a record in the measurement file 2 Either right click on the record and select Extract in the menu this displays or select Edit Extr...

Page 97: ... the result will be incorrect There are many techniques available to ensure that the sample is prepared success fully Once a suitable dispersion technique is found for the sample standardise the procedure using an SOP so that comparisons can be made between samples This chapter gives information on Sample preparation flow chart summarises the process Representative sampling Considerations for dry ...

Page 98: ... is not usually necessary and will almost certainly affect the size of liquid particles SAMPLE Analyse Analyse Take Representative Sample mix well or riffle if dry powder Analyse Ultrasound if necessary Try Surfactant Ultrasound if necessary Ultrasound if necessary e g Ethanol Propan 2 ol IPA Methanol Acetone Butanone Methyl Ethyl Ketone Hexane Toluene Dimethyl Digol Try Solvent Does it disperse i...

Page 99: ...ently roll the container continually changing its orientation for about 20 seconds This method works bet ter if the container is only half full Spinning rifflers If the distribution of particles within a sample is particularly broad representative sampling can be difficult If problems continue using a spinning riffler may help This is a vibrating hopper which vibrates the sample down a chute The a...

Page 100: ...a highly cohesive material tends to stick and clump together giving biased measurements Sample clumping together can often be overcome by drying the sample in an oven Obviously care should be taken with delicate materials where drying in the oven may damage the sample To drive the moisture from the sample set the oven to the highest temperature possible but not above its melting point If it is obv...

Page 101: ...persant before use either with an in line pipe filter or for small quantities a syringe based disposable type Filtration to 1 micron is generally adequate with 0 22 microns being commonly available and an ideal size If the dispersant is stored under pressure or at low temperature it may be necessary to consider degassing before use A pressure release or a temperature rise will reduce the solubilit...

Page 102: ...rsion are experienced consider using another disper sant This list gives commonly used dispersants with their refractive indices The Sample Dispersion and Refractive Index guide gives refractive index information for many more dispersants The cost of some of the organic dispersants may limit their use to the Hydro 2000S which typically only uses 150ml of dispersant The problem of the safe disposal...

Page 103: ...he dispersant before the background is measured Try adding a drop of surfactant to a quantity of sample and dispersant mixed in a small beaker If the sample sinks to the bottom of the beaker in large clumps dis pose of the sample and start again This time add the sample to a dry beaker add a drop of surfactant and mix thoroughly to a thick paste Add the dispersant and mix well This usually avoids ...

Page 104: ...e bottom of the beaker try applying two minutes of ultrasonics by placing the slurry and its beaker in an ultrasonic bath It will be immediately apparent if this has been effective Further ultrasonics can be applied when the sample is added to the tank if necessary This often prevents re agglomeration but is not always needed Note Be wary of using ultrasonics with fragile particles the ultrasonic ...

Page 105: ...e no twists or loops in the connected sample tubing When adjusting the pump and stirrer speed for a particular sample ensure the speed is not so fast that it introduces air into the system When a surfactant is added to the sample excessive speed of the stirrer pump may cause frothing This will force bubbles into the system Degassing If dispersant is stored under pressure or at low temperature cons...

Page 106: ...ks to the bottom Obscuration decreases as the larger particles settle out Increase the pump stirrer speed Sample swells in dispersant Obscuration decreases Try another dispersant Particles sticks to the windows Rapidly increasing obscuration Use an admixture Condensation on the cell windows Rapidly increasing obscuration If and only if the disper sant is water add a quan tity of hot not boiling wa...

Page 107: ... using different parameters and the result saved as a new record Defining user size bands customising the particles size ranges used for col umns in histograms and tables Alarms users can set three alarms that monitor various measurement states These are the cleanliness alarm alignment alarm and diameter alarms Averaging records creates an average record from several records usually repeats of the...

Page 108: ... can be enabled Obscuration settings can be used when measuring wet or dry samples However obscuration settings are the preferred method for making dry measurements If using the SOP Wizard click on the Measurement button on the Measure ment dialogue as described in the appropriate dispersion unit manual To change the obscuration settings 1 For a manual measurement click the Options button then cli...

Page 109: ... good sample representation is the most important consideration The required obscuration can be determined experimentally by measuring the par ticle size at different obscurations At low obscurations the result reproducibility may be poor due to poor sampling or signal to noise issues At very high obscura tions the calculated result may shift to smaller particle sizes due to the effects of multipl...

Page 110: ...will advise how many good snaps were collected in the event of a time out and offers the option of using them as the basis for the measurement Autodilution Autodilution allows the sample concentration to be automatically adjusted by add ing more dispersant This feature is not available in manual measurements Good Laboratory Practice dictates that autodilution is an inferior procedure to the addi t...

Page 111: ...haracteristics of that mode can be obtained separately from the complete distribution This is particularly important for users who are also trans forming the result where small modes in the volume distribution caused by errors are magnified and can become dominant when transformed to a number distribution To reduce the result range in an SOP 1 In the Material tab select the Advanced button in the ...

Page 112: ... class i and n is the required distribution type 1 for sur face 2 for length and 3 for number Note A small volume of particles of small sizes can be transformed to a signifi cant part of a number distribution If this small volume is just due to noise or other errors in the measurement it may swamp the actual desired distri bution These small errors in the measurement are in effect magnified by the...

Page 113: ...Material tab 2 Select the Advanced button in the Result calculation section 3 Select the Enable transformation check box and select the relevant Trans form Volume to radio button To transform a result in an existing record 1 Open the relevant measurement file 2 Select the record to transform 3 Select Edit Result and then click OK in the displayed dialogue 4 Select the Material tab 5 Select the Adv...

Page 114: ...ction has a Specify new result calculation check box that when selected lets the user change the settings The Measurement Options section in Chapter 4 has details of these dialogues Remember that the original record cannot be changed When a user alters a record using the Result Editor the changes are saved as a new record A modified record can always be identified as its Source parameter shows whe...

Page 115: ...those required by the relevant standard for sieves Size bands are defined by selecting Edit User sizes The dialogue below will appear This dialogue allows the user to either manually set the size bands using the Edit sizes tab or automatically generating the size classes between user defined limits using the Generate Sizes tab To define a size band manually 1 Select the Edit Sizes tab in the Edit ...

Page 116: ... bands User defined size bands can be saved and loaded using this dialogue Generating size bands Using the Generate facility ensures that the size classes are as evenly distributed as possible This approach is quicker than creating a range of sizes manually To generate size bands 1 Select the Generate Sizes tab in the User sizes dialogue shown below 2 Choose the upper and lower limits for the whol...

Page 117: ...dgment on the cleanliness of the system To set a Cleanliness alarm in a manual measurement 1 Select Measure Manual 2 Once the background measurements are complete press the Options button 3 Select the Measurement tab 4 Select Alarms 5 Select the Enable check box to enable the cleanliness alarm 6 Move the slider on the Cleanliness level to set the sensitivity of the alarm To set a Cleanliness alarm...

Page 118: ...able warns when alignment is poor check box 6 Adjust the Sensitivity slider if necessary Diameter alarms It is possible to set alarm limits for the three percentiles D v 0 1 D v 0 5 D v 0 9 that will trigger if the reported value of a percentile falls outside a prede fined size range An upper and lower size limit can be set for each of the three per centiles The alarm can be set to stop the measur...

Page 119: ...he Lower limit and Upper limit boxes 5 Click OK Averaging records It is possible to create an average record from several records usually repeats of the same sample Select multiple records by using the CTRL or Shift keys then select Edit Create average result A dialogue will appear that will give the user the opportunity to enter a sample name and the record numbers that were used to create the av...

Page 120: ...can be viewed using the current soft ware This provides an ongoing means of viewing records without the need to retain the original instrument To do this select File Import S X choose the required data file and press Open The measurement records imported will now be displayed The field view should be changed to display the software version MAN0384 1 0 Mastersizer 2000 book Page 14 Tuesday March 20...

Page 121: ...le size distribu tion measured by another instrument or technique and is made up of a set of mul tiplying factors with its corresponding particle size The result emulation generator wizard calculates the factors from a Mastersizer result and an external result The factors may also be individually edited using the factor editor dialogue box but this should rarely be necessary Note The success of th...

Page 122: ...Chapter 9 Advanced features Page 9 16 MAN 0384 MAN0384 1 0 Mastersizer 2000 book Page 16 Tuesday March 20 2007 8 56 AM ...

Page 123: ...Part 2 Supervisor s Guide MAN0384 1 0 Mastersizer 2000 book Page 1 Tuesday March 20 2007 8 56 AM ...

Page 124: ...MAN0384 1 0 Mastersizer 2000 book Page 2 Tuesday March 20 2007 8 56 AM ...

Page 125: ...curity Introduction This chapter describes Security principles Setting up the Administrator Security guidelines Setting up user groups Setting up individual users MAN0384 1 0 Mastersizer 2000 book Page 1 Tuesday March 20 2007 8 56 AM ...

Page 126: ...his is not mandatory If passwords are not set up the user just has to type their username to log in otherwise they must provide the password too Creates user groups Adds users to one or more user groups After installation The first time the software is run the security system will be disabled and an administrator user and administrators group will be created by the system This is so at least one u...

Page 127: ...ccount To set up the administrator 1 Select Security Configure security to display this dialogue When the software is run for the first time the security system defaults to a member of the Administrators group with no password 2 Select the Administrator name in the first row and then User Properties Confirm the blank password for the Administrator account that is do not type anything in and click ...

Page 128: ...her without closing down the software the first user must select Security Logout and then the second user must select Security Login and enter the appropriate username password Note It is preferable to assign at least two users to the Administrators group These users user names and passwords should be stored in a secure loca tion This is to safeguard against accidental lockout or deletion of permi...

Page 129: ... Security Configuration dialogue select User New Group or dou ble click on an empty Groups row to display the Group Properties dialogue shown below 2 Enter a Group name and a Description of the group s purpose Example names might be Operators general users of the system Supervisors skilled users who can perform configuration and create SOPs 3 The Members list shows all the users currently assigned...

Page 130: ...cribed above for adding a group Setting up individual users Each user is defined by their Unique Username this along with the user Password forms the unique key required to identify each individual using the system The Username is commonly an abbreviated form of the individual name or a unique identifier such as an employee code Full Name the full printed name of the individual This can be used on...

Page 131: ...and force the user to change their password the next time they log on by selecting the User Must Change Password at Next Logon check box 3 Press the Groups button to display this Group Memberships dialogue 4 Use the Add button to allocate the user to appropriate group s by moving each group to the Member of list 5 After adding the user to all required groups click OK MAN0384 1 0 Mastersizer 2000 b...

Page 132: ...ord the user has to enter the current password and spec ify a new password with confirmation Pressing OK changes the security settings If the administrator used the User cannot change password option this prevents a user from changing their password Otherwise once they have logged in a user can change their own password by using Security Change password To keep the system secure users should chang...

Page 133: ...Part 3 Appendices MAN0384 1 0 Mastersizer 2000 book Page 1 Tuesday March 20 2007 8 56 AM ...

Page 134: ...MAN0384 1 0 Mastersizer 2000 book Page 2 Tuesday March 20 2007 8 56 AM ...

Page 135: ...and back scattering Mas tersizer 2000 only Light sources Red light Helium neon laser Blue light Solid state light source Mastersizer 2000 only Optical alignment system Automatic rapid align system with dark field optical reticle and multi element alignment detector Sample dispersion unit interchange system Sample dispersion units automatically recognised config ured and enabled on insertion of mea...

Page 136: ...Appendix A Specification Page A 2 MAN 0384 A MAN0384 1 0 Mastersizer 2000 book Page 2 Tuesday March 20 2007 8 56 AM ...

Page 137: ...nd the sample cell However if a sample pipe or sealing ring should fail then sample and dispersant may drip into the cell area of the optical bench A drain is fitted in the base of the cell area to limit the spread of any leak Should a small leak occur the sample dispersant may come into contact with the following materials Caution The paint finish of the external covers may be permanently damaged...

Page 138: ...compatibility Page B 2 MAN 0384 B Remember to check the chemical compatibility of the sample dispersion units before using a new sample and dispersant MAN0384 1 0 Mastersizer 2000 book Page 2 Tuesday March 20 2007 8 56 AM ...

Page 139: ...ely Si vous constatez des signes de dommages quelconques contactez immédiatement le transporteur Bei irgendwelchen Zeichen von Transportschäden den Spediteur sofort benachrichtigen Si se advierte algún signo de deterioro contactar inmediatamente con el transportista Contacte imediatamente a empresa transportadora se houver qualquer sinal de embalagem danificada MAN0384 1 0 Mastersizer 2000 book Pa...

Page 140: ...rpackungsbänder vorsichtig entlang den Falzlinien durchschneiden Cortar con cuidado la cinta de embalaje de plástico por la líneas de doblado Com cuidado corte a fita de embalagem plástica ao longo das dobras 4 ill 4924 Open the wings of the carton and remove the top foam inserts Ouvrez les rabats du carton et retirez les blocs de mousse du haut Die Klappen des Kartons öffnen und die oberen Schaum...

Page 141: ...Gerät ohne Hilfe einer zweiten Person zu heben Stets die korrekte Hubart verwenden um eine Rückenverletzung zu vermeiden No se debe intentar nunca levantar el aparato sin ayuda de otras personas Aplicar siempre las técnicas de elevación adecuadas para evitar daños en la espalda Não tente nunca levantar o instrumento da caixa sem o auxílio de outros use sempre técnicas de levantamento adequadas par...

Page 142: ...on and unwrap Sortez tous les autres paquets du carton et déballez les Sämtliche andere Pakete aus dem Karton nehmen und auspacken Retirar todos los demás paquetes de la caja y desenvolverlos Retire todas as outras embalagens da caixa e abra as 10 ill 1715 Retain all packaging in case the instrument requires transporting in the future Conservez tous les emballages au cas où l instrument devrait êt...

Page 143: ...Mastersizer 2000 Page D 1 D Regulatory statements This appendix shows the regulatory information for each product MAN0384 1 0 Mastersizer 2000 book Page 1 Tuesday March 20 2007 8 56 AM ...

Page 144: ...ements Page D 2 MAN 0384 D CE Declaration of Conformity APA2000 The CE badge on this product signifies conformance to European Commission Directives ill 7964 MAN0384 1 0 Mastersizer 2000 book Page 2 Tuesday March 20 2007 8 56 AM ...

Page 145: ...x D Mastersizer 2000 Page D 3 CE Declaration of Conformity EPA2000 The CE badge on this product signifies conformance to European Commission Directives ill 7965 MAN0384 1 0 Mastersizer 2000 book Page 3 Tuesday March 20 2007 8 56 AM ...

Page 146: ...s been tested and found to comply with the limits for a Class A digital device pursuant to part 15 of the FCC rules These limits are designed to provide reasonable protection against harmful interference when the equipment is operated in a commercial environment This equipment generates uses and can radiate radio frequency energy and if not installed and used in accordance with the instruction man...

Page 147: ... equipment This Class A digital apparatus complies with Canadian ICES 003 Cet appareil numérique de la classe A est conforme à la norme NMB 003 du Canada VCCI acceptance Japan only The Voluntary Control Council for Interference VCCI mark on this product signifies compliance to Japanese EMC regulations as specified by VCCI ill 6793 Translation This is a Class A product based on the standard of the ...

Page 148: ...Appendix D Regulatory statements Page D 6 MAN 0384 MAN0384 1 0 Mastersizer 2000 book Page 6 Tuesday March 20 2007 8 56 AM ...

Page 149: ...cles 4 25 Cleanliness 4 3 Cleanliness alarm 9 11 COMPUTER connector 3 6 Computer 3 3 Concentration at different obscurations 6 9 calculating 6 7 definition 6 5 how calculated 6 7 volume calculation 6 7 Condensation on cell windows 8 10 Configure Accessory dialogue 8 9 Configure New SOP 2 4 Control Palette 5 6 Custom user reports 5 6 D Data export templates 7 7 Data graph 5 8 Default reports 5 1 5 ...

Page 150: ...aying out a report 5 7 Length distribution 9 6 Lifting the instrument C 3 Light shroud 3 7 Locking handle 3 7 M Maintenance 1 4 Malvern website 1 6 Manual measurement function of 2 4 procedure 4 6 reason to use 4 3 result range 9 5 test 4 8 transforming result 9 7 Mastersizer 2000E 4 4 4 10 Material dialogue 4 19 Material tab 9 5 Materials button 4 8 Measure Background step 4 2 Measure Background ...

Page 151: ...5 exporting 7 6 re analysing 7 2 searching 7 3 transforming result 9 7 Records and files 7 2 Records tab adding field 5 4 changing 5 4 changing record order 5 5 removing a record 5 5 Reducing result range 9 5 Refractive Index 9 8 Refractive index common dispersants 8 6 Removing a record 5 5 Report Designer Layout option 5 7 overview 5 6 Report tabs 3 9 Report Saving dialogue 4 22 Reports adding gr...

Page 152: ...rd dialogues 4 18 SOP measurement procedure 4 4 transforming result 9 7 Sorting records 7 5 Span 6 5 Specification C 1 Spinning rifflers 8 3 SSA Specific Surface Area 6 6 Standard deviation 6 13 Standard Operating Procedure SOP 2 4 4 3 Statistics graph 5 8 Statistics report 5 3 Status area 4 5 Supervisor role 1 2 Surface Weighted Mean 6 5 6 9 Surfactants 8 7 T Table types 5 9 Tables in reports 5 9...

Page 153: ......

Page 154: ......

Reviews: