Malmet Blanket Warming Cabinet
Operation, Maintenance and Installation Manual
Issue 20
Page
7
Jun-23
2.0 Installation
Floor Bench Skirt
Floor Bench Skirt is factory fitted to the cabinet. To level, remove the four plastic plugs from the inside floor and
adjust the feet by turning the slotted screw head. Once the device is level, replace the plugs.
If the Floor-Bench Skirt is ordered separately to convert a warming cabinet, the conversion will take approximately
fifteen minutes and requires a screwdriver only. Carefully, place the warming cabinet on its back. The base is pre-
drilled with ten Nutsert holes. Using the screws supplied, fasten the Floor-Bench Skirt. Carefully, stand the
warming cabinet upright and level as above.
The front panel of the Floor-Bench Skirt is removable to clean under the warming cabinet.
Combination Cabinets
To level, remove the four plastic plugs from the inside floor and adjust the feet by turning the slotted screw head.
Once the warming cabinet is level, replace the plugs.
The front panel of the floor skirt is removable to clean under the warming cabinet.
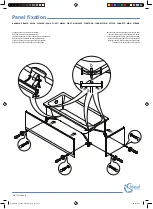
Cabinet Stand
Cabinet Stand is factory fitted to the warming cabinet. To level, remove the front panel of the stand and adjust
the feet by turning the slotted screw-head. This panel can also be removed to clean under the warming cabinet.
If the stand is ordered separately to convert a warming cabinet, the conversion will take approximately fifteen
minutes and requires a screwdriver only. Carefully, place the warming cabinet on its back. The base is pre-drilled
with ten Nutsert holes. Using the screws supplied, fasten the stand. Carefully, place the warming cabinet upright
and level as above.
Combination Conversion Kit
This comprises a Floor-Bench Skirt and a Rear Joining Bracket. Conversion will take approximately fifteen minutes
and requires a screwdriver only. Carefully, place the bottom warming cabinet on its back. The base is pre-drilled
with ten Nutsert holes. Using the screws supplied, fasten the Floor-Bench Skirt. Carefully, stand the warming
cabinet upright.
Remove the 7 plugs (3 small and 4 large) on the top of the bottom warming cabinet, place the top warming cabinet
in position locating the bottom hinge bolts in the four large holes. Remove the two screws in the warming cabinet
that secure the slide out service tray and slide out as far as it will go. There are three securing holes located inside
the top of the service compartment. Using the screws supplied, fasten the warming cabinets together and replace
the service tray.
The back of both warming cabinets is pre-drilled with four Nutsert holes, using the screws supplied, fix the Rear
Joining Bracket into position. Place the warming cabinet in position and level.
Plugs must be replaced after levelling or the temperature control of the warming cabinet may be compromised
.
Wall Mounted Cabinet
Wall Mounting Brackets are supplied for single 210 litre and 260 litre models. Secure the bracket to the wall,
ensuring it is level. It is recommended to use 4 (8mm x 50mm) long coach screws for stud position walls and dyna
bolts for solid walls.
Two people are required to lift the warming cabinet to the height of the Mounting Bracket, move the top of the
warming cabinet to the wall at approximately 45° and locate on the Wall Mounting Bracket. When secure swing
the bottom of the warming cabinet to the wall ensuring it is firmly pushed onto the wall bracket. To remove,
reverse this procedure.
CAUTION: Wall mounted blanket warming cabinet when fully loaded weighs approximately
113 kg.
unloaded
weight approximately
83 kg