background image

SkyRaider DS10 User Manual


July 14, 2018


SkyRaider DS10 User Manual 

Page 160 


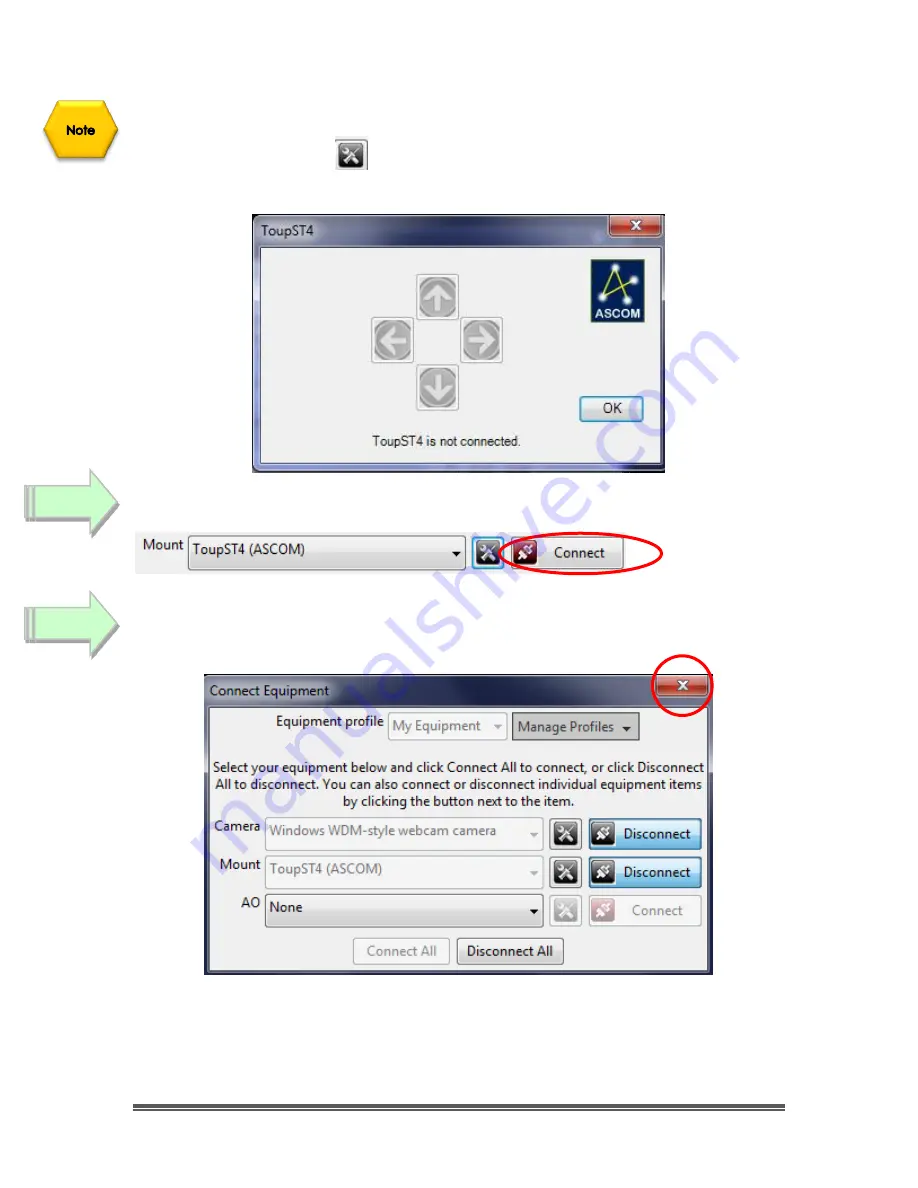
You can check to see if the 

SkyRaider 

can control your Mount by 

Left Clicking


on the 

Mount Setup Icon


 and use the 

Arrow Buttons

 to see if your mount 

moves. 


Left-Click

 on the 

Mount Connect Button

 activate the connection. 


Click

 on 

Red X

 to close the 

Connect Equipment

 Window. 


Step 8 

Step 9 

Summary of Contents for SkyRaider DS10

Page 1: ...l quickly introduce you to the wonders of the MallinCam SkyRaider DS10 Camera It will include instructions on how to install the Software and Drivers and how connect the SkyRaider to your computer alo...

Page 2: ...Revision Sheet SkyRaider DS10 User Manual Page ii Version Date Revision Description 3 4 07 14 2018 Template Creation...

Page 3: ...your Computer 13 Connecting AutoGuider Cable to the SkyRaider DS10 15 4 Using MallincamSky Software 16 The MallincamSky Window 16 SkyRaider Quick Setup and Pictorial Work Flow 17 Live Stack Pictorial...

Page 4: ...eo 50 Save 51 Save As 51 Batch Save 54 Paste as New File 56 Recent Files 56 Exit 57 Edit 57 Cut 57 Copy 58 Paste 58 Paste Shortcut 58 Delete 58 Image Select 58 Select All 58 Select None 59 View 59 Bro...

Page 5: ...t 99 Image Type 100 Auto Capture 100 Batch Record 100 Pause Video Capture 100 Open Video Folder 101 Zoom 101 Image Select 101 Track 101 Histogram 102 Reticle 102 ST4 Test 103 Advance Reverse 104 Stitc...

Page 6: ...on 130 Flat Field Correction 132 Introduction 132 Optical Path Noise 132 Taking Flats 133 Black Level 135 Live Stack 136 Conversion Gain 139 Sharpen 140 Misc 140 Cooling 140 Parameters 141 7 Installin...

Page 7: ...ect a part of the Image and Zoom in 174 How do I automatically save 1 image every 30 seconds 175 How do I adjust the brightness in my monochrome SkyRaider 175 How do I Broadcast my image onto Night Sk...

Page 8: ...r The unique Conversion Gain can be activated in HCG to LCG High Contrast Gain and Low Contrast Gain mode where high gain and low gain is desirable for certain imaging application live or during imagi...

Page 9: ...ratio No Amp Glow 21 80mm Diagonal Sensor Size Resolution Sizes 4096 X 2160 38 FPS 0 100ms 3704 X 2778 35 FPS 0 100 ms 2048 X 1080 70 FPS 0 100ms 1360 X 720 100 FPS 0 100ms Digital Binning Mode 1 x 1...

Page 10: ...udes the following standard equipment MALLINCAM SkyRaider DS10 Camera High Precision 2 mount Eyepiece Adapter 5 metre USB 3 0 cable SkyRaider DS10 also includes a 2 metre ST4 Guider cable Software and...

Page 11: ...M Recommend 4GB or more 200MB Free HDD Installing the Software Visit the Software Downloads Page in the Support Tab located on the website www mallincam net Select the Blue Click Here Button to downlo...

Page 12: ...rogram if just downloading MallincamSky The DRIVER folder contains the ASCOM and Direct Show Drivers for the camera The WINDOWS APPLICATION folder contains the camera control software Double Click on...

Page 13: ...your own location or select the default Click on Install to proceed Windows may again ask for permission to install the device software Click on Install to accept The MallincamSky Software will take a...

Page 14: ...e running the SkyRaiderDS10 on a USB 2 0 cable you will see the name as SkyRaiderDS10C 2 0 Optionally see Installing the ASCOM Driver for more in depth details Double Click on ASCOM DRIVER folder then...

Page 15: ...t back in the box for safe keeping Screw in the 2 adapter to the front of the SkyRaider DS10 Insert the SkyRaider DS10 with 2 Adapter attached into a 2 eyepiece adapter on your Telescope Depending upo...

Page 16: ...your computer This simple step can improve both thru put power and distance between your computer and the SkyRaider DS10 camera Windows will then automatically load the correct SkyRaider Camera Driver...

Page 17: ...uider Cable to the SkyRaider DS10 If you are going to use your SkyRaider DS10 as an Autoguider then you will need to attach the provided ST4 cable Attach one end of the ST4 cable into the ST4 slot on...

Page 18: ...The MallincamSky Left SideBar provides the simple click activation and selection capabilities to control all aspects of the image and camera The Left SideBar Base provides selection options for Camera...

Page 19: ...pical workflow when using the SkyRaider DS10 with MallincamSky Start Mallincam Deep Sky Object Planetary Start Trigger Mode then Take Dark Field Trigger Mode to Image Activate Dark Field Video Mode to...

Page 20: ...Raider DS10 User Manual Page 18 Live Stack Pictorial Work Flow A typical workflow when Live Stacking with MallincamSky Expose Object Choose and Activate Video Mode or Trigger Mode Live Stack Adjust Im...

Page 21: ...A typical workflow when using the Histogram Command with MallincamSky Expose Object Increase Left number or Move Left Bar in Darkens Increase Right number or Move Right Bar in Brightens Select Histog...

Page 22: ...10 User Manual July 14 2018 SkyRaider DS10 User Manual Page 20 ROI Pictorial Work Flow A typical workflow when using the ROI Command with MallincamSky Expose Object Trigger Mode Trigger Mode Video Mod...

Page 23: ...SkyRaider DS10 User Manual July 14 2018 SkyRaider DS10 User Manual Page 21 Save Image Pictorial Work Flow A typical workflow on how to Save an Image with MallincamSky Expose Object...

Page 24: ...e 22 Record Video Pictorial Work Flow A typical workflow on how Record a Video with MallincamSky Expose Object If No Time Limit Set Enter File Location Format Prefix Type Number of Seconds Number of V...

Page 25: ...0 User Manual Page 23 Batch Record Pictorial Work Flow A typical workflow on how to Batch Record a series of Videos with a single Click Expose Object Enter File Location Format Prefix Type Number of S...

Page 26: ...al Page 24 Auto Capture Pictorial Work Flow A typical workflow on how to Auto Capture a series of Images with a single Click Expose Object Enter File Location Format Prefix Type Capture Mode Total num...

Page 27: ...ge 25 Save Sequence of Images Pictorial Work Flow Trigger Mode A typical workflow on an alternative method to Save a Sequence of Images with the Sequence Command in Trigger Mode with MallincamSky Expo...

Page 28: ...ital Binning A typical workflow on applying Digital Binning Choose a Method usually Additive now select a Binning Number from 1 default to 4 Notice the video window will decrease in size so you may ne...

Page 29: ...l workflow when taking a Dark Field with MallincamSky Determine Maximum Exposure Choose and Activate Video Mode or Trigger Mode with Maximum Exposure Required Click on Loop if using Trigger Mode Dark...

Page 30: ...rk Flow Choose and Activate Video Mode or Trigger Mode with Maximum Exposure Click on Loop if Using Trigger Mode Prepare Telescope for Flat Field Apply Flat Field Capture and Resolution Choose Quantit...

Page 31: ...aider DS10 User Manual Page 29 Sharpen Pictorial Work Flow Choose and Activate Video Mode or Trigger Mode with Maximum Exposure Click on Loop if using Trigger Mode Select Sharpen Value Choose percenta...

Page 32: ...amera Tab With the Camera Tab selected on the Left SideBar Left Click on the SkyRaiderDS10 between lines in Camera Heading Once the SkyRaider is selected a black rectangle with SkyRaider Camera name w...

Page 33: ...antity Start with 5 exposures to get a feel of the process Then Left Click on the Capture Button The Software will display its progress above the selected Quantity Remember it is beneficial to set the...

Page 34: ...into Trigger Mode if you are imaging Deep Sky Objects else remain in Video Mode if imaging Planetary Objects and adjust the Exposure Time to match the current target and the equipment you are using I...

Page 35: ...if you do notice warm pixels and would like to eliminate them Then follow the step by step instructions located in the section called Dark Field Correction later in the manual The following instructio...

Page 36: ...ternal stacking programs to pull out the finest detail from your video images From the Capture and Resolution Tab on the MallincamSky ToolBar select the Largest resolution values that your SkyRaider i...

Page 37: ...annoys you you can Left Click Hold and Drag corners of the rectangle to resize it to either cover the whole image window or even to be a zero size box at one of the corners of your image window This...

Page 38: ...the object bright enough match your viewing requirements You can also adjust the Gain to the Right to brighten your image Now is the time to adjust the Color Balance and Color Adjustment Contrast Gam...

Page 39: ...was enclosed by the ROI s Blue Rectangle To return back to Full Video Mode just Click on the Defaults Button on the ROI Open Tab Using the Scroll Wheel on your mouse when the mouse is over the Image W...

Page 40: ...ld Correction by checking the Check the Enable Button in the Dark Field Tab to disable Dark Field Correction just un check the Enable Button in the Dark Field Tab Again for most planetary imaging Dark...

Page 41: ...vided later in the User Manual The following instructions are used as a guide to assist you in doing Deep Sky imaging Don t forget when finished with a particular step that uses a particular feature t...

Page 42: ...er is able to produce This will provide enough data for external stacking programs to pull out the finest detail from your video images From the Capture and Resolution Tab on the MallincamSky ToolBar...

Page 43: ...Correction Tab on the Left SideBar of MallincamSky You will normally determine the maximum exposure time that you will be using for the evening but to get started for the first time we will choose 5...

Page 44: ...ou to select the Quantity of Dark Fields and the option to start the Dark Field Capture process Select 5 for the Quantity then Left Click on the Capture Button which will change its name to Stop in ca...

Page 45: ...he slider or Click on the Current Exposure Time Value to open up the Exposure Time Window Enter in 1 second 1000 ms in this window and Click the OK button to accept We will use a small exposure so we...

Page 46: ...0 seconds using your Keyboard o You can Click on the up or down arrow in the Time Unit Box of choice to move the exposure time to your required value 30 seconds Click on the Single Button to a take a...

Page 47: ...conds before the Dark fields are applied Obtaining an Image of our First Deep Sky Object is enough for most to start the celebration process again most of us will call for our spouse to have a look at...

Page 48: ...the mess up there is always the Defaults Button to bring your image back To finely adjust the image characteristics open up the Histogram Tab and either enter in the Left and Right values or Left Clic...

Page 49: ...de what is best for you To shorten the exposure also reduces the resolution you have the option of selecting Digital Binning You can choose no Binning 1 all the way to 4 x 4 Binning Note you will need...

Page 50: ...anual will describe in exact detail what each control on both the Top Line Menu and the Icon Toolbar does This Chapter is best read on a rainy day or can be used to jump to the specific section that d...

Page 51: ...image on your computer MallincamSky supports and can open a variety of image formats These are identified in the Files of type list box MallincamSky can open more than one image simultaneously by Ctr...

Page 52: ...nd allow you use the File Open Video command Select the name of the file you want to open If the file does not appear select the option for showing all files from the Video Files Drop Down Button The...

Page 53: ...up Window MallincamSky discards all changes made since the last File Save operation The File Save command saves the contents of the entire window unless if there was an ROI Region of Interest defined...

Page 54: ...The default is unchecked Optimize Huffman codes The default is unchecked Smoothing The values range between 0 and 100 The default value is 0 Save these setting as defaults When saving a file the curr...

Page 55: ...ng Compressions as JPEG the Image quality can be adjusted by the slider bar The values range between 0 and 100 The Default value is 75 Save these setting as defaults When saving a file the current set...

Page 56: ...current settings will be saved as defaults for the next file save operation For Bitmap bmp PCX pcx Targa tga There is no Option choices Batch Save The File Batch Save command will be enabled when a An...

Page 57: ...is prefix will be combined with Name Format to form a final file name naming paradigm File Type In this combo box select the format in which you want the image to be saved can be BMP JPG PNG TIF Click...

Page 58: ...perties via the Image Menu choice see Image section in user Manual MallincamSky will accept image data from other applications via the clipboard as long as it is in Windows Bitmap DIB format Mallincam...

Page 59: ...If an image has been modified before attempting to Exit MallincamSky will issue a warning to ask if user wants to save the images or not Edit This Drop Down Menu will allow you to Cut Copy and Paste L...

Page 60: ...the File and then used Edit Copy into your currently selected folder Remember to use File Paste as New File to paste image into a new MallincamSky Window Paste Shortcut This control allows you to plac...

Page 61: ...der the specified directory in the Folders Sidebar The Browse Window resembles the Windows Explorer Left Clicking on the will expand a folder so that you can examine its contents You can Right Click o...

Page 62: ...The SideBar can contain 3 different Tabs Camera Folders and Undo Redo Left Click on the SideBar control to expand it You will see the 3 choices each with a check mark beside it Left Click on the chec...

Page 63: ...ata as linear or logarithmic Clicking on the Histogram Control again closed the Histogram window Grids The View Grids control has the ability to display a grid overlay on top of your Video Window You...

Page 64: ...t Click on the Grids option on the left of the Preferences Window and adjust the Style No Grid Auto Grid and Manual Grid Line Style Solid Dash Dot or DashDot and Color that you are interested in Left...

Page 65: ...Down Arrow along the Horizontal Ruler to where ever you want When it is dragging over the video image there will be a Vertical Line in the Color and Style chosen by you aiding you in judging where to...

Page 66: ...ze to reset the Zoom to 100 Actual Size will be disabled if the View is already set to 100 and place the image video inside the Video Window Tab Full Screen Selecting the View Full Screen control will...

Page 67: ...ticles or cross hairs styles to aid in aligning your telescope to a star or another stellar object You can change the color of the Reticle via the Option Preferences control in the Top Menu Line Left...

Page 68: ...e or Small Icons Simply Left Click to make your Selection Refresh This control allows you to refresh the contents of the currently selected folder Properties This control will display the current File...

Page 69: ...est the ST4 port on the camera You can also pause the Video image on the Video Window from here Start Pause Left Clicking on this control will Pause the SkyRaider Camera s live display Left Clicking o...

Page 70: ...s in a specific direction Due to the various orientations of the SkyRaider Camera once inserted inside the telescope the Green Directions Arrows will not necessarily match the direction of Mount movem...

Page 71: ...is not activated Left Click this Snap button on the Camera Sidebar to a capture image quickly Only when the video window is active the Capture Capture Image menu will be enabled If the Live and Snap...

Page 72: ...record video in Trigger Mode as this command is identical When the Recording process starts the SkyraideDS10 will toggle the fans when recording starts and when the recording sequence stops The only...

Page 73: ...cord Tab in Options Preferences choose the location and file type and duration for recorded Video Files In the Batch Record Tab in Options Preferences chose the number of Videos to be recorded plus th...

Page 74: ...abort the current Video but will continue with the next sequence MallincamSky will also provide you in a status on how the recording are going by displaying a Status Information line on the bottom of...

Page 75: ...ur Bits dialog is opened the default checked color bit is the current image s color bit Check the desired bit and click OK to end the command The image will be converted to the selected color bits in...

Page 76: ...e same adjustment to every pixel in the image The Brightness Contrast command does not work with individual channels and is not recommended for high end output because it can result in the loss of det...

Page 77: ...ue of 20 and a B value of 50 When the values of all three components are equal the result is a shade of neutral gray When the value of all components is 255 the result is pure white when the value is...

Page 78: ...a Based on the human perception of color the HIS model describes three fundamental characteristics of colors Hue is the color reflected from or transmitted through an object It is measured as a locati...

Page 79: ...The Default values are 0 HMS Select the Image Adjust HMS command to adjust the HL Highlight M Midtone and S Shadow parts of the image Each part s value ranges from 100 to 100 This command is only avai...

Page 80: ...en only information about the Red channel will be retained The Green and Blue information will be discarded Invert Select the Image Adjust Invert command to reverse the pixel values of the active imag...

Page 81: ...ial Sigma like the domain and the Range Sigma you can affect how many pixels the algorithm uses when applying the smoothing Rotate This control allows you to rotate and or flip your image across an ax...

Page 82: ...ve the portions of an image that does not want so that the focus is on the part of the image that is left First select Edit Image Select the mouse cursor will change into cross hairs from the Top Menu...

Page 83: ...nd Height will stay proportionate to each other If the Constrain Proportions is unchecked the Width and the Height can be set independently but this will distort the image Reset Resets the image s Wid...

Page 84: ...tant to note that even though we re talking about brightness levels we re not just talking about black and white grayscale images but Histograms work equally well and are just as important with full c...

Page 85: ...the following statistical information below the Histogram Pixels Represents the total number of pixels used to calculate the Histogram Level Displays the intensity level of the area underneath the poi...

Page 86: ...put It would take a novel to explain each of these standard graphical enhancement tools So I will leave it up to you to Google Search the enhancement type to see if it is something you could use You c...

Page 87: ...nual July 14 2018 SkyRaider DS10 User Manual Page 85 You can modify the color effectiveness range with the Range control to color sharpen your image You can modify the image the pixel no pixel count w...

Page 88: ...July 14 2018 SkyRaider DS10 User Manual Page 86 You can examine the image as a 3 D color contour map with the 3 D setup control You can apply the Pseudo Color application tools to turn a Black and Wh...

Page 89: ...o is greatly improved The stacked image may have had some black edges this is because the images in the video has moved and in the stacking process MallincamSky will added black to the image area that...

Page 90: ...al Page 88 MallincamSky will Open an Image Stacking Progress Bar to inform you of the process Once completed the stacked image will appear in the Video Image window You can now apply other processing...

Page 91: ...camera Directory The file Directory can be select by Left Clicking the Browse button File The File Name This can be a combination of Name of Format File Prefix and File Type avi or ser format as shown...

Page 92: ...you to set the number of Video recordings in the batch plus the time interval between each separate recording Clicking on OK accepts the settings The Options Preferences Auto Capture tab will allow yo...

Page 93: ...able its edit box You can enter the Total Images from 1 to 9999 to be captured MallincamSky will stop the Time lapse capture process automatically when the Total Images are reached If Total Images is...

Page 94: ...ayed in the Browse window or not The checked Format can be displayed in the Browse window The Target Tab allows you to label the target that you are currently shooting The 10 solar system objects are...

Page 95: ...Line Style for the grid can be Solid Dash Dot or DashDot The Default is Solid Grid Line Color The color of the grid line The Default color is Red 255 0 0 Reticle Color The color of the Reticle The Def...

Page 96: ...Sky window to your liking This control allows you to determine what metadata is embedded inside the FITS and EXIF files when they are saved File views that read FITS or EXIF images can then display de...

Page 97: ...res opened or captured inside MallincamSky s frame If you have made any modifications to the pictures or if you have captured some pictures from the camera choosing the Close All will let you finish t...

Page 98: ...attered through the list 1 Choose the Windows Windows control 2 Select the windows you want to close Hold Ctrl or Shift key to select more than one at a time Here 4 windows are selected 3 Click Close...

Page 99: ...ocate a particular image MallincamSky supports and can open a variety of image formats These are identified in the Files of type list box MallincamSky can open more than one image simultaneously by Ct...

Page 100: ...al error When an image is closed and not to save its changes is chosen MallincamSky discards all changes made since the last Save operation The Save Icon always saves the contents of the entire window...

Page 101: ...Double Click on a Graphics File inside the Video Window it will open up that Graphics File in a new Tab in the Video Window You can close the Tab in the Video Window by Right Clicking on the Tab s Ti...

Page 102: ...licking on the Auto Capture icon MallincamSky will indicate the status of the Auto Capture process on the lower left of the MallincamSky window Batch Record This icon activates the Batch Record routin...

Page 103: ...ive or static by using the Left Click Hold and Drag technique Once selected then you can Copy Ctrl C the selected region and then Paste it into another software program Once a Region of Interest Recta...

Page 104: ...nformation purposes beneath the Video window being displayed Clicking on the icon again will remove the Histogram The icon has a pull down tab where you can choose to display the real time Histogram i...

Page 105: ...used to check if the camera can correctly communicate with the Telescope Mount Connect the ST4 cable provided with the SkyRaider Camera to the ST4 Port on your Telescope Mount Turn on the Telescope M...

Page 106: ...directly enter a number into the number box or Left Click on the up and down arrows to scroll up or down the value in the number box Attempt to orientate the SkyRaider Camera in the eye piece holder o...

Page 107: ...to create a horizontal panoramic image or a vertical panoramic image Have the camera viewing a specific location or object Now Left Click on the Snap button This will place a snapshot in the viewing...

Page 108: ...ation stitched images can be arranged using one of following projection mappings Plane Cylindrical Spherical Fisheye Stereographic Mercator or Transverse Mercator Seam Finder MallincamSky provides fou...

Page 109: ...Next to bring up the final Stich Window Again make some logical guesses with the numbers and Left Click on the Finish button when decisions have been made MallincamSky will work thru the Snaps and app...

Page 110: ...anual Page 108 You can try other Stitching decision by having the Stitched imaged active in your Video Window and Left Clicking on the Stitch Icon again You will notice that your original snapped imag...

Page 111: ...S10 User Manual July 14 2018 SkyRaider DS10 User Manual Page 109 Preferences This icon opens up the preferences window This icon is identical to the Main Tab line Options Preferences See above in the...

Page 112: ...eo Window to remind you that that control is in effect You will be able to collapse the control window by Left Clicking on the Up Arrow on the control heading Camera List The Camera List control lists...

Page 113: ...ick on the Drop Down list on the Resolution to see all the allowable resolutions available for your SkyRaider The SkyRaider DS10 has four resolutions 3704 x 2778 4096 x 2160 2048 x 1080 and 1360 x 720...

Page 114: ...Options Preferences Tab to choose the location name format and duration of the video Left clicking on the Record Icon will tell MallincamSky to start recording a video of what is currently being capt...

Page 115: ...k on the Slider Bar which selects it you can use the Left and Right Arrow Keys of your keyboard to move the slider this gives you more control For Deep Sky Objects start the Gain at about 50 For Plane...

Page 116: ...h Auto Exposure checked you will see a Green Rectangle labelled Exposure will appear over your Video Window This Green Rectangle is a marked region that is a reference region for judging if the image...

Page 117: ...o move the slider this gives you more control If you Left Click on the Current Exposure Time Value a window will open up where you can enter in the exact exposure time you require This window will als...

Page 118: ...ously Loop images from the SkyRaider DS10 You have two methods of setting your exposure to a large value o You can Click in the Time Unit Box of choice and enter in an amount i e 30 seconds using your...

Page 119: ...format to match your preferences this is great for choosing a folder location for AstroToaster Number in Sequence Use this control to enter in the number of images you would like MallincamSky to save...

Page 120: ...el Red Green Blue there are 12 bits assigned That is there are 4096 212 shades of Red Green and Blue available The larger the Bit Depth the larger the data and the harder the CPU must work to produce...

Page 121: ...ver get confused with what settings you have entered into the Color Balance control you can reset these values back to their defaults by Left Clicking on the Default Button Color Adjustment The Color...

Page 122: ...e Left Click Hold and Drag technique to move the slider to the left or right or just Left Click on the Saturation s slider this selects it then use your Left and Right arrow keys on your Keyboard to a...

Page 123: ...is like adjusting the mid tone slider on a histogram You can either use the Left Click Hold and Drag technique to move the slider to the left or right or just Left Click on the Gamma s slider this sel...

Page 124: ...a grey image provides especially when imaging the Moon If you require the color video to be displayed in Color then Left Click on the Color choice If you require the color video to be displayed in sha...

Page 125: ...I or Region Of Interest relates to the rectangular portion of the video image that you may be interested in You will lose you Dark Field using this control When you are recording video images of plane...

Page 126: ...ROI to its full screen by Left Clicking on the Default Button You may need to set Fit to Window in the Drop Down Size command in the MallincamSky Tool Bar If you are trying to improve the frame rate f...

Page 127: ...t exposure value for your particular object But try not to get too aggressive as you can easily clip remove important data form your image If you are looking at a color image the Histogram will reflec...

Page 128: ...Increasing the Left Bar Darkens the image Decreasing the Right Bar Brightens the image The Before image is a 3 second exposure with Left at 0 and Right at 250 The After image same 3 second exposure w...

Page 129: ...gives up the number of horizontal and vertical pixel resolution by that same factor You can have the Mallincam either Avera the pixels or Add the pixels The supported Binning available is 1x1 2x2 3x3...

Page 130: ...s one effectively lowering the number of pixels in the image resolution You can use the Zoom controls to increase the image size to your needs You will notice that the brightness of the image will dra...

Page 131: ...suggest saving a set of Darks for each of the binning modes Use a naming convection or a file location so that it is easy to not only choose the correct Darks for a binning setting but with in that b...

Page 132: ...re Resolution The Exposure Gain Window will expand select the exposure time for the Dark Field You must determine what you believe will be the maximum exposure for this session As you will create Dark...

Page 133: ...m right side of the MallincamSky window you will see a counter letting you know how long is left in that particular exposure Once you have finished taking your Dark Fields don t forget to remove the l...

Page 134: ...nts and other unwanted shadow producing things in the light path The result of such optical path obscuration is an unevenly illuminated CCD CMOS chip These noise variations are usually caused either b...

Page 135: ...the camera after you have taken your flats with integration times to allow the flat to produce an image that captures of noise but Flat images should never bloom but should also not be less than a sec...

Page 136: ...ill display its progress above the selected Quantity Remember the images you select the more averaged will be the Flat Field As the Flat Fields are being exposed you can watch the exposure counter in...

Page 137: ...o slightly brighten towards level 31 or dim towards level 0 the starting point for the image s backest location Using this slider allows you to define what you believe based on your current image shou...

Page 138: ...e follwing images captured live illustrate the advantages of Stacking M5 a single 5 second exposure using SkyRaider DS10 on 10 VRC M5 two 5 second exposures stacked using SkyRaider DS10 on 10 VRC M5 t...

Page 139: ...l MallincamSky if you would like the images Added made brighter or Meaned made sharper plus inidcate is you are stacking Planets or Deep Sky Objects This command will provide a live status of its stac...

Page 140: ...he image Start the Stacking by checking the Enable Box The stacking process will keep you informed with its status by indicating you what the current input stacking number is what the current output h...

Page 141: ...sed sensitivity and low read noise for lowlight scenes providing tremendous benefit for real time imaging The LCG mode is comparable to the old NO GAIN while the HCG mode is comparible to high gain is...

Page 142: ...Misc Currently this control will allow you todisplay the image in its inverse That is while background wit black stars Just use the check box to activate Cooling The Mallincam SkyRaider DS10 comes wi...

Page 143: ...ad the control parameters from the above file in the Drop Down List Left Click on the Save command and MallioncamSky will open a window that will allow you to give a name to the current sessions and t...

Page 144: ...ameter files single pgt file whci contains all of their parameter files into your MallincamSky folders When you import a set of parameter files into your system it will overwrite all of your parameter...

Page 145: ...es and not have them overwtitten Parameter File Folder Michael s SkyRaider Dsc Parameters File for New Hamburg Michael s SkyRaider DS10 Parameters File for New Hamburg Michael s SkyRaider Dsc Paramete...

Page 146: ...load form the download page The following instruction will represent a Windows Computer There may be a download for a Later version as updates come along Your Browser should download a zipped file cal...

Page 147: ...era The DIRECTSHOW DRIVER folder contains the Direct Show Drivers for the camera The WINDOWS APPLICATION folder contains the camera control software Installing DirectShow Driver Open up the DIRECTSHOW...

Page 148: ...close the process The DirectShow driver will give you the ability to display the SkyRaider video using other video display software The software that uses the DirectShow video protocol will always hav...

Page 149: ...omputer www ascom standards org Open up the ASCOM DRIVER folder then Double Click on the ASCOMMallincamSetup file to Start the installation process Depending upon the version of Windows the following...

Page 150: ...y to Install Window will appear Click on Install to install the ASCOM Driver Depending upon the version of Windows you may see the Following Pop up Install it That s it The installation process will p...

Page 151: ...Guiding with MaximDL and Mallincam ASCOM The following is a pictorial procedure on how to select the Mallincam ASCOM driver assumes you have already installed this driver on your computer in MaximDL...

Page 152: ...e 150 Left Click the Setup Camera button on Camera 2 from the Setup Tab Choose ASCOM from Camera Model in Setup ASCOM popup Window Now Left Click on the Advanced Button in the Setup ASCOM popup Window...

Page 153: ...r Left Click on the OK Button to accept the Mallincam Driver in the ASCOM Camera Chooser Window You will be returned to the Setup ASCOM window then Left Click on its OK button to accept this and you w...

Page 154: ...k on the OK Button to accept the settings and return to the Camera Control Window All you need to do now is select Connect from the Setup Tab to activate the camera and start using MaxImDL as you norm...

Page 155: ...S10 User Manual July 14 2018 SkyRaider DS10 User Manual Page 153 Guiding in PHD2 with Mallincam ASCOM Driver Start the PHD2 software Click on the Connection Icon to open up Connect Equipment Window St...

Page 156: ...p Down List Left Click on the Camera Setup Button to open Setup Window Setup Recommendations for SkyRaider is to use 640 480 Resolution with the 8 Bit Depth and Low Frame Rate Left Click on OK to go b...

Page 157: ...n on Camera List to connect camera Select On Camera from the Mount Dropdown list Left Click on the Connect on Mount List and select On camera to tell PHD2 that the mount that the SkyRaider controls th...

Page 158: ...y would PHD can control the exposure time of the SkyRaider Camera with the exposure drop down button If you are using a Mallincam SkyRaider DS10 camera to do your auto guiding with PHD and you are usi...

Page 159: ...er DS10 User Manual July 14 2018 SkyRaider DS10 User Manual Page 157 Running PHD2 with WDM Driver ToupST4 Driver Start PHD2 software Click on the Camera Icon to open up Connect Equipment Window Step 1...

Page 160: ...018 SkyRaider DS10 User Manual Page 158 Choose WDM style webcam camera from Camera Dropdown List Left Click on the Connect button on Camera List The Camera choice window will pop up Select MALLINCAM a...

Page 161: ...ider DS10 User Manual July 14 2018 SkyRaider DS10 User Manual Page 159 Select Resolution recommend 640x480 or lowest possible and Click on OK Choose ToupST4 ASCOM from the Mount Dropdown List Step 6 S...

Page 162: ...can check to see if the SkyRaider can control your Mount by Left Clicking on the Mount Setup Icon and use the Arrow Buttons to see if your mount moves Left Click on the Mount Connect Button activate t...

Page 163: ...ideo image every 1 second Left Clicking on the Cam Dialog Box see image above in PHD2 will open a window where you can adjust the parameters of the SkyRaider Camera such as the actual Exposure as the...

Page 164: ...ntrol the SkyRaider with a variety of other pieces of Software such as SharpCap Now this is the first generation of DirectShow Sharpcap driver interaction and as such not all of the commands are perfe...

Page 165: ...nds to 5 seconds You will need to record those numbers to assist you SharpCap recognizes that the DS10 does have an extended mode for exposures that are over 5 seconds To turn on the extended mode ove...

Page 166: ...setting on the right of the Slider to Pop Up a window that allows you to directly enter in the time in ms You can also control the Gain in the window The other Tabs in the Window will also you to adj...

Page 167: ...wnloaded from http www astrotoaster com AstroToaster Work Flow Images are sent by MallincamSky to a folder that AstroToaster is monitoring AstroToaster will the align and stack those images producing...

Page 168: ...files Yellow are the images to be stacked Green is the stacked image There is a check box next to the files All checked files will be combined into the current stacked final image If you Click on a Fi...

Page 169: ...xample if you are using Trigger Mode after setting the exposure so that you are seeing the correct amount of detail in the Video Window Use the Options Button in Trigger Mode to choose the same folder...

Page 170: ...sends the images to the Monitoring Folder you will see them appear with Yellow squares besides their name Click on the Stack Tab on AstroToaster and Viewer Tab if not activated to activate the automa...

Page 171: ...file named stacked tif with a Green Square besides its name This is the Stacked image that you are seeing in the AstroToaster Viewer Window Adjust the Image in AstroToaster Click on Color Adj Tab to...

Page 172: ...t http astroprecisioninstruments com products astro live As of this writing the Version of AstroLive is v1 4 This version did not have the SkyRaider series of camera in mind But the MALLINCAM ASCOM Dr...

Page 173: ...Control Window Make any adjustments you need then Click on the OK Button to Accept You will be returned to the ASCOM Camera Chooser Window Click on OK to return to the AstroLive Window To activate the...

Page 174: ...which will allow you to spend more time using and less time fighting with your equipment You have lots of hardware that is sometimes difficult to get it all working together Sequence Generator pro wo...

Page 175: ...Select the required resolution and ensure that you are using Raw as the format Start Running Sequences based on your needs If you are using Sequence Generator Pro then you will need to save flats bias...

Page 176: ...e corners of the Green Rectangle and drag it to the matching corner of your Video Window Next grab the opposite corner of the Green Rectangle and drag it to the same location as the first corner This...

Page 177: ...Right Marker Line or a combination of both to the left will brighten up you image in a more controlled manner How do I Broadcast my image onto Night Skies Network NSN As a direct way is not yet avail...

Page 178: ...e Image Again Just Left Click on the Defaults Button in the SideBar s ROI control Note by changing the ROI the Dark Fields will be removed from the SkyRaider How do I Turn Off Dark Field correction Ju...

Page 179: ...ctive Extension Repeater Cable When I try to connect I receiver message Catastrophic failure Exception from HRESULT 0x8000FFF E_UNEXPECTED This message indicates that something has blocked or over wri...

Page 180: ...mallincam net software downloads html To summarize as per the research done by Doug Murphy Add a much RAM as you can into your system Settings System Privacy Settings General all off Location all off...

Page 181: ...his problem is experienced by many video gamers and the solution that resolves this problem is to select only 1 or 2 of the CPUs running the program The work around is to tell MallincamSky to use only...

Page 182: ...e Task Manager from the list This will open up the task Manager Window Locate and Right Click on mallincamsky Process located in the Task Manager This will open up a small Selection Window Click on Go...

Page 183: ...ht Click on the mallincamsky exe file and another selection window will appear choose Set affinity from that list This will pop up the Processor affinity window Uncheck all Processors Then Check a pro...

Page 184: ...14 2018 SkyRaider DS10 User Manual Page 182 Close the Task Manager Window Note you will have to repeat this every time you restart the MallincamSky as windows doesn t remember you selecting 1 process...

Page 185: ...r alignment difficulties when stacking images You need bright stars to get a successful frame alignment In other words increase gain or increase exposure or re adjust histogram to deliver a brighter i...

Page 186: ...ight frames in order to remove hot and warm pixels and amplifier glow However other noise will remain and needs to be removed with other manipulations and software Dark Field Correction Dark Field cor...

Page 187: ...and the effect they have with respect to exposure times Take this into account when selecting your exposure time for your 10 dark images But remember this is NOT a Dark Frame subtraction the exposure...

Page 188: ...der DS10 User Manual Page 186 The two screen captures below demonstrate the difference that applying a Dark Field to an image can provide 90 second exposure lens covered 10 Dark Fields Applied 90 seco...

Page 189: ...to mention all the guys and gals and the Yahoo MallinCam site http tech groups yahoo com group mallincam messages One of the most important decisions you will need to make with broadcasting the image...

Page 190: ...allincamSky Software window This allows you to spend some time playing and adjusting the settings prior to connecting to NSN As you become more comfortable you will not worry about that and will adjus...

Page 191: ...A helpful hint I slide over the KVYcam window so that some of the text appears in the KVYcam window Can the members on NSN read the words If not adjust Remember this may take a couple of sessions unti...

Page 192: ...indow If you need to you can again use the KVYcam desktop select icon and select or change the location or size of the window for it to grab If you have a dual monitor you can leave the KVYcam window...

Page 193: ...IN button to accept You will next be presented with the Channel Line Up screen for Night Skies network Click on the Login selection on the upper right hand side of the screen Another Login Window will...

Page 194: ...NSN may hear an extreme loud buzzing feedback noise Later on we will look at using the microphone but until then I recommend CLICKING on the little microphone symbol on the upper right corner of the N...

Page 195: ...s Select the Camera Now is the time to activate the camera or in our case have NSN driver point to our KVYcam Splitcam Webcam Max output RIGHT CLICK inside the NSN Video window to bring up a Settings...

Page 196: ...right Over time you will find the sweet spot for your system Select your Resolution from the Pull Down Menu Select a starting value of 1280 x 720 for the system Again play with these to see what sett...

Page 197: ...that people use It all depends upon what computer equipment you are using Suggestion 1 Get a second cheap monitor This way you can have NSN running in your browser on one monitor and MallincamSky run...

Page 198: ...fore login back in Don t worry the NSN viewers sense what is happening and will keep the conversations going while waiting for you to come back on Don t be afraid to ask for advice by typing in on the...

Page 199: ...Customizing the Screen You can customize what controls and the defaults for most of the controls you want active by Left Clicking anywhere in the Left Control Panel then choose the Settings choice to...

Page 200: ...r size up to 28 4mm diagonal CCD or CMOS sensor astronomical camera The large format focal reducer has a 2 48mm thread on either end and comes with a T to 2 adapter to allow use with all T mount type...

Page 201: ...SkyRaider DS10 User Manual July 14 2018 SkyRaider DS10 User Manual Page 199 User Notes...

Reviews: