
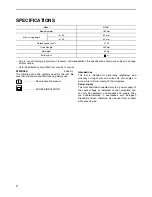


4
21.
Keep cutting tools sharp and clean.
Properly
maintained cutting tools with sharp cutting edges
are less likely to bind and are easier to control.
22.
Use the power tool, accessories and tool bits
etc. in accordance with these instructions and in
the manner intended for the particular type of
power tool, taking into account the working con-
ditions and the work to be performed.
Use of the
power tool for operations different from those
intended could result in a hazardous situation.
Service
23.
Have your power tool serviced by a qualified
repair person using only identical replacement
parts.
This will ensure that the safety of the power
tool is maintained.
ADDITIONAL SAFETY RULES FOR TOOL
ENB036-4
1.
Wear hearing protection.
2.
Keep Guards In Place and In Working Order.
Never wedge or tie lower guard open. Check
operation of lower guard before each use.
Don’t use if lower guard does not close briskly
over saw blade.
CAUTION: If saw is dropped, lower guard may
be bent, restricting full return.
3.
Do not use blades which are deformed or
cracked.
4.
Do not use blades made of high speed steel.
5.
Do not stop the blades by lateral pressure on
the saw blade.
6.
Keep Blades Clean and Sharp.
Sharp blades minimize stalling and kickback.
7.
DANGER:
Keep Hands Away From Cutting Area.
Keep hands away from blades. Don’t reach
underneath work while blade is rotating. Don’t
attempt to remove cut material when blade is
moving.
CAUTION: Blades coast after turn off.
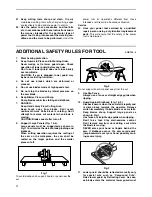
8.
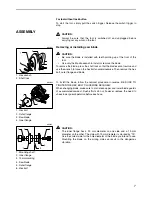
Support Large Panels (Fig. 1 & 2).
Large panels must be supported as shown in
Fig. 1 to minimize the risk of blade pinching and
kickback.
When cutting operation requires the resting of
the saw on the workpiece, the saw shall be
rested on the larger portion and the smaller
piece cut off.
9.
Use Rip Fence.
Always use a fence or straight edge guide when
ripping.
10.
Guard Against Kickback. (Fig. 1 & 3)
Kickback occurs when the saw stalls rapidly and
is driven back towards the operator. Release
switch immediately if blade binds or saw stalls.
Keep blades sharp. Support large panels as
shown in Fig. 1.
Use fence or straight edge guide when ripping.
Don’t force tool. Stay alert-exercise control.
Don’t remove saw from work during a cut while
the blade is moving.
NEVER place your hand or fingers behind the
saw. If kickback occurs, the saw could easily
jump backwards over your hand, possibly caus-
ing severe injury.
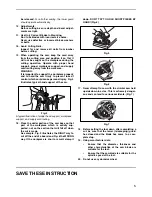
11.
Lower guard should be retracted manually only
for special cuts such as “Compound Cuts”.
Raise lower guard by Retracting Lever. As soon
as blade enters the material, lower guard must
Fig. 1
To avoid kickback, do support board or panel near the
cut.
Fig. 2
Do not support board or panel away from the cut.
Fig. 3


