Makita XRM06X Instruction Manual Download Page 13

13   ENGLISH

Pairing your Bluetooth

® 

device

1.  Press the Source button 

 to select Bluetooth

®


function. “BT READY” will be shown on the display and 

“READY” will flash with every 2 seconds interval.

2.  Activate Bluetooth

®

 on your device according to the 

device’s user manual to allow the paring procedure.

3.  Press and release the Pair button 

 , then “BT PAIR” 

will be shown on the display and it will flash with 1 

second interval. You can start the search of your radio 

on your Bluetooth

®

 device. Once the name of your 

radio is appeared on your Bluetooth

®

 device, press the 

item in your Bluetooth

®

 list. With some old type mobiles 

(versions earlier than BT 2.1 Bluetooth

®

 device), you 

may need to input the pass code “0000”.

4.  Your Bluetooth

®

 device will be linked with the radio.

5.  Once connected, “BLUETOOTH” will remain on the 

display and the backlight will be dim-out in 10 seconds. 

You can now play the music in your Bluetooth

®

-enabled 

device via your radio.

Playing Bluetooth

®

 device which has 

already paired

1.  Press the Source button 

 to select Bluetooth

®


function. “BT READY” will be shown on the display and 

“READY” will flash with every 2 seconds interval.

2.  Search and link the radio on your Bluetooth

®

 device. 

Some device may link with the radio automatically.

 You can now play the music in your Bluetooth

® 

-enabled 

device via your radio.

Note:


  The radio can pair with 8 Bluetooth

®

 devices at most. 

When you pair Bluetooth

®

 devices more than this 

number, pairing history will be overwritten from the 

oldest pairing history.


  If there are 2 Bluetooth

®

 devices searching for your 

radio, it will show its availability on both devices.


  If your Bluetooth

®

 device is temporarily disconnected to 

your radio, then you need to manually reconnect your 

device again to the radio.


  If the name of your radio is appeared on your 

Bluetooth

®

 device list but your device cannot connect 

with it, please delete the item name of your radio from 

your list and pair the device with your radio again 

following the steps described previously.


  The effective operation range between the radio and 

the paired device is approximately 10 meters (30 feet).


  Any obstacle between the radio and the device can 

reduce the operational range.

Disconnecting your Bluetooth

®

 device

Press and hold the Pair button 

 for 2-3 seconds to

disconnect with your Bluetooth

®

 device. “BLUETOOTH”

will disappear from the display indicating deactivation of

Bluetooth

®

.

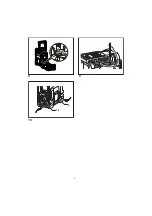
Charging with USB power supply port 
(Fig. 10)

There is the USB port at the front side of the radio. You

can charge USB device trough the USB port.

1.  Connect the USB device, such as iPod, MP3, or CD 

player, with USB cable available in the market.

2.  Press the Power button 

 to switch on your radio.

3.  No matter if the radio is AC powered or battery 

powered, the radio can charge the USB device when 

the radio is switched on and in FM radio mode, or 

BT mode, or AUX mode, which is appeared when an 

external audio source is connected.

Note:

You cannot charge USB devices during AM mode 

because radio signal reception becomes extremely poor 

when charging USB device.


  The maximum volume of the output power speaker will 

decrease when your USB is charging.


  The USB socket can provide max 1A 5V of electrical 

current.

Important:


  Before connecting USB device to the charger, always 

backup your data of USB device. Otherwise your data 

may lose by any possibility.


  The charger may not supply power to some USB 

devices.


  When not using or after charging, remove the USB 

cable and close the cover.


  Do not connect power source to USB port. Otherwise 

there is risk of fire. The USB port is only intended for 

charging lower voltage device. Always place the cover 

onto the USB port when not charging the lower voltage 

device.


  Do not insert a nail, wire, etc. into USB power supply 

port. Otherwise a circuit short may cause smoke and 

fire.


  Do not connect this USB socket with your PC USB port, 

as it is highly possible that it may cause breakdown of 

the units.

MAINTENANCE

 CAUTION:

Never use gasoline, benzine, thinner, alcohol or the like. 

Discoloration, deformation or cracks may result.

Summary of Contents for XRM06X

Page 1: ...EN Job Site Radio Instruction manual 5 ESMX Radio de Trabajo Manual de instrucciones 15 XRM06X ...

Page 2: ...2 1 A B C D G F H I E 4 5 1 2 3 7 8 9 10 12 13 11 14 15 16 6 17 17 17 18 ...

Page 3: ...3 2 4 6 7 3 5 1 2 1 2 LXT LXT CXT CXT ...

Page 4: ...4 8 10 9 5 14 ...

Page 5: ... pack must be recharged only with the specified charger for the battery A charger that may be suitable for one type of battery may create a risk of fire when used with another battery 8 Use battery operated radio only with specifically designated battery packs Use of any other batteries may create a risk of fire 9 When battery pack is not in use keep it away from other metal objects like paper cli...

Page 6: ...ita Installing the batteries to non compliant products may result in a fire excessive heat explosion or leak of electrolyte 14 If the tool is not used for a long period of time the battery must be removed from the tool 15 During and after use the battery cartridge may take on heat which can cause burns or low temperature burns 16 Do not touch the terminal of the tool immediately after use as it ma...

Page 7: ...may cause harmful interference to radio communications However there is no guarantee that interference will not occur in a particular installation If this equipment does cause harmful interference to radio or television reception which can be determined by turning the equipment off and on the user is encouraged to try to correct the interference by one or more of the following measures Reorient or...

Page 8: ...BL1021B 12 0 2 5 BL1820B 11 0 3 5 3 0 Ah BL1830 BL1830B 16 0 5 0 4 0 Ah BL1041B 24 0 5 0 BL1840B 22 0 7 0 5 0 Ah BL1850B 28 0 9 0 6 0 Ah BL1860B 34 0 11 0 Cluster Battery Slide Battery WARNING Only use the battery cartridges listed above Use of any other battery cartridges may cause injury and or fire Note Table regarding to the battery operating time above is for reference The actual operating ti...

Page 9: ...y sign and POWERFAIL appear on the display are all the signs that the main battery pack needs to replace Note The battery pack can t be charged via the supplied AC power adaptor When low battery sign appears and an EMPTY keeps on flashing is the time to replace the back up batteries Indicating the remaining battery capacity Fig 6 7 1 Indicator lamps 2 Check button Only for battery cartridges with ...

Page 10: ...bed 3 Press and hold the required Preset button 1 to 5 until the display shows P4 for example after the frequency The station will be stored using the preset number Repeat this procedure for the remaining presets as you wish 4 Preset stations which have already been stored may be overwritten by following the above procedure if required Display modes FM Your radio has a range of display options for...

Page 11: ...the Tuning control knob until RDS CT and a clock symbol appear on the display Press the Tuning control knob to enter the setting 3 Rotate the Tuning control knob until RDS CT appears on the display Press the Tuning control knob to confirm the setting The clock time of the radio will set up automatically according to the RDS data received 4 When the action is completed the RDS icon will appear on t...

Page 12: ...he Sleep Timer setting SLEEP XX will show on the display 2 Keep holding the Power button and the Sleep Timer options will start switching on the display Stop until the desired Sleep Timer setting appears on the display The setting will be saved and the LCD will return to normal display 3 Your radio will switch off automatically after the preset Sleep Timer has elapsed The Sleep Timer icon will sho...

Page 13: ...he device with your radio again following the steps described previously The effective operation range between the radio and the paired device is approximately 10 meters 30 feet Any obstacle between the radio and the device can reduce the operational range Disconnecting your Bluetooth device Press and hold the Pair button for 2 3 seconds to disconnect with your Bluetooth device BLUETOOTH will disa...

Page 14: ...marks owned by Bluetooth SIG Inc Bluetooth version 5 0 Bluetooth profiles A2DP SCMS T Transmission power Bluetooth specification power Class 2 Transmission range Max 10m varies according to usage conditions Supported codec SBC Compatible Bluetooth profile A2DP Circuit feature Loudspeaker 3 5inches 8ohm x 2 Output Power 10 8V 1 2W x 2 14 4V 2 2W x 2 18V 3 5W x 2 Input terminal 3 5mm dia AUX IN Ante...

Page 15: ...cesorios especificados por el fabricante 6 Desenchufe este aparato durante las tormentas o cuando no vaya a usarlo por un periodo prolongado 7 Una radio a batería con baterías integrales o un paquete de baterías independiente se debe recargar solamente con el cargador especificado para la batería Un cargador que puede ser adecuado para un tipo de batería puede crear un riesgo de incendio cuando se...

Page 16: ...ugar seguro Siga las regulaciones locales en lo relacionado a la eliminación de baterías 13 Use las baterías solo con los productos especificados por Makita La instalación de las baterías con productos no conformes podría resultar en un incendio calor excesivo explosión o fuga de electrolitos 14 Si la herramienta no se usa por un periodo prolongado de tiempo debe retirar la batería 15 Durante y tr...

Page 17: ...a las instrucciones puede causar interferencias perjudiciales en las comunicaciones de radio Sin embargo no hay garantía de que no ocurrirán las interferencias en una instalación determinada Si este equipo causa interferencias perjudiciales en la recepción de radio o televisión que se pueden identificar encendiendo y apagando el equipo recomendamos al usuario que intente solucionar las interferenc...

Page 18: ...5 2 5 2 0 Ah BL1021B 12 0 2 5 BL1820B 11 0 3 5 3 0 Ah BL1830 BL1830B 16 0 5 0 4 0 Ah BL1041B 24 0 5 0 BL1840B 22 0 7 0 5 0 Ah BL1850B 28 0 9 0 6 0 Ah BL1860B 34 0 11 0 Batería de clúster Batería deslizante ADVERTENCIA Solo use las baterías indicadas anteriormente El uso de cualquier otra batería podría causar lesiones o fuego Nota La tabla sobre el tiempo de funcionamiento de la batería es para re...

Page 19: ...cuando tanto el signo de batería baja como POWERFAIL aparezcan en pantalla son señales de que la batería principal debe cambiarse Nota La batería no puede cargarse con el adaptador de CA suministrado Cuando el signo de batería baja aparece y EMPTY parpadea en pantalla es el momento de reemplazar las baterías de respaldo Indicación de la capacidad restante de la batería Fig 6 7 1 Luces indicadoras ...

Page 20: ...ión desde el extremo opuesto de la banda de frecuencia 6 Use el control de sintonización para ajustar el nivel de sonido como desee Presintonizar emisoras en modo AM FM Hay 5 presintonías de emisoras para radio AM y otras cinco para radio FM Se usan de la misma manera en ambas bandas 1 Presione el botón de encendido para encender la radio 2 Presione el botón de fuente para seleccionar la banda de ...

Page 21: ... 3 La hora parpadeará en pantalla Gire el control de sintonización para seleccionar la hora deseada y presione el control de sintonización para confirmar los ajustes A continuación gire el control de sintonización para seleccionar el minuto deseado y presione el control de sintonización para confirmar los ajustes 4 Gire el control de sintonización hasta que DATE ADJ aparezca en pantalla Presione e...

Page 22: ...para seleccionar la hora y presione de nuevo el control de sintonización para confirmar los ajustes de la hora A continuación gire el control de sintonización para seleccionar los minutos y presione el control de sintonización para confirmar los ajustes de los minutos 4 Gire el control de sintonización y la pantalla mostrará las opciones de frecuencia para la alarma Las opciones de la alarma son O...

Page 23: ...ción crea un vínculo permanente para que los dos dispositivos siempre puedan reconocerse entre sí Vincular el dispositivo Bluetooth 1 Presione el botón de fuente para seleccionar la función Bluetooth En pantalla se mostrará BT READY y READY parpadeará cada 2 segundos 2 Active el Bluetooth en su dispositivo según el manual de instrucciones para permitir el proceso de vinculación 3 Presione y suelte...

Page 24: ...s de una carga retire el cable USB y cierre la cubierta No conecte una fuente de alimentación al puerto USB Existe riesgo de que se produzca un incendio El puerto USB está diseñado únicamente para cargar dispositivos de bajo voltaje Cuando no cargue un dispositivo de bajo voltaje coloque siempre la cubierta en el puerto USB No inserte un clavo un cable etc en el interior del puerto de suministro d...

Page 25: ...SJN 3A81eA5Z00000 2021 04 08 XRM06X NA2 2101 Makita Corporation 3 11 8 Sumiyoshi cho Anjo Aichi 446 8502 Japan www makita com ...

Reviews: