background image

31 ESPAÑOL

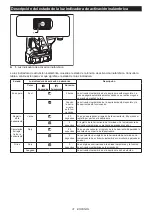
Descripción del estado de la luz indicadora de activación inalámbrica

1

►    

1.

 Luz indicadora de activación inalámbrica

La luz indicadora de activación inalámbrica muestra el estado de la función de activación inalámbrica. Consulte la 

tabla a continuación para ver qué significa el estado de la luz indicadora.

Estado

Luz indicadora de activación inalámbrica

Descripción

Color


Encendida


Parpadeando

Duración

En espera

Azul

2 horas

La activación inalámbrica de la aspiradora está disponible. La 

luz se apagará automáticamente cuando no se realice ninguna 

operación durante 2 horas.

Cuando 

la herra-

mienta 

está fun-

cionando.

La activación inalámbrica de la aspiradora está disponible y la 

herramienta está funcionando.

Registro 

de la 

herramienta

Verde

20 

segundos

Ya se puede realizar el registro de la herramienta. Esperando el 

registro por parte de la aspiradora.

segundos

El registro de la herramienta ha terminado. La luz indicadora de 

activación inalámbrica comenzará a parpadear en azul.

Cancelación 

del regis-

tro de la 

herramienta

Rojo

20 

segundos

Ya se puede cancelar el registro de la herramienta. Esperando la 

cancelación por parte de la aspiradora.

segundos

La cancelación del registro de la herramienta ha terminado. La 

luz indicadora de activación inalámbrica comenzará a parpadear 

en azul.

Otros

Rojo

segundos

La energía es suministrada a la unidad inalámbrica y la función 

de activación inalámbrica está arrancando.

Apagada

-

-

La activación inalámbrica de la aspiradora se ha detenido.

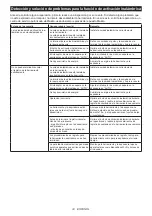
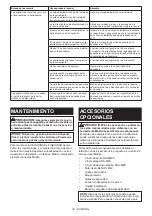
Summary of Contents for GMH02

Page 1: ...INSTRUCTION MANUAL MANUAL DE INSTRUCCIONES Cordless Demolition Hammer Martillo de Demolición Inalámbrico GMH02 IMPORTANT Read Before Using IMPORTANTE Lea antes de usar ...

Page 2: ...ls create sparks which may ignite the dust or fumes 3 Keep children and bystanders away while operating a power tool Distractions can cause you to lose control Electrical Safety 1 Power tool plugs must match the outlet Never modify the plug in any way Do not use any adapter plugs with earthed grounded power tools Unmodified plugs and matching outlets will reduce risk of electric shock 2 Avoid body...

Page 3: ...ition that may affect the power tool s operation If dam aged have the power tool repaired before use Many accidents are caused by poorly maintained power tools 6 Keep cutting tools sharp and clean Properly maintained cutting tools with sharp cutting edges are less likely to bind and are easier to control 7 Use the power tool accessories and tool bits etc in accordance with these instructions tak i...

Page 4: ... gas leak 17 Do not operate the tool at no load unnecessarily SAVE THESE INSTRUCTIONS WARNING DO NOT let comfort or familiarity with product gained from repeated use replace strict adherence to safety rules for the subject product MISUSE or failure to follow the safety rules stated in this instruction manual may cause serious personal injury Symbols The followings show the symbols used for tool vo...

Page 5: ...in or wet conditions 5 Do not use the wireless unit in places where the temperature exceeds 50 C 122 F 6 Do not operate the wireless unit in places where medical instruments such as heart pace makers are nearby 7 Do not operate the wireless unit in places where automated devices are nearby If oper ated automated devices may develop malfunction or error 8 Do not operate the wireless unit in places ...

Page 6: ...l causing injury to you or someone around you CAUTION Do not install the battery cartridge forcibly If the cartridge does not slide in easily it is not being inserted correctly Indicating the remaining battery capacity Press the check button on the battery cartridge to indi cate the remaining battery capacity The indicator lamps light up for a few seconds 1 2 1 Indicator lamps 2 Check button Indic...

Page 7: ... Using the trigger lock button for continuous operation For continuous operation depress the trigger lock but ton from B side while pulling the switch trigger and then release the switch trigger To stop the tool depress the trigger lock button from A side Speed change 1 1 Speed adjusting dial The blows per minute can be adjusted by turning the adjusting dial The dial is marked 1 lowest speed to 5 ...

Page 8: ...ION Always use the side handle to ensure safe operation CAUTION After installing or adjusting the side handle make sure that the side handle is firmly secured The side handle can be swung in a vertical direction and secured at any desired position It can also be adjusted at eight steps back and forth in a horizontal direction Loosen the clamp nut to swing the side han dle to a desired position and...

Page 9: ... trying to rotate the bit 1 1 Change ring cover Dust extractor attachment Optional accessory 1 Install the hose holder A Loosen the clamp nut and then remove the hex bolt Install the hose holder A between the hex bolt and the clamp nut by tightening the clamp nut firmly 1 2 3 1 Hex bolt 2 Hose holder A 3 Clamp nut 2 Attach the holder joint to the tool and then attach the hose holder C to the holde...

Page 10: ...erations CAUTION Always make sure that the work piece is secured before operation Failure to prop erly secure the workpiece may cause the workpiece to move resulting in injury CAUTION Do not pull the tool out forcibly even the bit gets stuck Loss of control may cause injury CAUTION Do not leave the tool stabbed in the workpiece Otherwise the tool may starts unin tentionally and cause an injury NOT...

Page 11: ...reless activation function Installing the wireless unit Optional accessory CAUTION Place the tool on a flat and stable surface when installing the wireless unit NOTICE Clean the dust and dirt on the tool before installing the wireless unit Dust or dirt may cause malfunction if it comes into the slot of the wireless unit NOTICE To prevent the malfunction caused by static touch a static discharging ...

Page 12: ...ol registration NOTE During the tool registration do not pull the switch trigger or turn on the power switch on the vacuum cleaner NOTE Refer to the instruction manual of the vacuum cleaner too If you wish to activate the vacuum cleaner along with the switch operation of the tool finish the tool registra tion beforehand 1 Install the batteries to the vacuum cleaner and the tool 2 Set the stand by ...

Page 13: ...m cleaner to AUTO 1 1 Stand by switch 4 Push the wireless activation button on the tool briefly The wireless activation lamp will blink in blue 2 1 1 Wireless activation button 2 Wireless activation lamp 5 Pull the switch trigger of the tool Check if the vacuum cleaner runs while the switch trigger is being pulled To stop the wireless activation of the vacuum cleaner push the wireless activation b...

Page 14: ...uum cleaner is available and the tool is running Tool registration Green 20 seconds Ready for the tool registration Waiting for the registration by the vacuum cleaner 2 seconds The tool registration has been finished The wireless activation lamp will start blinking in blue Cancelling tool registration Red 20 seconds Ready for the cancellation of the tool registration Waiting for the cancellation b...

Page 15: ...nd then become red After that press the wireless activation button on the tool in the same way 1 2 1 2 1 Wireless activation button 2 Wireless activation lamp If the cancellation is performed successfully the wire less activation lamps will light up in red for 2 seconds and start blinking in blue NOTE The wireless activation lamps finish blinking in red after 20 seconds elapsed Press the wireless ...

Page 16: ... power button on the vacuum cleaner is turned on Push the wireless activation button briefly and perform the tool registration cancellation procedures again The tool registration procedures for the tool or vacuum cleaner have not finished Perform the tool registration procedures for both the tool and the vacuum cleaner at the same timing Radio disturbance by other appliances which generate high in...

Page 17: ...injury to persons Only use accessory or attachment for its stated purpose If you need any assistance for more details regard ing these accessories ask your local Makita Service Center SDS MAX bull point SDS MAX cold chisel SDS MAX scaling chisel SDS MAX clay spade Bit grease Side handle Safety goggles Dust extractor attachment Wireless unit Makita genuine battery and charger NOTE Some items in the...

Page 18: ...o con conexión a la red eléctrica con cableado eléctrico o herra mienta eléctrica de funcionamiento a batería inalámbrica Seguridad en el área de trabajo 1 Mantenga el área de trabajo limpia y bien ilu minada Las áreas oscuras o desordenadas son propensas a accidentes 2 No utilice las herramientas eléctricas en atmósferas explosivas tal como en la presencia de líquidos gases o polvo inflamables La...

Page 19: ...vo puede reducir los riesgos relacionados con el polvo 8 No permita que la familiaridad adquirida debido al uso frecuente de las herramientas haga que se sienta confiado e ignore los prin cipios de seguridad de las herramientas Un descuido podría ocasionar una lesión grave en una fracción de segundo 9 Utilice siempre gafas protectoras para prote ger sus ojos de lesiones al usar herramientas eléctr...

Page 20: ...o se indique en las instrucciones para el uso y cuidado Advertencias de seguridad para el martillo de demolición inalámbrico 1 Utilice protectores de oídos La exposición al ruido puede provocar pérdida auditiva 2 Utilice los mango s auxiliare s que se sumi nistren con la herramienta La pérdida de con trol puede ocasionar lesiones 3 Sujete la herramienta eléctrica por las superficies de asimiento a...

Page 21: ...absoluto El cartucho de batería puede explotar si se tira al fuego 8 No clave corte aplaste lance o deje caer el cartucho de batería ni golpee un objeto sólido contra el cartucho de batería Dicha acción podría resultar en un incendio calor excesivo o en una explosión 9 No use una batería dañada 10 Las baterías de ión de litio están sujetas a los requisitos reglamentarios en materia de bie nes peli...

Page 22: ...n instrumento de precisión Tenga cuidado de no dejar caer ni golpear la unidad inalámbrica 11 Evite tocar la terminal de la unidad inalámbrica con las manos descubiertas o con materiales metálicos 12 Retire siempre la batería del producto al insta lar en él la unidad inalámbrica 13 Cuando abra la tapa de la ranura evite el lugar donde el polvo y el agua puedan introducirse en la ranura Mantenga si...

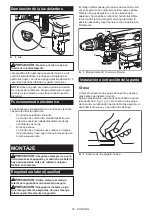
Page 23: ...de batería hasta que el indicador rojo no pueda verse Si no podría accidentalmente salirse de la herramienta y caer al suelo causando una lesión a usted o alguien a su alrededor PRECAUCIÓN No instale el cartucho de batería a la fuerza Si el cartucho no se desliza al interior fácilmente se debe a que no está siendo insertado correctamente Indicación de la capacidad restante de la batería Oprima el ...

Page 24: ...e la herramienta aumenta al incre mentar la presión en el gatillo interruptor Para detenerla suelte el gatillo interruptor Cuando termine de usarla oprima el botón de bloqueo del gatillo del lado B 1 2 B A 1 Botón de bloqueo del gatillo 2 Gatillo interruptor Uso del botón de bloqueo del gatillo para una operación continua Para una operación continua oprima el botón de blo queo del gatillo del lado...

Page 25: ...gúrese siempre de que la herramienta esté apagada y el cartucho de batería haya sido extraído antes de realizar cualquier trabajo en la misma Empuñadura lateral auxiliar PRECAUCIÓN Utilice siempre el mango lateral para garantizar una operación segura PRECAUCIÓN Después de instalar o ajus tar el mango lateral asegúrese de que el mango lateral quede firmemente asegurado El mango lateral puede girars...

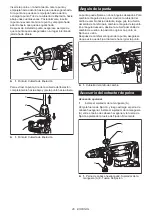
Page 26: ...a La punta puede fijarse en doce ángulos deseados Para cambiar el ángulo de la punta deslice la cubierta del anillo de cambio hacia adelante luego gire la cubierta del anillo de cambio para cambiar el ángulo de la punta En el ángulo deseado deslice la cubierta del anillo de cambio de vuelta a la posición original La punta se fijará en su sitio Después de cambiar el ángulo de la punta asegúrese de ...

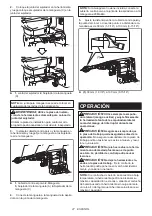
Page 27: ...stancia entre la cubierta contra polvo y la punta del cincel o cincel de punta La distancia reco mendada es de 30 mm 1 3 16 a 100 mm 3 15 16 1 1 30 mm 1 3 16 a 100 mm 3 15 16 OPERACIÓN PRECAUCIÓN Utilice siempre la empuña dura lateral mango auxiliar y sujete firmemente la herramienta tanto de la empuñadura lateral como del mango del interruptor durante las operaciones PRECAUCIÓN Asegúrese siempre ...

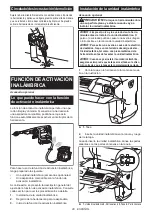
Page 28: ... la unidad inalámbrica 2 Registro de la herramienta para la aspiradora 3 Inicio de la función de activación inalámbrica Instalación de la unidad inalámbrica Accesorio opcional PRECAUCIÓN Coloque la herramienta sobre una superficie plana y estable cuando vaya a instalar la unidad inalámbrica AVISO Limpie el polvo y la suciedad en la herra mienta antes de instalar la unidad inalámbrica El polvo o la...

Page 29: ... el registro de la herramienta NOTA Durante el registro de la herramienta no jale el gatillo interruptor ni active el interruptor de encen dido en la aspiradora NOTA Consulte también el manual de instrucciones de la aspiradora Si desea activar la aspiradora junto con el interruptor de la herramienta termine antes con el registro de la herramienta 1 Instale las baterías en la aspiradora y en la her...

Page 30: ...nterruptor de modo en espera 4 Oprima el botón de activación inalámbrica en la herramienta durante un lapso breve La luz indicadora de activación inalámbrica parpadeará en azul 2 1 1 Botón de activación inalámbrica 2 Luz indica dora de activación inalámbrica 5 Jale el gatillo interruptor de la herramienta Verifique que la aspiradora funcione mientras jala el gatillo interruptor Para detener la act...

Page 31: ...rica de la aspiradora está disponible y la herramienta está funcionando Registro de la herramienta Verde 20 segundos Ya se puede realizar el registro de la herramienta Esperando el registro por parte de la aspiradora 2 segundos El registro de la herramienta ha terminado La luz indicadora de activación inalámbrica comenzará a parpadear en azul Cancelación del regis tro de la herramienta Rojo 20 seg...

Page 32: ...ctivación inalámbrica en la herramienta de la misma manera 1 2 1 2 1 Botón de activación inalámbrica 2 Luz indica dora de activación inalámbrica Si la cancelación se realiza exitosamente las luces indicadoras de activación inalámbrica se encenderán en rojo durante 2 segundos y comenzarán a parpadear en azul NOTA Las luces indicadoras de activación inalám brica terminarán parpadeando en rojo despué...

Page 33: ...orrectamente en la herramienta Instale la unidad inalámbrica correctamente La terminal de la unidad inalámbrica y o la ranura está sucia Retire con cuidado el polvo y la suciedad en la terminal de la unidad inalámbrica y limpie la ranura El interruptor de modo en espera en la aspiradora no está ajustado en AUTO Ajuste el interruptor de modo en espera en la aspiradora en AUTO No hay suministro de e...

Page 34: ...ensidad Mantenga la herramienta y la aspiradora lejos de aparatos tales como dispositivos Wi Fi y hornos de microondas La aspiradora funciona aun cuando el gatillo interruptor de la herra mienta no ha sido jalado Otros usuarios están usando la activa ción inalámbrica de la aspiradora con sus herramientas Apague el botón de activación inalámbrica de las demás herramientas o cancele el registro de d...

Page 35: ...s términos más vigentes de la garantía aplicable a este producto En caso de no disponer de esta hoja de garantía anexa consulte los detalles sobre la garantía descritos en el sitio web de su país respectivo indicado a continuación Estados Unidos de América www makitatools com Canadá www makita ca Otros países www makita com ...

Page 36: ...ados por el lijado aserrado esmerilado taladrado y otras actividades de la construcción contienen sustancias químicas reconocidas por el Estado de California como causantes de cáncer defectos de nacimiento y otros peligros de reproducción Algunos ejemplos de estos productos químicos son plomo de pinturas a base de plomo sílice cristalino de ladrillos y cemento y otros productos de albañilería y ar...

Reviews: