background image

7

rules for the subject product. MISUSE or failure to 
follow the safety rules stated in this instruction 
manual may cause serious personal injury.

FUNCTIONAL DESCRIPTION

CAUTION:

• Always be sure that the tool is switched off and 

unplugged before adjusting or checking function on the 
tool.

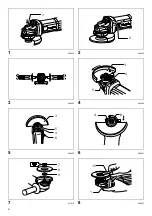
Shaft lock (Fig. 1)

CAUTION:

• Never actuate the shaft lock when the spindle is 

moving. The tool may be damaged.

Press the shaft lock to prevent spindle rotation when 
installing or removing accessories.

Switch action (Fig. 2)

CAUTION:

• Before plugging in the tool, always check to see that 

the slide switch actuates properly and returns to the 
“OFF” position when the rear of the slide switch is 
depressed.

To start the tool, slide the switch lever toward the “I (ON)” 
position. For continuous operation, press the front of the 
switch lever to lock it.
To stop the tool, press the rear of the switch lever, then 
slide it toward the “O (OFF)” position.

ASSEMBLY

CAUTION:

• Always be sure that the tool is switched off and 

unplugged before carrying out any work on the tool.

Installing side grip (handle) (Fig. 3)

CAUTION:

• Always be sure that the side grip is installed securely 

before operation.

Screw the side grip securely on the position of the tool as 
shown in the figure.

Installing or removing wheel guard (For 
depressed center wheel, multi disc/
abrasive cut-off wheel, diamond wheel)

For tool with locking screw type wheel guard (Fig. 4)

WARNING:

• When using a depressed center grinding wheel/Multi-

disc, flex wheel, wire wheel brush, cut-off wheel or 
diamond wheel, the wheel guard must be fitted on the 
tool so that the closed side of the guard always points 
toward the operator.

• When using an abrasive cut-off/diamond wheel, be 

sure to use only the special wheel guard designed for 
use with cut-off wheels. (In European countries, when 
using a diamond wheel, the ordinary guard can be 
used.)

Mount the wheel guard with the protrusion on the wheel 
guard band aligned with the notch on the bearing box. 
Then rotate the wheel guard to such an angle that it can 

protect the operator according to work. Be sure to tighten 
the screw securely.
To remove wheel guard, follow the installation procedure 
in reverse.

For tool with clamp lever type wheel guard


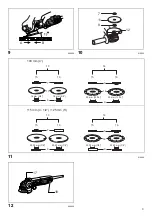
(Fig. 5 & 6)

Loosen the lever on the wheel guard after loosening the 
screw. Mount the wheel guard with the protrusion on the 
wheel guard band aligned with the notch on the bearing 
box. Then rotate the wheel guard around to the position 
shown in the figure. Tighten the lever to fasten the wheel 
guard. If the lever is too tight or too loose to fasten the 
wheel guard, loosen or tighten the screw to adjust the 
tightening of the wheel guard band.
To remove wheel guard, follow the installation procedure 
in reverse.

Installing or removing depressed center 
grinding wheel/Multi-disc (Fig. 7)

WARNING:

• Always use supplied guard when depressed center 

grinding wheel/Multi-disc is on tool. Wheel can shatter 
during use and guard helps to reduce chances of 
personal injury.

Mount the inner flange onto the spindle. Fit the wheel/disc 
on the inner flange and screw the lock nut onto the 
spindle.
To tighten the lock nut, press the shaft lock firmly so that 
the spindle cannot revolve, then use the lock nut wrench 
and securely tighten clockwise.

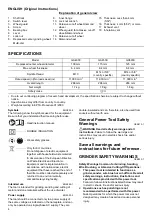
 (Fig. 8)

To remove the wheel, follow the installation procedure in 
reverse.

WARNING:

Only actuate the shaft lock when the spindle is not 
moving.

OPERATION

WARNING:

• It should never be necessary to force the tool. The 

weight of the tool applies adequate pressure. Forcing 
and excessive pressure could cause dangerous wheel 
breakage.

• ALWAYS replace wheel if tool is dropped while 

grinding.

• NEVER bang or hit grinding disc or wheel onto work.
• Avoid bouncing and snagging the wheel, especially 

when working corners, sharp edges etc. This can 
cause loss of control and kickback.

• NEVER use tool with wood cutting blades and other 

saw blades. Such blades when used on a grinder 
frequently kick and cause loss of control leading to 
personal injury.

CAUTION:

• After operation, always switch off the tool and wait until 

the wheel has come to a complete stop before putting 
the tool down.

Grinding and sanding operation

ALWAYS hold the tool firmly with one hand on housing 
and the other on the side handle. Turn the tool on and 
then apply the wheel or disc to the workpiece.

Summary of Contents for GA4530

Page 1: ...r Betriebsanleitung I Smerigliatrice angolare Istruzioni per l uso NL Haakse slijpmachine Gebruiksaanwijzing E Esmeriladora angular Manual de instrucciones P Esmerilhadeira angular Manual de instruções DK Vinkelsliber Brugsanvisning GR Γωνιακός τροχός Οδηγίες χρήσης GA4030 GA4530 GA5030 009421 ...

Page 2: ...2 1 009422 2 009423 3 009424 4 009425 5 009430 6 009431 7 011018 8 009427 1 2 3 4 5 3 5 4 6 4 6 7 8 9 10 1 ...

Page 3: ...10848 12 009428 A B 7 11 9 12 16 mm 5 8 20 mm 13 16 22 23 mm 7 8 22 23 mm 7 8 22 23 mm 7 8 22 23 mm 7 8 16 mm 5 8 20 mm 13 16 7 13 15 16 14 15 16 13 9 7 14 9 7 13 15 16 14 15 16 13 9 7 14 9 100 mm 4 115 mm 4 1 2 125 mm 5 17 18 ...

Page 4: ...and all instructions Failure to follow the warnings and instructions may result in electric shock fire and or serious injury Save all warnings and instructions for future reference GRINDER SAFETY WARNINGS GEB033 7 Safety Warnings Common for Grinding Sanding Wire Brushing or Abrasive Cutting Off Operations 1 This power tool is intended to function as a grinder sander wire brush or cut off tool Read...

Page 5: ...e surface and pull the power tool out of your control 13 Do not run the power tool while carrying it at your side Accidental contact with the spinning accessory could snag your clothing pulling the accessory into your body 14 Regularly clean the power tool s air vents The motor s fan will draw the dust inside the housing and excessive accumulation of powdered metal may cause electrical hazards 15 ...

Page 6: ...cific for Sanding Operations a Do not use excessively oversized sanding disc paper Follow manufacturers recommendations when selecting sanding paper Larger sanding paper extending beyond the sanding pad presents a laceration hazard and may cause snagging tearing of the disc or kickback Safety Warnings Specific for Wire Brushing Operations a Be aware that wire bristles are thrown by the brush even ...

Page 7: ...ding to work Be sure to tighten the screw securely To remove wheel guard follow the installation procedure in reverse For tool with clamp lever type wheel guard Fig 5 6 Loosen the lever on the wheel guard after loosening the screw Mount the wheel guard with the protrusion on the wheel guard band aligned with the notch on the bearing box Then rotate the wheel guard around to the position shown in t...

Page 8: ...d RELIABILITY repairs carbon brush inspection and replacement any other maintenance or adjustment should be performed by Makita Authorized Service Centers always using Makita replacement parts OPTIONAL ACCESSORIES CAUTION These accessories or attachments are recommended for use with your Makita tool specified in this manual The use of any other accessories or attachments might present a risk of in...

Page 9: ...aking account of all parts of the operating cycle such as the times when the tool is switched off and when it is running idle in addition to the trigger time For European countries only ENH101 17 EC Declaration of Conformity Makita declares that the following Machine s Designation of Machine Angle Grinder Model No Type GA4030 GA4530 GA5030 Conforms to the following European Directives 2006 42 EC T...

Page 10: ...é générales des outils électriques GEA010 1 AVERTISSEMENT Veuillez lire toutes les consignes de sécurité et les instructions Il y a un risque de choc électrique d incendie et ou de blessure grave si les consignes et les instructions ne sont pas toutes respectées Conservez toutes les consignes et instructions pour référence ultérieure AVERTISSEMENTS DE SÉCURITÉ POUR LA MEULEUSE GEB033 7 Consignes d...

Page 11: ...doit porter un équipement de protection corporelle Des fragments de pièces à travailler ou d un accessoire cassé peuvent être projetés hors de la zone de travail immédiate et entraîner des blessures 10 Ne tenez l outil électrique que par ses surfaces de poigne isolées lorsque vous effectuez une opération au cours de laquelle l accessoire de découpe peut entrer en contact avec des fils dissimulés o...

Page 12: ...onner et n appliquez pas de pression excessive Ne tentez pas d effectuer une découpe d une profondeur excessive Une surcharge de la meule augmente la charge et la susceptibilité aux torsions ou coincements de la meule lors de la découpe et la possibilité d un rebond ou le risque de cassure de la meule b Ne positionnez pas votre corps en ligne avec et derrière la meule rotative Lorsque la meule en ...

Page 13: ...e à tronçonner travaillez toujours avec le carter de collecte des poussières exigé par la réglementation locale 34 Aucune pression latérale ne doit être appliquée sur le disque pendant la coupe CONSERVEZ CES INSTRUCTIONS AVERTISSEMENT NE vous laissez PAS tromper au fil d une utilisation répétée par un sentiment d aisance et de familiarité avec le produit en négligeant le respect rigoureux des cons...

Page 14: ...nt le meulage Ne frappez JAMAIS le disque de meulage ou la meule contre la pièce à travailler Évitez de laisser la meule sautiller ou s accrocher tout spécialement lorsque vous travaillez dans les coins sur les bords tranchants etc Cela peut causer une perte de contrôle et un rebond N utilisez JAMAIS cet outil avec des lames à bois et autres lames de scie Les lames de ce type sautent fréquemment l...

Page 15: ...NG905 1 Les niveaux de bruit pondéré A typiques ont été mesurés selon la norme EN60745 Niveau de pression sonore LpA 85 dB A Niveau de puissance sonore LWA 96 dB A Incertitude K 3 dB A Portez des protections auditives Vibrations ENG900 1 La valeur totale de vibration somme du vecteur triaxial a été déterminée selon la norme EN60745 Modèle GA4030 Mode de fonctionnement meulage de surface Émission d...

Page 16: ... GA4030 GA4530 GA5030 sont conformes aux directives européennes suivantes 2006 42 CE sont produites conformément aux normes ou documents de normalisation suivants EN60745 Le dossier technique conforme à la norme 2006 42 CE est disponible auprès de Makita Jan Baptist Vinkstraat 2 3070 Belgique 31 12 2013 Yasushi Fukaya Directeur Makita Jan Baptist Vinkstraat 2 3070 Belgique ...

Page 17: ...nd kann daher auch an einer Stromversorgung ohne Schutzkontakt betrieben werden Allgemeine Sicherheitshinweise für Elektrowerkzeuge GEA010 1 WARNUNG Lesen Sie alle Sicherheitshinweise und Anweisungen sorgfältig durch Wenn die Hinweise und Anweisungen nicht beachtet werden besteht die Gefahr eines Stromschlags Brands und oder das Risiko von ernsthaften Verletzungen Bewahren Sie alle Hinweise und An...

Page 18: ...rtikel herausfiltern können die bei verschiedenen Arbeiten entstehen Lange und intensive Lärmbelastung kann zu Hörverlust führen 9 Achten Sie darauf dass Zuschauer den Sicherheitsabstand zum Arbeitsbereich einhalten Jeder der den Arbeitsbereich betritt muss eine Schutzausrüstung tragen Splitter des Werkstücks oder eines zerbrochenen Zubehörteils können umherfliegen und zu Verletzungen auch außerha...

Page 19: ...r können diese zerbrechen e Verwenden Sie immer unbeschädigte Spannflansche in der richtigen Größe und Form für die von Ihnen gewählte Schleifscheibe Geeignete Flansche stützen die Schleifscheibe und verringern so die Gefahr eines Schleifscheibenbruchs Flansche für Trennscheiben unterscheiden sich möglicherweise von Flanschen für Schleifscheiben f Verwenden Sie keine abgenutzten Schleifscheiben vo...

Page 20: ...achten Sie darauf dass ihr Gewinde tief genug für die Spindellänge ist 29 Vergewissern Sie sich dass das Werkstück sicher eingespannt ist 30 Beachten Sie dass sich die Schleifscheibe nach dem Ausschalten der Maschine noch weiterdreht 31 Falls der Arbeitsplatz sehr heiß feucht oder durch leitfähigen Staub stark verschmutzt ist verwenden Sie einen Kurzschlussschalter 30 mA zum Schutz des Bedieners 3...

Page 21: ... auf den Innenflansch und schrauben Sie die Sicherungsmutter auf die Spindel Drücken Sie zum Anziehen der Sicherungsmutter die Spindelarretierung fest um die Spindel zu blockieren und ziehen Sie anschließend die Mutter mit dem Sicherungsmutterschlüssel im Uhrzeigersinn an Abb 8 Zum Entnehmen der Trennscheibe befolgen Sie die Einbauprozedur rückwärts WARNUNG Betätigen Sie die Spindel Arretiertaste ...

Page 22: ...n Servicecentern ausgeführt werden Dabei sind ausschließlich Makita Ersatzteile zu verwenden SONDERZUBEHÖR ACHTUNG Für das in diesem Handbuch beschriebene Makita Gerät werden die folgenden Zubehör und Zusatzteile empfohlen Bei Verwendung anderer Zubehör und Zusatzteile kann es zu Verletzungen kommen Verwenden Sie Zubehör und Zusatzteile nur für den vorgesehenen Zweck Informationen zu diesem Zubehö...

Page 23: ... den Bediener getroffen werden die auf den unter den tatsächlichen Arbeitsbedingungen zu erwartenden Belastungen beruhen beziehen Sie alle Bestandteile des Arbeitsablaufs ein also zusätzlich zu den Arbeitszeiten auch Zeiten in denen das Werkzeug ausgeschaltet ist oder ohne Last läuft Nur für europäische Länder ENH101 17 EG Konformitätserklärung Makita erklärt dass die nachfolgende n Maschine n Bez...

Page 24: ...essa a terra Avvertenze generali di sicurezza per l uso dell utensile GEA010 1 AVVERTENZA Leggere attentamente tutte le avvertenze di sicurezza e le istruzioni La mancata osservanza delle istruzioni e delle avvertenze riportate di seguito potrebbe provocare scosse elettriche incendi e o lesioni gravi Conservare le avvertenze e le istruzioni per riferimenti futuri AVVERTENZE DI SICUREZZA PER LA SME...

Page 25: ...nto di protezione individuale I frammenti di un pezzo o di un accessorio rotto possono volare via e provocare lesioni oltre l area operativa immediata 10 Nel corso di operazioni che potrebbero portare l accessorio di taglio a contatto con conduttori nascosti o con il proprio cavo di alimentazione impugnare l utensile esclusivamente mediante le superfici isolate predisposte Se l accessorio da tagli...

Page 26: ...lpi o rotture del disco b Non posizionare il corpo in linea e dietro al disco mobile Se il disco nel punto di mobilità si sposta lontano dal corpo gli eventuali contraccolpi possono spingere il disco mobile e l utensile direttamente verso l utente c Quando il disco sta grippando o interrompe un taglio per qualsiasi motivo spegnere l utensile e mantenere l utensile fermo fino a quando il disco si a...

Page 27: ... FUNZIONALE ATTENZIONE Prima di regolare o controllare le funzioni dell utensile verificare sempre di averlo spento e scollegato dall alimentazione Blocco dell albero Fig 1 ATTENZIONE Non usare il blocco dell albero mentre il mandrino è in funzione L uso in tali condizioni può danneggiare l utensile Premere il blocco dell albero per evitare la rotazione del mandrino durante l installazione o la ri...

Page 28: ...ricolo di lesioni ATTENZIONE Dopo l uso spegnere sempre l utensile e attendere che il disco si sia fermato prima di riporlo Smerigliatura e carteggiatura Tenere SEMPRE saldamente l utensile con una mano sull alloggiamento e l altra sull impugnatura laterale Accendere l utensile e applicare il disco o la mola sul pezzo In linea generale tenere il bordo del disco o della mola a un angolo di circa 15...

Page 29: ... K 1 5 m s2 Modello GA4530 Modalità di lavoro smerigliatura della superficie Emissione vibrazioni ah AG 7 5 m s2 Variazione K 1 5 m s2 Modalità di lavoro smerigliatura con disco Emissione vibrazioni ah DS 2 5 m s2 o inferiore Variazione K 1 5 m s2 Modello GA5030 Modalità di lavoro smerigliatura della superficie Emissione vibrazioni ah AG 8 5 m s2 Variazione K 1 5 m s2 Modalità di lavoro smerigliat...

Page 30: ...m Het gereedschap is dubbel geïsoleerd en mag derhalve ook op een niet geaard stopcontact worden aangesloten Algemene veiligheidswaarschuwingen voor elektrisch gereedschap GEA010 1 WAARSCHUWING Lees alle veiligheidswaarschuwingen en alle instructies Het niet volgen van de waarschuwingen en instructies kan leiden tot elektrische schokken brand en of ernstig letsel Bewaar alle waarschuwingen en inst...

Page 31: ...aan De oogbescherming moet in staat zijn rondvliegend afval te stoppen dat ontstaat bij de diverse werkzaamheden Het stofmasker of ademhalingsapparaat moet in staat zijn deeltjes te filteren die ontstaat bij de werkzaamheden Langdurige blootstelling aan zeer intens geluid kan leiden tot gehoorbeschadiging 9 Houd omstanders op veilige afstand van het werkgebied Iedereen die zich binnen het werkgebi...

Page 32: ...een doorslijpschijf Doorslijpschijven zijn bedoeld voor slijpen met de rand Krachten op het zijoppervlak kunnen deze schijven doen breken e Gebruik altijd onbeschadigde schijfflenzen van de juiste afmetingen en vorm voor de te gebruiken schijf Een goede schijfflens ondersteunt de schijf en verkleint daarmee de kans op het breken van de schijf Flenzen voor doorslijpschijven kunnen verschillen van f...

Page 33: ...orden gemonteerd controleert u dat de schroefdraad van de schijf lang genoeg is voor de lengte van de as 29 Controleer dat het werkstuk goed wordt ondersteund 30 Wees erop bedacht dat de schijf blijft doordraaien nadat het gereedschap is uitgeschakeld 31 Als de werkruimte bijzonder heet en vochtig is of sterk vervuild is met geleidend stof gebruik dan een kortsluitonderbreker 30 mA om de veilighei...

Page 34: ... aan op de as Monteer de schijf op de binnenflens en schroef de borgmoer op de as Om de borgmoer vast te draaien drukt u de asvergrendeling stevig in zodat de as niet kan draaien en gebruikt u vervolgens de borgmoersleutel om de borgmoer stevig rechtsom vast te draaien zie afb 8 Om de schijf te verwijderen volgt u de procedure in omgekeerde volgorde WAARSCHUWING Bedien de asvergrendeling nooit ter...

Page 35: ... gebruiksaanwijzing wordt beschreven Het gebruik van andere accessoires of hulpstukken kan gevaar voor persoonlijk letsel opleveren Gebruik de accessoires of hulpstukken uitsluitend voor de aangegeven gebruiksdoeleinden Mocht u meer informatie willen hebben over deze accessoires dan kunt u contact opnemen met uw plaatselijke Makita servicecentrum Beschermkap schijfkap Voor schijf met een verzonken...

Page 36: ...den rekening houdend met alle fasen van de bedrijfscyclus zoals de tijdsduur gedurende welke het gereedschap is uitgeschakeld en stationair draait naast de ingeschakelde tijdsduur Alleen voor Europese landen ENH101 17 EU verklaring van conformiteit Makita verklaart dat de volgende machine s Aanduiding van de machine Haakse slijpmachine Modelnr Type GA4030 GA4530 en GA5030 Voldoen aan de volgende E...

Page 37: ...ién en tomacorrientes sin conductor de tierra Advertencias de seguridad generales para herramientas eléctricas GEA010 1 ADVERTENCIA Lea todas las advertencias de seguridad y todas las instrucciones La no observancia de las advertencias y las instrucciones puede provocar descargas eléctricas incendios y o lesiones graves Guarde todas las advertencias e instrucciones para futuras consultas ADVERTENC...

Page 38: ...s se mantengan a suficiente distancia de la zona de trabajo Toda persona que acceda a la zona de trabajo deberá utilizar equipo de protección personal Podrían resultar dañadas incluso fuera del área de trabajo inmediata al salir proyectados fragmentos de la pieza de trabajo o del accesorio 10 Sujete la herramienta eléctrica sólo por las superficies de agarre aisladas al realizar una operación en l...

Page 39: ...omperse Advertencias de seguridad adicionales específicas para operaciones de corte abrasivo a No haga demasiada fuerza ni aplique demasiada presión con el disco de corte No intente hacer cortes de una profundidad excesiva Si el disco se somete a una fuerza excesiva aumenta la carga y las posibilidades de que se doble o se agarrote en el corte así como de que se rompa o se produzca un contragolpe ...

Page 40: ...ento de su país o región 34 Los discos de cortar no deben ser sometidos a ninguna presión lateral GUARDE ESTAS INSTRUCCIONES ADVERTENCIA NO deje que la comodidad o la familiaridad con el producto a base de utilizarlo repetidamente sustituya la estricta observancia de las normas de seguridad del producto en cuestión El MAL USO o la no observancia de las normas de seguridad expuestas en este manual ...

Page 41: ...No golpee NUNCA el disco de amolar u otros discos contra la pieza de trabajo Evite que el disco rebote o se enganche especialmente cuando trabaje en esquinas bordes afilados etc Podría ocasionar la pérdida del control y retrocesos bruscos No utilice NUNCA esta herramienta con discos para cortar madera ni otros discos de sierra Con estas sierras la herramienta podría rebotar con fuerza y causarle l...

Page 42: ...sonido LWA 96 dB A Incertidumbre K 3 dB A Utilice protección para los oídos Vibración ENG900 1 Valor total de la vibración suma de vectores triaxiales determinado según el estándar EN60745 Modelo GA4030 Modo de trabajo amolado de superficies Emisión de vibraciones ah AG 7 0 m s2 Incertidumbre K 1 5 m s2 Modo de trabajo lijado con disco Emisión de vibraciones ah DS 2 5 m s2 o menos Incertidumbre K ...

Page 43: ...43 El archivo técnico de acuerdo con 2006 42 CE está disponible en Makita Jan Baptist Vinkstraat 2 3070 Bélgica 31 12 2013 Yasushi Fukaya Director Makita Jan Baptist Vinkstraat 2 3070 Bélgica ...

Page 44: ...de choques eléctricos incêndios e ou ferimentos graves Guarde todos os avisos e instruções para referência futura AVISOS DE SEGURANÇA DA ESMERILHADEIRA GEB033 7 Avisos de Segurança Comuns para Afiar Lixar Escovar com arame ou para Operações de corte abrasivas 1 Esta ferramenta serve para esmerilhar lixar escovar com arame e cortar Leia todos os avisos instruções ilustrações e especificações de seg...

Page 45: ...orrente pode electrificar as peças de metal da ferramenta e provocar um choque 11 Posicione o cabo eléctrico longe do acessório rotativo Se perder o controlo o cabo eléctrico pode ser cortado ou movimentado bruscamente e a sua mão ou braço podem ser puxados para o acessório rotativo 12 Nunca pouse a ferramenta antes do acessório parar por completo O acessório rotativo pode apanhar a superfície e f...

Page 46: ...te na peça de trabalho Deixe o disco atingir a velocidade máxima e reentre cuidadosamente no corte O disco pode empenar subir ou recuar se a ferramenta for reiniciada na peça de trabalho e Fixe os painéis ou qualquer peça de trabalho demasiado grande para minimizar o risco da roda bater e recuar As peças de trabalho de grandes dimensões tendem a abater sob o seu próprio peso Os suportes devem ser ...

Page 47: ...avanca de interruptor para o bloquear Para desligar a ferramenta prima a parte de trás da alavanca de interruptor depois mova o para a posição O desligada MONTAGEM PRECAUÇÃO Certifique se sempre de que a ferramenta está desligada no interruptor e da tomada antes de efectuar qualquer trabalho na mesma Instalar a pega lateral Fig 3 PRECAUÇÃO Certifique se sempre de que a pega lateral está bem instal...

Page 48: ...uncionamento com disco de corte abrasivo diamantado acessório opcional Fig 10 A direcção para montar a porca de bloqueio e a flange interna varia conforme a espessura do disco Consulte a tabela abaixo Fig 11 AVISO Quando usar um disco de corte abrasivo disco de diamante use apenas a protecção do disco especial concebida para utilizar com discos de corte Nos países europeus ao utilizar um disco de ...

Page 49: ...trabalho afiar à superfície Emissão de vibração ah AG 8 5 m s2 Incerteza K 1 5 m s2 Modo de trabalho lixação excêntrica Emissão de vibração ah DS 2 5 m s2 ou menos Incerteza K 1 5 m s2 ENG902 1 O valor da emissão de vibração declarado foi medido de acordo com o método de teste padrão e pode ser utilizado para comparar uma ferramenta com outra O valor da emissão de vibração declarado pode também se...

Page 50: ...er kan det medføre elektrisk stød brand og eller alvorlig personskade Gem alle advarsler og instruktioner til senere reference SIKKERHEDSADVARSLER FOR VINKELSLIBER GEB033 7 Fælles sikkerhedsadvarsler for afslibning sandslibning trådbørstning og vinkelslibning 1 Denne maskine er beregnet til brug som afsliber sandsliber trådbørste eller vinkelsliber Læs alle sikkerhedsadvarsler instruktioner illust...

Page 51: ...terende tilbehør kan gribe fat i overfladen og trække i maskinen så du mister kontrollen 13 Lad ikke maskinen køre mens du bærer den ved siden Hvis dit tøj kommer i kontakt med det roterende tilbehør kan det gribe fat i tøjet og trække tilbehøret ind i kroppen på dig 14 Rengør regelmæssigt maskinens ventilationsåbninger Motorventilatoren trækker støvet ind i kabinettet og koncentration af forstøve...

Page 52: ...ke kan se Den fremstikkende skive kan skære i gas eller vandrør elektriske kabler eller genstande der kan forårsage tilbageslag Specifikke sikkerhedsadvarsler for sandslibning a Anvend ikke for stort sandpapir Følg producentens anbefalinger ved valg af sandpapir Større sandpapir der stikker ud over sandpladen kan skære i personer og sidde fast forårsage slid på disken eller tilbageslag Specifikke ...

Page 53: ... benytte den særlige beskyttelsesskærm der er beregnet til brug med slibeskiver I europæiske lande kan den almindelige beskyttelsesskærm anvendes ved brug af en diamantskive Montér beskyttelsesskærmen så fremspringet på båndet på skærmen er justeret med mærket på kuglelejeboksen Roter derefter beskyttelsesskærmen hen på en sådan vinkel at den kan beskytte operatøren i henhold til arbejdet Sørg for...

Page 54: ...Skift aldrig skivens vinkel under betjeningen Hvis der øves tryk fra siden på vinkelslibeskiven f eks ved afslibning kan skiven revne eller brække hvilket kan medføre alvorlig personskade En diamantskive skal anvendes vinkelret på det materiale der skæres VEDLIGEHOLDELSE FORSIGTIG Sørg altid for at værktøjet er slukket og at stikket er taget ud før du udfører inspektion eller vedligeholdelse Brug ...

Page 55: ... maskinen bruges til andre formål vil vibrationsemissionsværdien muligvis være en anden ADVARSEL Vibrationsemissionen under den faktiske brug af maskinen kan afvige fra den opgivne emissionsværdi afhængigt af den måde maskinen anvendes på Sørg for at bestemme sikkerhedsforanstaltninger for beskyttelse af operatøren som er baseret på en eksponeringsvurdering for brug under faktiske forhold hvor all...

Page 56: ...νοφασικό ρεύμα Τα εργαλεία αυτά διαθέτουν διπλή μόνωση και συνεπώς μπορούν να συνδεθούν με πρίζες χωρίς γείωση Γενικές Προειδοποιήσεις Ασφαλείας Του Ηλεκτρικού Εργαλείου GEA010 1 ΠΡΟΕΙΔΟΠΟΙΗΣΗ Διαβάστε όλες τις προειδοποιήσεις ασφαλείας και όλες τις οδηγίες Αν δεν ακολουθήσετε όλες τις προειδοποιήσεις και τις οδηγίες υπάρχει κίνδυνος ηλεκτροπληξίας πυρκαγιάς ή και σοβαρού τραυματισμού Φυλάξτε όλες...

Page 57: ...ητο να φοράτε προσωπίδα κατά της σκόνης ωτοασπίδες γάντια και φόρμα συνεργείου που έχουν τη δυνατότητα να σταματούν την κίνηση μικρών θραυσμάτων που προέρχονται από τη λείανση ή το τεμάχιο εργασίας Ο προστατευτικός εξοπλισμός για τα μάτια πρέπει να έχει τη δυνατότητα να σταματά την κίνηση των εκτινασσόμενων θραυσμάτων που δημιουργούνται από τις διάφορες εργασίες Η προσωπίδα κατά της σκόνης ή ο ανα...

Page 58: ...κό εργαλείο και να τοποθετηθεί ώστε να παρέχει μέγιστη ασφάλεια με τρόπο ώστε ο χειριστής να είναι εκτεθειμένος σε όσο το δυνατό μικρότερο μέρος του τροχού Το προστατευτικό βοηθά στην προστασία του χειριστή από σπασμένα τμήματα του τροχού ακούσια επαφή με τον τροχό και από τους σπινθήρες που μπορούν να προκαλέσουν ανάφλεξη του ρουχισμού d Πρέπει να χρησιμοποιείτε τους τροχούς μόνο για τις συνιστώμ...

Page 59: ...φήνετε να λειτουργεί για λίγη ώρα Να προσέχετε για κραδασμούς ή κινήσεις που θα μπορούσαν να υποδείξουν κακή τοποθέτηση ή κακή ισορρόπηση του τροχού 22 Να χρησιμοποιείτε την καθορισμένη επιφάνεια του τροχού για την εκτέλεση του τροχίσματος 23 Μην αφήνετε το εργαλείο σε λειτουργία Το εργαλείο πρέπει να βρίσκεται σε λειτουργία μόνο όταν το κρατάτε 24 Μην αγγίζετε το τεμάχιο εργασίας αμέσως μετά τη λ...

Page 60: ...αλείο με προστατευτικό του τροχού που ασφαλίζει με μοχλό Εικ 5 και 6 Ξεσφίξετε το μοχλό στο προστατευτικό του τροχού αφότου ξεσφίξετε τη βίδα Τοποθετήστε το προστατευτικό τροχού με τρόπο ώστε η προεξοχή στη ζώνη προστατευτικού τροχού να είναι ευθυγραμμισμένη με την εγκοπή στο κιβώτιο τριβέων Στη συνέχεια περιστρέψετε το προστατευτικό του τροχού στη θέση που δείχνεται στην εικόνα Σφίξετε το μοχλό γ...

Page 61: ...ή μπορεί ο τροχός να αναπηδήσει ή να κλωτσήσει Μην αλλάζετε ποτέ τη γωνία του τροχού κατά τη διάρκεια εργασιών κοπής Αν ασκείτε πλευρική πίεση στον τροχό κοπής όπως και στο τρόχισμα ο τροχός θα ραγίσει και θα σπάσει προκαλώντας σοβαρό προσωπικό τραυματισμό Πρέπει να χειρίζεστε το διαμαντένιο τροχό κατακόρυφα ως προς το υλικό που πρόκειται να κοπεί ΣΥΝΤΗΡΗΣΗ ΠΡΟΣΟΧΗ Να βεβαιώνεστε πάντοτε ότι το ερ...

Page 62: ...σης να χρησιμοποιηθεί για μια προκαταρκτική αξιολόγηση της έκθεσης στους κραδασμούς Η δηλωθείσα τιμή των παραγομένων κραδασμών χρησιμοποιείται για τις κύριες χρήσεις του ηλεκτρικού εργαλείου Ωστόσο εάν το ηλεκτρικό εργαλείο χρησιμοποιηθεί για άλλες εφαρμογές η τιμή των παραγόμενων κραδασμών μπορεί να είναι διαφορετική ΠΡΟΕΙΔΟΠΟΙΗΣΗ Η εκπομπή κραδασμών κατά τη διάρκεια της πραγματικής χρήσης του ηλ...

Page 63: ...63 ...
Page 64: ...Makita Jan Baptist Vinkstraat 2 3070 Belgium Makita Corporation Anjo Aichi Japan 884853H990 www makita com ALA ...

Reviews: