background image

Summary of Contents for ELECTRIC BRAKE 6094DW

Page 1: ... 100 243 mm x 58 mm x 262 mm 1 6 kg 7132 x 2 118 I 115164 I Rimin I R 4 I 19 112 x 2 114 x 10 5116 I 13 5 lbsl Battery Cartridge 9000 1 Model DC9100 Fast charger Dimensions IL x W x HI Net I weight A C only D C I 145 mm x 80 mm x 63 mm 0 8 kg I l H r I 5 0 H z 6 0 H z I 9 6 V 15314 x 3 118 x 2 112 I 1 8 Ibs Manufacturer reserves the right to change specifications without notice Note Specifications...

Page 2: ... job of a heavy duty tool Don t use tool for purpose not intended DRESS PROPERLY Don t wear loose clothing or jewelry They can be caught in moving parts Rubber gloves and non skid footwear are recommended when working outdoors Wear protective hair covering to contain long hair USE SAFETY GLASSES Also use face or dust mask if cutting operation is dusty DON T ABUSE CORD Never carry tool by cord or y...

Page 3: ...r conditions that may affect its operation A guard or other part that is damaged should be properly repaired or replaced by an authorized serv ice center unless otherwise indicated elsewhere in this instruction manual Have defective switches replaced by authorized service center Don t use tool if switch does not turn it on and off 19 GUARD AGAINST ELECTRIC SHOCK Prevent body contact with grounded ...

Page 4: ...e of improper extension cord could result in a risk of fire and electric shock If extension cord must be used make sure a That pins on plug of extension cord are the same number size and shape b That extension cord is properly wired and in good electrical condition and c That wire size is at least as large as the one specified in the table below TABLE 1 RECOMMENDED MINIMUM AWG SIZE FOR EXTENSION C...

Page 5: ...o not incinerate the Battery Cartridge even if it is severely damaged or is completely worn out The battery cartridge can explode in a fire as nails coins etc ADDITIONAL SAFETY RULES 1 Be aware that this tool is always in an operating condition because it does 2 Always be sure you have a firm footing 3 Hold the tool firmly 4 Keep hands away from rotating parts 5 When drilling into walls floors or ...

Page 6: ... that it rests on the charger port floor Press the switch button and check to see that the charging light comes on When it goes out you may remove the fully charged battery cartridge After charging unplug the charger from the power source CAUTION 0 Your new battery cartridge is not charged You will need to charge it before use 0 Do not leave the switch button pressed in with tape etc or the circui...

Page 7: ...o the sleeve the sleeve will not return to its original position and the bit will not be secured In this case try re inserting the bit according to the instructionsabove To removethe bit slide the sleeve toward the motor and pull the bit out firmly Holdingtool Hold the tool as shown in the figure When drilling a large diameter hole hold the tool firmly with both hands CAUTION Before inserting the ...

Page 8: ...in six stages by turning the adjusting ring so that the pointer on the adjusting ring points to a number on the tool body The fastening torque is minimum when the pointer points to the number 1 and maximum when it points to the 8 marking The clutch will slip a t varying torque levels when the pointer is set at the numbers 1 to 5 The clutch is designed not to slip a t the 8 marking Adjusting ring P...

Page 9: ...at you wish to use Make sure that the driver bit is inserted straight in the screw head or the screw and or When driving wood screws predrill pilot i l diameter of I Recommended Size bit may be damaged of pilot hole mm 2 0 2 2 5 64 3 32 2 2 2 5 2 5 2 8 3 32 3 32 3132 7 64 2 9 3 2 7 64 1 8 5 5 7 32 I 3 3 3 6 I1 18 9 64 5 1 13 64 3 6 3 9 9 64 5 32 Overloadprotector The overload protector automatical...

Page 10: ...Wood screws I 3 5 mm x 20 mm 1 8 x 3 4 I 4 5 mm x 20 mm W 1 6 x 3 4 Medium hardwood I 400 screws 90 screws 60screws 5 1 mm x 35 mm 3 16 x 1 3 8 5 5 mm x 50 mm 7 32 x 2 500 screws 400 Rlmin 10 ...

Page 11: ...he battery cartridge is removed before attempting to perform inspection or maintenance To maintain product SAFETY and RELlABlLITY reparis maintenance or adjustment should be performed by Makita Authorized or Factory Service Centers always using Makita replacement parts 11 ...

Page 12: ...ries or attachments should be used only in the proper and intended manner Size PhilIips 2 3 Slotted 5F 7F Part No 7842144A 784215 0A 7840104A 784011 0A 0 12 V Fast charger Model DC9012 0 Drill chuck S10 Part No 763061 8 oChuck key SlO Part No 763412 5 0 Fast charger Model DC9100 0 Battery cartridge 9000 Part No 632007 4 0 Steel carryingcase Part No 181606 4 0 Battery holster Holster holds extra ba...

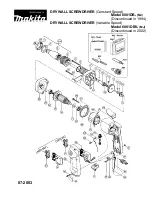
Page 13: ...Dec 19 86 EN CORDLESS SCREWDRIVER Model 60941 Note The switch and other part configurations may differ from country to country 13 ...

Page 14: ...000LLB Stop Ring E 9 Compression Spring 10 Thin Washer 10 Spur Gear 78 Ring 16 Spur Gear 93 Thin Washer 10 Compression Spring 10 Flat Washer 5 Plane Bearing 5 DC Motor 9 6 V Switch 1 6 2 2 3 1 4 2 5 1 6 2 I 1 8 1 9 1 1 1 1 1 1 1 1 1 1 1 1 1 1 1 1 1 Retaining Ring S 6 FIR Washer 14 Ball Bearing 626LL8 Flat Washer 6 Spur Gear 89 Steel 8811 4 8 Clutch Cam Conical Compression Spring 16 21 P 3 Ring 8 D...

Page 15: ...sed misused or improperly maintained e alterations have been made to the tool IN NO EVENT SHALL MAKITA BE LIABLE FOR ANY INDIRECT INCIDENTAL OR CON SEQUENTIAL DAMAGES FROM THE SALE OR USE OF THE PRODUCT THIS DISCLAIMER APPLIESBOTH DURING AND AFTER THE TERM OF THIS WARRANTY MAKITA DISCLAIMS LIABILITY FOR ANY IMPLIED WARRANTIES INCLUDING IMPLIED WARRANTIES OF MERCHANTABILITY AND FITNESS FOR A SPECIF...

Reviews: