background image

___ 

Reparaturanleitung PS-4600 / PS-5000 

       13 

Repair Manual PS-32


Installing the clutch 

Install the clutch with the arrow marking point 
outside. 
Torque: 35 ± 2.5 Nm 

CAUTION: Before installing the clutch, 
disassemble the starter (see chap. 06), in 
order to prevent damage to the starting 
catches.


04  CLUTCH


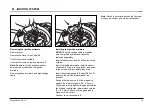
Inserting the flyweights 

Hook the springs as shown in the illustration. 
The press the flyweights onto the guide. To do 
this, first push on one flyweight, then put on 
the second flyweight. 
Press the flyweights all the way onto the 
guide. 

CAUTION: Note the position of the springs. 
Do not replace springs individually! If a 
spring breaks or is fatigued, all two 
springs must be replaced.

The illustration shows the inside of the clutch.

Summary of Contents for DOLMAR PS-32C

Page 1: ...REPAIR MANUAL EA3201S35B PS 32C ...

Page 2: ...7 01 Sprocket guard Chain tensioning system 8 02 Clutch drum with chain sprocket 9 03 Chain brake 10 11 04 Clutch 12 13 05 Oil pump 14 06 Starter 15 07 Ignition system trouble shooting 16 07 Ignition system 17 18 08 Carburetor 19 20 09 Vibration damper 22 10 Tank 23 24 11 Cylinder Piston 25 26 12 Torques 27 CONTENTS ...

Page 3: ...park plug Typ Fuel consumption at max load per ISO 7293 kg h 0 68 Specific consumption at max load per ISO 7293 g kWh 500 Fuel tank capacity l 0 4 Chain oil tank capacity l 0 28 Mixture ratio fuel two stroke oil when using DOLMAR oil 50 1 100 1 HP 100 when using Aspen Alkalyt two stroke fuel 50 1 2 when using other oils 50 1 quality grade JASO FC or ISO EGD Chain brake engages manually or in case ...

Page 4: ...gage Spring in starter broken broken parts inside the engine Engine speed gets stuck Multiple systems Engine speed about 4 500 6 000 rpm Carburetor too lean Bleed air at cylinder and or rubber intake hose Fuel line bent throttle link stuck Warm engine won t start Carburetor Fuel tank is filled Ignition spark Wrong carburetor adjustment Flooded from choke use no half throttle function Piston ring w...

Page 5: ...embly mandrel for tapping out the flywheel without damage to the crankshaft thread 944 500 880 3 Setting gauge Gauge for measuring the gap between flywheel and armature 944 500 891 4 Torque wrench 3 8 Drive socket 944 500 864 Bit 152 mm 944 500 865 Bit 49 mm 944 500 866 Torque wrench 3 8 Drive 950 230 000 5 Piston stop wedge Wedge for blocking the engine through the exhaust port 944 602 001 ...

Page 6: ...the centrifugal clutch 944 500 695 7 Tachometer Electronic tachometer for measuring the engine speed of 2 and 4 stroke engines 950 233 220 8 Needle nose pliers Various assembly disassembly tasks 944 603 400 9 Disassembly hook Removal installation Brake band spring 950 237 000 10 Over underpressure pump For checking sealing of radial rings and gaskets 957 004 001 ...

Page 7: ...S 32 11 12 13 14 M4 x 20 00 SPECIAL TOOLS 11 Sealing plate For sealing intake side 944 603 040 12 Sealing plate For sealing exhaust side 944 603 140 13 Ignition tester Checking the ignition 950 233 230 14 Mounting tool Bearings on crankshaft 944 500 903 ...

Page 8: ... off the front bar pin 1 Chain tensioner function An angled worm drive converts the turns of the adjustment screw 2 to forward or backward motion of the tensioning pin 3 If necessary turn adjusting screw 2 clockwise until the fastening screw 4 is accessible Unscrew the fastening screw and pull the chain tensioner up and out Assembly Grease spindle and worm gear with multi purpose grease 944 360 00...

Page 9: ...the clutch drum can be removed Clutch drum with sprocket and needle bearing Check the chain sprocket 1 for damage and wear Check the clutch drum needle bearing for wear and damage Assembly the bearing with multi purpose high performance grease 944 360 000 Note If using a new clutch drum lubricate the needle bearing Check the inside of the clutch drum for damage and wear Replace the clutch drum if ...

Page 10: ...1 3 4 5 03 CHAIN BRAKE Removing the brake band CAUTION Wear protective gloves to prevent cuts Remove the sprocket guard bar and chain Remove the clutch drum see Chapter 02 Push the hand guard forward to engage the chain brake This tensions the brake band spring Unscrew screws 1 and remove the cover 2 Lift the brake band 3 upward and turn it out of the disengagement mechanism 4 ...

Page 11: ...ove the muffler See Chap 04 Disengage the fan side handguard arm towards the muffler 6 7 8 9 10 10 03 CHAIN BRAKE Pull the handguard off pin 8 using light back and forth motions Note When reassembling always use a new circlip 6 927 304 000 Install the handguard in the reverse order Make sure that the handguard guide 10 is not unhooked If necessary push it back into position with a screwdriver abou...

Page 12: ... thread to loosen and remove the clutch Remove the guide washer and spacer washer The flyweights can now be pushed off the guide axially in one direction 1 2 3 4 5 04 CLUTCH Disassembly CAUTION To prevent cuts wear protective gloves Remove the sprocket guard bar and chain Pull the handguard towards the front handle to release the chain brake if necessary Remove the clutch drum see Chapter 02 Remov...

Page 13: ... to the starting catches 04 CLUTCH Inserting the flyweights Hook the springs as shown in the illustration The press the flyweights onto the guide To do this first push on one flyweight then put on the second flyweight Press the flyweights all the way onto the guide CAUTION Note the position of the springs Do not replace springs individually If a spring breaks or is fatigued all two springs must be...

Page 14: ...s in a new valve about 2 mm deep under the housing surface Make sure that the ventilation channel 10 is free of deposits Clean if necessary 1 2 A 4 3 1 2 3 5 6 8 7 9 10 05 OIL PUMP General The oil pump is driven by the drive worm gear 1 on the crankshaft This gear engages the oil pump piston 3 Consequently the oil pump operates only when the engine is on The oil flow rate can be adjusted with adju...

Page 15: ...rew 5 Tension the return spring clockwise Turn the return spring about 6 turns with the aid of the cable which should be pressed into the gap in the cable drum Place the air guide 3 in the fan housing and make sure the three recesses 4 engage Pull the opening 10 on the fan housing over the pin on the hood Position the fan housing correctly on the saw press against it slightly and pull the starter ...

Page 16: ... air filter check carburetor adjustment Use DOLMAR high performance two stroke oil Adjust spark gap Wash spark plug in acetone Do not sandblast If necessary replace spark plug Eliminate cause wrong carburetor setting too much oil in fuel frequent short operations Replace spark plug and check ignition module for corrosion if necessary replace Has the defect been remedied Check radial play of drive ...

Page 17: ...the mandrel and the flywheel Hold the machine in one hand or place on a soft surface and knock the flywheel loose with a tap on the mandrel CAUTION The cone of the crankshaft must always be degreased before assembly Torque nut 20 5 Nm 07 IGNITION SYSTEM Removing the flywheel Remove starter see chap 06 Block the piston see chap 04 Loosen the nut in the direction of the arrow and remove it along wit...

Page 18: ... and cannot be replaced separately Insert plastic pieces into the bolt holes on the cylinder Insert the ignition armature install the short circuit cable 1 under the top screw and screw in the screws until just before they stop Insert the setting gauge 4 Kapitel 00 Pos 3 between the ignition armature and the fylwheel Position the flywheel so that the magnet is against the armature gap 0 25 0 3 mm ...

Page 19: ...s ON 3 2 1 4 Assembly Bring piston to top dead centre and position the opening on the piston ring to the piston ring lock Hold the piston firmly with one hand and carefully push the piston over it 11 08 CARBURETOR Removing the intake manifold and carburetor CAUTION Completely empty the fuel tank before disassembling the carburetor Remove cover Move combination switch 1 to safety position Unscrew 2...

Page 20: ... 7 under the holder 6 Install the contact spring with short circuit cable ON 8 9 6 7 10 11 12 Tighten the screws 4 by hand evenly alternating crosswise and then tighten to the right torque 10 0 5 Nm likewise alternating crosswise Screw in screws 9 Check the cylinder side annular spring on the flange for correct seating Note Before inserting the carburetor make sure that the carburetor mounting fla...

Page 21: ...If valve flaps are bent replace the diaphragm and gasket Check control diaphragm If the control diaphragm is bent hardened or torn or if there is visible wear on the button 8 If the diaphragm is not flexible replace the diaphragm and gasket 6 5 7 4 8 3 2 1 08 CARBURETOR Control lever Control lever Correctly Control lever Too high Control lever Too low Base Setting L 2 H 4 NOTE Adjust the carbureto...

Page 22: ...Spring 3 Remove starter housing see chap 06 Loosen and remove screws with Torx screwdriver chap 00 pos 1 Pull out damping spring Spring 4 Loosen and remove screws with Torx screwdriver chap 00 pos 1 Remove damping spring Remove spring bush Note During assembly insert spring retainer between the cushion spring and the cylinder Screw the metric thread screw into the cylinder 3 4 1 2 09 VIBRATION DAM...

Page 23: ... in the throttle lever as shown below 1 2 4 3 10 TANK Grip mechanism Unscrew screw 1 and pull the lower grip half slightly up and to the rear in the area of the screw hole Note When disassembling the throttle lever the following must be performed Remove cover Unscrew all middle screws of the damping springs Chapter 09 Remove tubular handle The throttle lever has a slot 2 at the hinge Pull the tank...

Page 24: ...lightly counter clockwise out of the retainer and then carefully lift it out with a sharp flat point screwdriver Note Do not lever against the line connections as this can break them off Use always a new fuel nipple 5 8 6 7 10 TANK Removal Unscrew all middle screws of the damping springs Chapter 09 Also remove the damping spring 2 Remove front handle Using needle nose pliers carefully pull the fue...

Page 25: ...ankcase Crack in cylinder Spark plug leaking Rubber intake on cylinder leaking Defective pulse line Note The engine must be removed in order to localize leaks Remove clutch See Chap 04 Remove flywheel See Chap 07 Remove engine See Chap 08 Remove the bottom half of the crankcase mark position and press the bushings out of the engine holder Mount the bottom half of the crankcase to the cylinder with...

Page 26: ...e assembly wet the cylinder path piston and needle bearing with oil Use a new crankcase gasket and new seal rings If the engine was removed to localize leaks insert the bushings base to cylinder into the engine housing Insert the bottom half of the crankcase Position the crankshaft in the bottom half Further procedure as described in Chap 08 Carburetor under Assembly When installing the ball beari...

Page 27: ...der Flywheel nut fastening Handle to tank Spark plug Contact spring screw 913 350 404 913 455 164 908 005 165 165 888 030 165 888 040 165 888 020 165 180 200 165 888 130 920 308 024 913 455 164 965 603 040 165 888 120 5 x 40 20 Torx Schlitz 5 5 x 16 Torx M 5 x 16 Torx M 5 x 16 Torx M 5 x 40 Torx M 4 x 40 Torx M 10 x 1L M 5 x 20 Torx 6KT nut M 8 x 1 5 5 x 16 Torx SW 16 Phillips head M 3 x 10 4 x 2 ...

Page 28: ...___ Reparaturanleitung PS 4600 PS 5000 28 Repair Manual PS 32 DOLMAR GmbH Postfach 70 04 20 D 22004 Hamburg Germany ...

Reviews: