background image

7

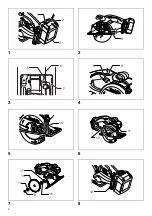
Hex wrench storage (Fig. 8)

When not in use, store the hex wrench as shown in the 
figure to keep it from being lost.

OPERATION

CAUTION:

• Always insert the battery cartridge all the way until it 

locks in place. If you can see the red part on the upper 
side of the button, it is not locked completely. Insert it 
fully until the red part cannot be seen. If not, it may 
accidentally fall out of the tool, causing injury to you or 
someone around you.

• Be sure to move the tool forward in a straight line 

gently. Forcing or twisting the tool will result in 
overheating the motor and dangerous kickback, 
possibly causing severe injury.

• If the tool is operated continuously until the battery 

cartridge has discharged, allow the tool to rest for 
15 minutes before proceeding with a fresh battery.

• Never twist or force the tool in the cut. This may cause 

motor overload and/or a dangerous kickback, resulting 
in serious injury to the operator.

• Always wear eye protection or goggle before operation. 

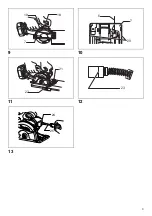
(Fig. 9)

Hold the tool firmly. The tool is provided with both a front 
grip and rear handle. Use both to best grasp the tool. If 
both hands are holding the tool, they cannot be cut by the 
blade. Set the base on the workpiece to be cut without the 
blade making any contact. Then turn the tool on and wait 
until the blade attains full speed. Now simply move the 
tool forward over the workpiece surface, keeping it flat 
and advancing smoothly until the cutting is completed. 
To get clean cuts, keep your cutting line straight and your 
speed of advance uniform. If the cut fails to properly follow 
your intended cut line, do not attempt to turn or force the 
tool back to the cut line. Doing so may bind the blade and 
lead to dangerous kickback and possible serious injury. 
Release switch, wait for blade to stop and then withdraw 
tool. Realign tool on new cut line, and start cut again. 
Attempt to avoid positioning which exposes operator to 
chips and particles being ejected from the tool. Use eye 
protection to help avoid injury.
The sight grooves in the base makes it easy to check the 
distance between the front edge of the blade and the 
workpiece whenever the blade is set to the maximum 
depth of cut. 

(Fig. 10)

CAUTION:

• Do not use a deformed or cracked blade. Replace it 

with a new one.

• Do not stack materials when cutting them.
• Do not cut hardened steel, stainless steel, wood, 

plastics, concrete, tile, etc. 

Cut only mild steel and 

aluminum.

• Do not touch the blade, workpiece or cutting chips with 

your bare hand immediately after cutting, they may be 
extremely hot and could burn your skin.

Always use the blades appropriate for your job.


The use of inappropriate blades may cause a poor 
cutting performance and/or present a risk of personal 
injury.

Rip fence (guide rule) (Accessory) 

(Fig. 11)

The handy rip fence allows you to do extra-accurate 
straight cuts. Simply slide the rip fence up snugly against 
the side of the workpiece and secure it in position with the 
screw on the front of the base. It also makes repeated 
cuts of uniform width possible.

MAINTENANCE

CAUTION:

• Always be sure that the tool is switched off and the 

battery cartridge is removed before attempting to 
perform inspection or maintenance.

Inspecting blade

• Check the blade carefully for cracks or damage before 

and after each use. Replace a cracked or damaged 
blade immediately.

• Continuing to use a dull blade may cause a dangerous 

kickback and/or motor overload.
Replace with a new blade as soon as it no longer cuts 
effectively.

• Blades for metal cutter cannot be re-sharpened.

Replacing carbon brushes (Fig. 12)

Remove and check the carbon brushes regularly.
Replace when they wear down to the limit mark. Keep the 
carbon brushes clean and free to slip in the holders.
Both carbon brushes should be replaced at the same 
time. Use only identical carbon brushes.
Use a screwdriver to remove the brush holder caps.
Take out the worn carbon brushes, insert the new ones 
and secure the brush holder caps. 

(Fig. 13)

To maintain product SAFETY and RELIABILITY, repairs, 
any other maintenance or adjustment should be 
performed by Makita Authorized Service Centers, always 
using Makita replacement parts.

ACCESSORIES

CAUTION:

• These accessories or attachments are recommended 

for use with your Makita tool specified in this manual. 
The use of any other accessories or attachments might 
present a risk of injury to persons. Only use accessory 
or attachment for its stated purpose.

If you need any assistance for more details regarding 
these accessories, ask your local Makita Service Center.
• Carbide-tipped blades
• Rip fence (Guide rule)
• Thumb screw M5 x 20
• Compression spring 6
• Hex  wrench  5
• Safety goggle
• Various type of Makita genuine batteries and chargers

Summary of Contents for DCS550ZJ

Page 1: ...ebsanleitung I Sega circolare a batteria per metallo Istruzioni per l uso NL Accu metaal cirkelzaag Gebruiksaanwijzing E Cortadora de metal inalámbrica Manual de instrucciones P Cortador de metal sem fios Manual de instruções DK Ledningsfrit metalskæreværktøj Brugsanvisning GR Κόφτης μετάλλων με μπαταρία Οδηγίες χρήσης BCS550 ...

Page 2: ...2 1 2 3 4 5 6 7 8 1 2 3 4 6 5 7 8 9 10 12 11 13 14 15 16 17 12 ...

Page 3: ...3 9 10 11 12 13 18 19 7 7 6 20 21 22 23 24 25 ...

Page 4: ... of the power tool live and shock the operator 6 When ripping always use a rip fence or straight edge guide This improves the accuracy of cut and reduces the chance for blade binding 7 Always use blades with correct size and shape diamond versus round of arbour holes Blades that do not match the mounting hardware of the tool will run eccentrically causing loss of control 8 Never use damaged or inc...

Page 5: ...f the lower guard spring If the guard and the spring are not operating properly they must be serviced before use Lower guard may operate sluggishly due to damaged parts gummy deposits or a buildup of debris 12 Lower guard should be retracted manually only for special cuts such as plunge cuts and compound cuts Raise lower guard by retracting handle and as soon as blade enters the material the lower...

Page 6: ...KS which can cause personal injury Sighting Fig 3 When cutting align the A position on the front of the base with your cutting line on the workpiece Switch action Fig 4 CAUTION Before inserting the battery cartridge into the tool always check to see that the switch trigger actuates properly and returns to the OFF position when released Do not pull the switch trigger hard without pressing the lock ...

Page 7: ...ace it with a new one Do not stack materials when cutting them Do not cut hardened steel stainless steel wood plastics concrete tile etc Cut only mild steel and aluminum Do not touch the blade workpiece or cutting chips with your bare hand immediately after cutting they may be extremely hot and could burn your skin Always use the blades appropriate for your job The use of inappropriate blades may ...

Page 8: ...ures to protect the operator that are based on an estimation of exposure in the actual conditions of use taking account of all parts of the operating cycle such as the times when the tool is switched off and when it is running idle in addition to the trigger time For European countries only ENH101 13 Declaration of Conformity We Makita Corporation as the responsible manufacturer declare that the f...

Page 9: ...ce stable Il est important que la pièce soit soutenue correctement pour minimiser l exposition du corps les pincements de lame et les pertes de maîtrise 5 Saisissez l outil électrique par ses surfaces de poigne isolées lorsque vous effectuez une opération au cours de laquelle l outil tranchant peut entrer en contact avec des fils cachés Tout contact avec un fil sous tension mettra également sous t...

Page 10: ...r si les réglages de la lame changent pendant la coupe Soyez extrêmement prudent lorsque vous effectuez une coupe en plongée dans un mur déjà posé ou toute autre surface derrière laquelle peuvent se trouver des objets cachés La lame risquerait d accrocher ces objets en dépassant de l autre côté et de causer un choc en retour Pour les coupes en plongée rétractez le carter de protection inférieur à ...

Page 11: ...TIONS Conseils pour assurer la durée de vie optimale de la batterie 1 Rechargez la batterie avant qu elle ne soit complètement épuisée Arrêtez toujours l outil et rechargez la batterie quand vous constatez que la puissance de l outil diminue 2 Ne rechargez jamais une batterie complètement chargée La surcharge réduit la durée de service de la batterie 3 Chargez la batterie alors que la température ...

Page 12: ...ILLES D UNE MONTRE Fig 7 Lorsque vous changez de lame vous devez retirer les copeaux et particules accumulés sur les carters de protection supérieur et inférieur Ce nettoyage ne remplace cependant pas la vérification du bon fonctionnement du carter de protection inférieur avant chaque utilisation Rangement de la clé hexagonale Fig 8 Lorsque vous n utilisez pas la clé hexagonale rangez la comme ind...

Page 13: ...me temps Utilisez uniquement des charbons identiques Retirez les bouchons de porte charbon à l aide d un tournevis Enlevez les charbons usés insérez les neufs et remettez en place les bouchons de porte charbon Fig 13 Pour assurer la SÉCURITÉ et la FIABILITÉ du produit toute réparation et tout travail d entretien ou de réglage doivent être effectués par un Centre de service après vente agréé Makita...

Page 14: ...formes aux directives européennes suivantes 98 37 CE jusqu au 28 décembre 2009 puis à partir du 29 décembre 2009 à la 2006 42 CE et sont produites conformément aux normes ou documents de normalisation suivants EN60745 La documentation technique est disponible auprès de notre représentant en Europe qui est Makita International Europe Ltd Michigan Drive Tongwell Milton Keynes MK15 8JD Angleterre 30 ...

Page 15: ... abstützen um Verletzungen ein Verkanten des Sägeblatts oder den Verlust der Kontrolle möglichst zu vermeiden 5 Halten Sie das Elektrowerkzeug an den isolierten Griffflächen wenn Sie unter Bedingungen arbeiten bei denen das Schneidwerkzeug versteckte Kabel berühren kann Der Kontakt mit einem Strom führenden Kabel leitet diesen an die metallenen Teile des Elektrowerkzeugs weiter und verursacht eine...

Page 16: ...muttern fest angezogen sind Wenn sich während des Sägens das Sägeblatt verschiebt kann dies zum Verkanten oder einem Rückschlag des Sägeblatts führen Seien Sie besonders vorsichtig wenn Sie einen Tauchschnitt in Wänden oder anderen nicht einsehbaren Bereichen ausführen Das vorstehende Sägeblatt kann sonst Gegenstände absägen die einen Rückschlag verursachen können Ziehen Sie bei Tauchschnitten die...

Page 17: ...t werden an denen die Temperatur 50 C 122 F oder höher erreichen kann 7 Selbst wenn der Akkublock schwer beschädigt oder völlig verbraucht ist darf er nicht angezündet werden Der Akkublock kann in den Flammen explodieren 8 Lassen Sie den Akku nicht fallen und vermeiden Sie Schläge gegen den Akku 9 Verwenden Sie keine heruntergefallenen oder gestoßenen Akkus BEWAHREN SIE DIESE ANWEISUNGEN AUF Tipps...

Page 18: ...r oder Ähnliches Die Verwendung solcher Flüssigkeiten beschädigt die Linse MONTAGE ACHTUNG Schalten Sie das Werkzeug stets aus und entfernen Sie den Akkublock bevor Sie Arbeiten am Werkzeug ausführen Montage und Demontage des Sägeblatts Abb 6 ACHTUNG Montieren Sie das Sägeblatt so dass seine Zähne an der Vorderseite der Maschine nach oben zeigen Verwenden Sie nur den mitgelieferten Schraubenschlüs...

Page 19: ...der das Risiko von Verletzungen bergen Parallelanschlag Führungslineal Zubehör Abb 11 Der praktische Parallelanschlag ermöglicht die Ausführung besonders genauer Geradschnitte Schieben Sie den Parallelanschlag einfach satt anliegend gegen die Werkstückkante und sichern Sie ihn mit der Feststellschraube an der Vorderseite des Gleitschuhs Wiederholte Schnitte auf gleicher Breite sind ebenfalls mögli...

Page 20: ...er dass Schutzmaßnahmen für den Bediener getroffen werden die auf den unter den tatsächlichen Arbeitsbedingungen zu erwartenden Belastungen beruhen beziehen Sie alle Bestandteile des Arbeitsablaufs ein also zusätzlich zu den Arbeitszeiten auch Zeiten in denen das Werkzeug ausgeschaltet ist oder ohne Last läuft Nur für europäische Länder ENH101 13 EU Konformitätserklärung Wir Makita Corporation als...

Page 21: ...inimo l eventualità di contatto con il corpo di blocco della lama o di perdita del controllo dell utensile 5 Se vengono eseguite operazioni in cui l utensile da taglio può venire a contatto con fili elettrici nascosti impugnare l utensile stesso per i punti di presa isolati Il contatto con un filo percorso da corrente farà sì che le parti metalliche esposte dell utensile si trovino anch esse sotto...

Page 22: ...erificarsi contraccolpi Prestare particolare attenzione nel caso sia necessario eseguire tagli ad immersione inserendo la lama in una parete esistente o in un altra superficie chiusa Avanzando la parte sporgente della lama potrebbe colpire oggetti non visibili e determinare un contraccolpo Nel caso di tagli ad immersione far rientrare il coprilama inferiore con l apposita maniglia 10 Prima di util...

Page 23: ...a già completamente carica In caso contrario la durata operativa della batteria potrebbe ridursi 3 Caricare la batteria in ambienti con temperatura compresa tra 10 C e 40 C 50 F 104 F Prima di caricare una batteria surriscaldata lasciarla raffreddare DESCRIZIONE FUNZIONALE ATTENZIONE Prima di regolare o controllare le funzioni dell utensile verificare sempre di averlo spento e di aver rimosso la b...

Page 24: ...omunque essere eseguita prima di ogni utilizzo Alloggiamento della chiave esagonale Fig 8 Per evitare di perdere la chiave esagonale quando non la si utilizza collocarla nella posizione illustrata nella figura FUNZIONAMENTO ATTENZIONE Inserire la batteria completamente fino a quando si blocca in posizione con uno scatto Se l area rossa del lato superiore del pulsante è ancora visibile la batteria ...

Page 25: ... cacciavite Estrarre le spazzole di carbone consumate inserire le nuove spazzole e fissare i coperchi dei portaspazzola Fig 13 Per garantire la SICUREZZA e l AFFIDABILITÀ del prodotto le riparazioni e qualsiasi altra operazione di manutenzione o regolazione devono essere eseguite dai centri di assistenza autorizzati Makita utilizzando sempre parti di ricambio Makita ACCESSORI ATTENZIONE L utensile...

Page 26: ...guenti direttive europee 98 37 CE fino al 28 dicembre 2009 e successivamente alla direttiva 2006 42 CE a partire dal 29 dicembre 2009 Sono inoltre prodotti in conformità con gli standard o i documenti standardizzati riportati di seguito EN60745 La documentazione tecnica viene conservata dal rappresentante autorizzato Makita in Europa ovvero Makita International Europe Ltd Michigan Drive Tongwell M...

Page 27: ...ndergrond Het is belangrijk het werkstuk goed te ondersteunen om de kans te minimaliseren dat uw lichaam eraan blootgesteld wordt het zaagblad vastloopt of u de controle over het gereedschap verliest 5 Houd het gereedschap vast aan het geïsoleerde oppervlak van de handgrepen wanneer u werkt op plaatsen waar het zaaggereedschap met verborgen bedrading in aanraking kan komen Door contact met onder s...

Page 28: ...wat leidt tot grote wrijving vastlopen en terugslag De vergrendelhendels voor het instellen van de zaagbladdiepte en verstelhoek moeten vastzitten alvorens te beginnen met zagen Als de instellingen van het zaagblad zich tijdens het zagen wijzigen kan dit leiden tot vastlopen of terugslag Wees extra voorzichtig bij blind zagen in bestaande wanden of op andere plaatsen Wanneer het zaagblad door het ...

Page 29: ... vallen of ergens tegenaan stoot 9 Gebruik een accu die is gevallen of gestoten niet meer BEWAAR DEZE VOORSCHRIFTEN Tips voor een lange levensduur van de accu 1 Laad de accu op voordat deze volledig leeg is Wanneer u merkt dat het gereedschap minder vermogen heeft stopt u met het gebruik ervan en laadt u eerst de accu op 2 Laad nooit een volledig opgeladen accu op Te lang opladen verkort de levens...

Page 30: ...t u vervolgens de inbussleutel om de inbusbout linksom los te draaien Verwijder tenslotte de zeskantbout de buitenflens en het zaagblad Om het zaagblad aan te brengen volgt u de procedure in omgekeerde volgorde ZORG ERVOOR DAT U DE INBUSBOUT RECHTSOM STEVIG VASTDRAAIT zie afb 7 Vergeet niet tijdens het verwisselen van het zaagblad ook de bovenste en onderste beschermkappen te ontdoen van opgehoopt...

Page 31: ...zaagblad door een nieuwe zodra het niet meer effectief zaagt Het zaagblad van de metaalcirkelzaag kan niet worden geslepen De koolborstels vervangen zie afb 12 Verwijder en controleer de koolborstels regelmatig Vervang deze wanneer ze tot aan de slijtgrensmarkering zijn afgesleten Houd de koolborstels schoon en zorg ervoor dat ze vrij kunnen bewegen in de houders Beide koolborstels dienen tegelijk...

Page 32: ...jke fabrikant verklaren dat de volgende Makita machine s Aanduiding van de machine Accu metaal cirkelzaag Modelnr Type BCS550 in serie zijn geproduceerd en Voldoen aan de volgende Europese richtlijnen 98 37 EC tot en met 28 december 2009 en daarna aan 2006 42 EC vanaf 29 december 2009 En zijn gefabriceerd in overeenstemming met de volgende normen of genormaliseerde documenten EN60745 De technische...

Page 33: ...orrectamente para minimizar la exposición del cuerpo el agarrotamiento del disco o la pérdida de control 5 Sujete la herramienta eléctrica por las superficies de agarre aisladas al realizar una operación en que la herramienta de corte pueda entrar en contacto con cables ocultos Si entra en contacto con un cable con corriente las piezas metálicas expuestas de la herramienta eléctrica se cargarán ta...

Page 34: ...roducir agarrotamiento y contragolpes Tenga especial cuidado cuando realice un corte de inmersión en paredes u otras áreas ciegas El disco puede cortar objetos que pueden provocar contragolpes Para cortes de inmersión retraiga el protector inferior utilizando el mango para retraerlo 10 Compruebe si el protector inferior está bien cerrado antes de cada uso No utilice la herramienta si el protector ...

Page 35: ... la vida útil de la batería 3 Cargue el cartucho de la batería a una temperatura ambiente que oscile entre 10 C y 40 C 50 F 104 F Antes de cargar un cartucho de batería caliente deje que se enfríe DESCRIPCIÓN DEL FUNCIONAMIENTO PRECAUCIÓN Asegúrese siempre de apagar la herramienta y extraer el cartucho de la batería antes de intentar realizar cualquier tipo de ajuste o comprobación en ella Instala...

Page 36: ... disco No obstante tales esfuerzos no sustituyen la necesidad de comprobar el funcionamiento del protector inferior antes de cada uso Almacenamiento de la llave Allen Fig 8 Cuando no la utilice guarde la llave Allen como se muestra en la figura para evitar que se pierda MANEJO PRECAUCIÓN Inserte siempre el cartucho de la batería hasta que quede completamente sujeto Si puede ver la parte roja de la...

Page 37: ...extraer las tapas de los portaescobillas Saque las escobillas de carbón desgastadas introduzca las nuevas y cierre las tapas de los portaescobillas Fig 13 Para conservar la SEGURIDAD y la FIABILIDAD del producto los trabajos de reparación y otros trabajos de mantenimiento y ajuste deberán ser realizados en centros de servicio autorizados de Makita utilizando siempre repuestos Makita ACCESORIOS PRE...

Page 38: ...con las siguientes Directivas europeas 98 37 EC hasta el 28 de diciembre de 2009 y después con 2006 42 EC desde el 29 de diciembre de 2009 Y se han fabricado de acuerdo con los siguientes estándares o documentos estandarizados EN60745 La documentación técnica la conserva nuestro representante autorizado en Europa que es Makita International Europe Ltd Michigan Drive Tongwell Milton Keynes MK15 8JD...

Page 39: ... que acessórios de corte possam entrar em contacto com fios eléctricos ocultos tenha o cuidado de tocar apenas nas superfícies isoladas desses acessórios O contacto com um fio eléctrico ligado à corrente pode electrificar as peças de metal da ferramenta e causar um choque 6 Quando escarificar utilize sempre uma vedação para escarificação ou guia de margem direita Isto melhora a precisão do corte e...

Page 40: ...ilizar a respectiva alavanca 10 Verifique se a protecção inferior fecha correctamente antes de cada utilização Não accione a ferramenta se a protecção inferior não se mover livremente e não se fechar imediatamente Nunca prenda ou amarre a protecção inferior na posição aberta Se a ferramenta cair acidentalmente a protecção inferior pode estar dobrada Levante a protecção inferior com a alavanca de r...

Page 41: ...O Certifique se sempre de que a ferramenta está desligada e que a bateria foi removida antes de proceder a ajustes ou testar acessórios Inserir ou retirar a bateria Fig 1 Sempre que for inserir ou remover a bateria desligue a ferramenta Para remover a bateria puxe a para fora ao mesmo tempo que desliza o botão de segurança no lado do cartucho Para inserir a bateria alinhe a respectiva saliência co...

Page 42: ...esteja perto de si Certifique se de que move suavemente a ferramenta para a frente numa linha recta Forçar ou torcer a ferramenta resultará num sobreaquecimento do motor e recuos perigosos causando possivelmente ferimentos graves Se mantiver a ferramenta a funcionar ininterruptamente até a bateria se gastar completamente deixe a em repouso durante 15 minutos antes de substituir a bateria Nunca tor...

Page 43: ...l Lâminas com ponta de carbido Vedação para escarificação guia paralela Parafuso M5 x 20 Mola de compressão 6 Chave sextavada 5 Óculos protectores Vários tipos de baterias e carregadores Makita genuínos Ruído ENG102 3 Os níveis acústicos ponderados A típicos foram determinados segundo a EN60745 Nível de pressão sonora LpA 101 dB A Nível de potência sonora LWA 112 dB A Imprecisão K 3 dB A Use prote...

Page 44: ... skjulte ledninger Ved kontakt med strømførende ledninger bliver udsatte metaldele på maskinen også strømførende hvorved brugeren kan få elektrisk stød 6 Ved flæksavning skal der altid benyttes et parallelanslag eller en lige kantstøtte Derved bliver snittet mere nøjagtigt og risikoen for at klingen binder reduceres 7 Brug altid klinger med den korrekte størrelse og form kantede eller runde af aks...

Page 45: ...an den nederste klingebeskytter blive bøjet Løft den nederste klingebeskytter med tilbagetrækningshåndtaget og sørg for at den bevæger sig frit og ikke berører klingen eller andre dele uanset skæringsvinkel og dybde For at kontrollere den nederste klingebeskytter skal De åbne klingebeskytteren manuelt og derefter frigive beskytteren og kontrollere at den lukkes Kontroller også at tilbagetrækningsh...

Page 46: ... del øverst på knappen er synlig er batteripakken ikke låst helt fast Sæt den helt ind indtil den røde del ikke er synlig Ellers kan den falde ud af værktøjet og skade Dem eller andre personer i nærheden Brug ikke magt ved montering af batteripakken Hvis den ikke glider let ind er den ikke indsat korrekt Indstilling af skæredybde Fig 2 FORSIGTIG Skru låsearmen godt fast når skæredybden er indstill...

Page 47: ...flyttes jævnt frem indtil skæringen er færdig De opnår rene snit ved at holde skærelinjen lige og flytte værktøjet med jævn hastighed Forsøg ikke at dreje eller tvinge værktøjet tilbage til skæringslinjen hvis snittet ikke følger den ønskede skæringslinje Hvis De gør dette kan klingen komme i klemme hvilket kan medføre farligt tilbageslag med risiko for alvorlig personskade Slip kontakten vent til...

Page 48: ... er målt i overensstemmelse med standardtestmetoden og kan bruges til at sammenligne et værktøj med et andet Den opgivne vibrationsemissionsværdi kan muligvis også bruges til en indledende eksponeringsvurdering ADVARSEL Vibrationsemissionen under den faktiske brug af maskinen kan afvige fra den opgivne emissionsværdi afhængigt af den måde maskinen anvendes på Sørg for at bestemme sikkerhedsforanst...

Page 49: ...γασίας σε μια σταθερή βάση Είναι σημαντικό να στηρίζετε το τεμάχιο σωστά για να ελαχιστοποιείται η έκθεση του σώματος η πιθανότητα εμπόδισης της κίνησης του δίσκου από κάποιο αντικείμενο και η απώλεια ελέγχου 5 Να κρατάτε το ηλεκτρικό εργαλείο από τις λαβές με μόνωση όταν εκτελείτε εργασίες κατά τις οποίες το κοπτικό εργαλείο μπορεί να έρθει σε επαφή με κρυμμένα καλώδια Αν το εργαλείο έρθει σε επα...

Page 50: ...ίναι κατεστραμμένοι Οι δίσκοι που δεν είναι κοφτεροί ή που δεν έχουν ρυθμιστεί σωστά δημιουργούν στενές εγκοπές και προκαλούν μεγάλη τριβή εμπόδιση της κίνησης του δίσκου και κλότσημα Οι μοχλοί ασφάλισης του βάθους δίσκου και της ρύθμισης λοξοτομής πρέπει να είναι σφιχτοί και ασφαλισμένοι πριν από το κόψιμο Αν η ρύθμιση του δίσκου μετακινηθεί κατά το πριόνισμα μπορεί να εμποδιστεί η κίνηση του δίσ...

Page 51: ... ή είναι εντελώς φθαρμένη Η μπαταρία μπορεί να εκραγεί σε φωτιά 8 Να προσέχετε να μη σας πέσει η μπαταρία και να μη συγκρουστεί με κάποιο αντικείμενο 9 Μην χρησιμοποιήσετε μια μπαταρία που έχει πέσει κάτω ή έχει χτυπηθεί ΦΥΛΑΞΤΕ ΑΥΤΕΣ ΤΙΣ ΟΔΗΓΙΕΣ Συμβουλές για τη διατήρηση της μέγιστης ζωής της μπαταρίας 1 Να φορτίζετε την μπαταρία πριν αποφορτιστεί εντελώς Πάντοτε να διακόπτετε τη λειτουργία του ...

Page 52: ...δίσκος και χρησιμοποιήστε το κλειδί για να χαλαρώστε το εξαγωνικό μπουλόνι γυρίζοντάς το αριστερόστροφα Κατόπιν αφαιρέστε το εξαγωνικό μπουλόνι την εξωτερική φλάντζα και το δίσκο Για να τοποθετήσετε το δίσκο ακολουθήστε τη διαδικασία αφαίρεσης με αντίστροφη σειρά ΒΕΒΑΙΩΘΕΙΤΕ ΝΑ ΣΦΙΞΕΤΕ ΚΑΛΑ ΤΟ ΕΞΑΓΩΝΙΚΟ ΜΠΟΥΛΟΝΙ ΓΥΡΙΖΟΝΤΑΣ ΤΟ ΔΕΞΙΟΣΤΡΟΦΑ Εικ 7 Όταν αλλάζετε δίσκους βεβαιωθείτε να καθαρίσετε επίσης...

Page 53: ...σκο μόλις ο παλιός δεν κόβει πλέον αποτελεσματικά Οι δίσκοι για μεταλλικούς κόπτες δεν ακονίζονται Αλλαγή καρβουνακιών Εικ 12 Να αφαιρείτε και να ελέγχετε τακτικά τα καρβουνάκια Να αντικαθιστάτε τα καρβουνάκια όταν έχουν φθαρεί έως την ένδειξη ορίου Να διατηρείτε τα καρβουνάκια καθαρά και ελεύθερα για να γλιστρούν στις υποδοχές Πρέπει να αλλάζετε ταυτόχρονα και τα δύο καρβουνάκια Να χρησιμοποιείτε...

Page 54: ...3 EC Δήλωση Συμμόρφωσης Η Εταιρία Makita ως υπεύθυνος κατασκευαστής δηλώνει ότι το παρακάτω μηχάνημα ή μηχανήματα της Makita Ονομασία Μηχανήματος Κόφτης μετάλλων με μπαταρία Αρ Μοντέλου Τύπος BCS550 αποτελούν παραγωγή σε σειρά και Συμμορφώνονται με τις ακόλουθες Ευρωπαϊκές Οδηγίες 98 37 ΕΚ έως στην 28η Δεκεμβρίου 2009 και επακόλουθα με την 2006 42 ΕΚ από την 29η Δεκεμβρίου 2009 Και κατασκευάζονται...

Page 55: ...55 ...

Page 56: ...Makita Corporation Anjo Aichi Japan 884688C999 www makita com ALA ...

Reviews: