


11 ENGLISH
7.
Do not incinerate the battery cartridge even if
it is severely damaged or is completely worn
out. The battery cartridge can explode in a fire.
8.
Be careful not to drop or strike battery.
9.
Do not use a damaged battery.
10.
The contained lithium-ion batteries are subject
to the Dangerous Goods Legislation require
-
ments.
For commercial transports e.g. by third parties,
forwarding agents, special requirement on pack-
aging and labeling must be observed.
For preparation of the item being shipped, consult-
ing an expert for hazardous material is required.
Please also observe possibly more detailed
national regulations.
Tape or mask off open contacts and pack up the
battery in such a manner that it cannot move
around in the packaging.
11.
When disposing the battery cartridge, remove
it from the tool and dispose of it in a safe
place. Follow your local regulations relating to
disposal of battery.
12.
Use the batteries only with the products
specified by Makita.
Installing the batteries to
non-compliant products may result in a fire, exces
-
sive heat, explosion, or leak of electrolyte.
13.
If the tool is not used for a long period of time,
the battery must be removed from the tool.
SAVE THESE INSTRUCTIONS.
CAUTION:
Only use genuine Makita batteries.
Use of non-genuine Makita batteries, or batteries that
have been altered, may result in the battery bursting
causing fires, personal injury and damage. It will
also void the Makita warranty for the Makita tool and
charger.
Tips for maintaining maximum
battery life
1.
Charge the battery cartridge before completely
discharged. Always stop tool operation and
charge the battery cartridge when you notice
less tool power.
2.
Never recharge a fully charged battery car-
tridge. Overcharging shortens the battery
service life.
3.
Charge the battery cartridge with room tem-
perature at 10 °C - 40 °C (50 °F - 104 °F). Let
a hot battery cartridge cool down before
charging it.
4.
Charge the battery cartridge if you do not use
it for a long period (more than six months).
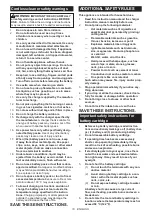
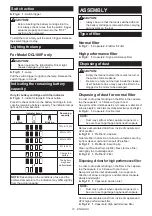
FUNCTIONAL DESCRIPTION
CAUTION:
•
Always be sure that the tool is switched off and
the battery cartridge is removed before adjust
-
ing or checking function on the tool.
•
Take care not to trap finger(s) between cleaner
and battery as shown in diagram when loading
battery. Trapping finger(s) may cause injury.
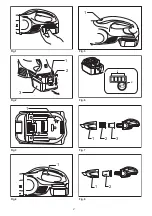
►
Fig.1
Installing or removing battery cartridge
►
Fig.2:
1.
Red indicator
2.
Button
3.
Battery cartridge
CAUTION:
•
Always switch off the tool before installing or
removing of the battery cartridge.
•
Hold the tool and the battery cartridge firmly
when installing or removing battery car-
tridge.
Failure to hold the tool and the battery
cartridge firmly may cause them to slip off your
hands and result in damage to the tool and
battery cartridge and a personal injury.
To remove the battery cartridge, slide it from the tool
while sliding the button on the front of the cartridge.
To install the battery cartridge, align the tongue on the
battery cartridge with the groove in the housing and slip
it into place. Insert it all the way until it locks in place
with a little click. If you can see the red indicator on the
upper side of the button, it is not locked completely.
CAUTION:
•
Always install the battery cartridge fully until the red indi-
cator cannot be seen. If not, it may accidentally fall out of
the tool, causing injury to you or someone around you.
•
Do not install the battery cartridge forcibly. If the cartridge
does not slide in easily, it is not being inserted correctly.
Battery protection system (Lithium-
ion battery with star marking)
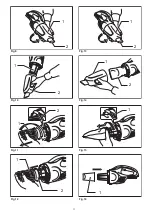
►
Fig.3:
1.
Star marking
Lithium-ion batteries with a star marking are equipped
with a protection system. This system automatically
cuts off power to the tool to extend battery life.
The tool will automatically stop during operation if the tool and/
or battery are placed under one of the following conditions:
• Overloaded:
The tool is operated in a manner that causes
it to draw an abnormally high current.
In this situation, release the trigger switch on
the tool and stop the application that caused
the tool to become overloaded. Then pull the
trigger switch again to restart.
If the tool does not start, the battery is over-
heated. In this situation, let the battery cool
before pulling the trigger switch again.
•
Low battery voltage:
The remaining battery capacity is too low
and the tool will not operate. In this situation,
remove and recharge the battery.
Summary of Contents for DCL180F
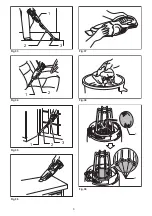
Page 2: ...1 2 3 1 1 1 1 2 1 2 3 2 1 Fig 1 Fig 2 Fig 3 Fig 4 Fig 5 Fig 6 Fig 7 Fig 8 2 ...
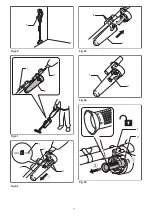
Page 3: ...1 2 1 2 1 2 1 2 1 2 2 1 1 1 Fig 9 Fig 10 Fig 11 Fig 12 Fig 13 Fig 14 Fig 15 Fig 16 3 ...
Page 4: ...1 1 1 1 2 1 1 1 Fig 17 Fig 18 Fig 19 Fig 20 Fig 21 Fig 22 Fig 23 Fig 24 4 ...
Page 5: ...1 2 3 1 2 1 1 2 1 1 2 1 1 Fig 25 Fig 26 Fig 27 Fig 28 Fig 29 Fig 30 Fig 31 Fig 32 5 ...
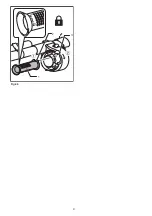
Page 6: ...1 2 3 1 2 1 2 3 1 2 Fig 39 Fig 33 Fig 34 Fig 35 Fig 36 Fig 37 Fig 38 6 ...
Page 7: ...1 1 2 3 Fig 41 2 3 1 4 2 1 1 2 1 2 Fig 45 Fig 40 Fig 42 Fig 43 Fig 44 7 ...
Page 8: ...2 1 3 Fig 46 8 ...
Page 71: ...71 ...